
 Flat 4


16 PowerPoint Hacks You Didn’t Know for More Effective Presentations
Quick Answer: The most useful PowerPoint hacks include playing a video continuously behind your content, using Sections and Summary Zoom for smooth navigation, applying Morph transitions, embedding fonts before sharing, and controlling your whole deck from the Slide Master. Used together, these PowerPoint hacks and tricks save time, sharpen your slide design, and make any presentation look far more professional.
Introduction
As a presentation consultant to working professionals, we’ve seen the same handful of problems come up again and again — videos that won’t stay in sync, decks that fall apart on someone else’s laptop, and hours lost to formatting that a single feature could have handled. Over the years, that experience has surfaced a set of genuinely useful PowerPoint hacks: practical fixes, best practices, and shortcuts that cut the time it takes to build and deliver a polished deck.
Whether you’re a seasoned executive or a first-time presenter, knowing the right tricks is the difference between a forgettable slideshow and a compelling, professional deck. Below are 16 PowerPoint hacks — from classic problem-solvers to modern AI-assisted features — organized so you can jump straight to the one you need.
1. Play a Video Continuously Behind Your Content
A well-placed video can hold a business audience’s attention far better than another wall of bullet points. The classic problem: you want a single video to keep playing while you walk through several points — but PowerPoint normally stops media the moment you change slides.
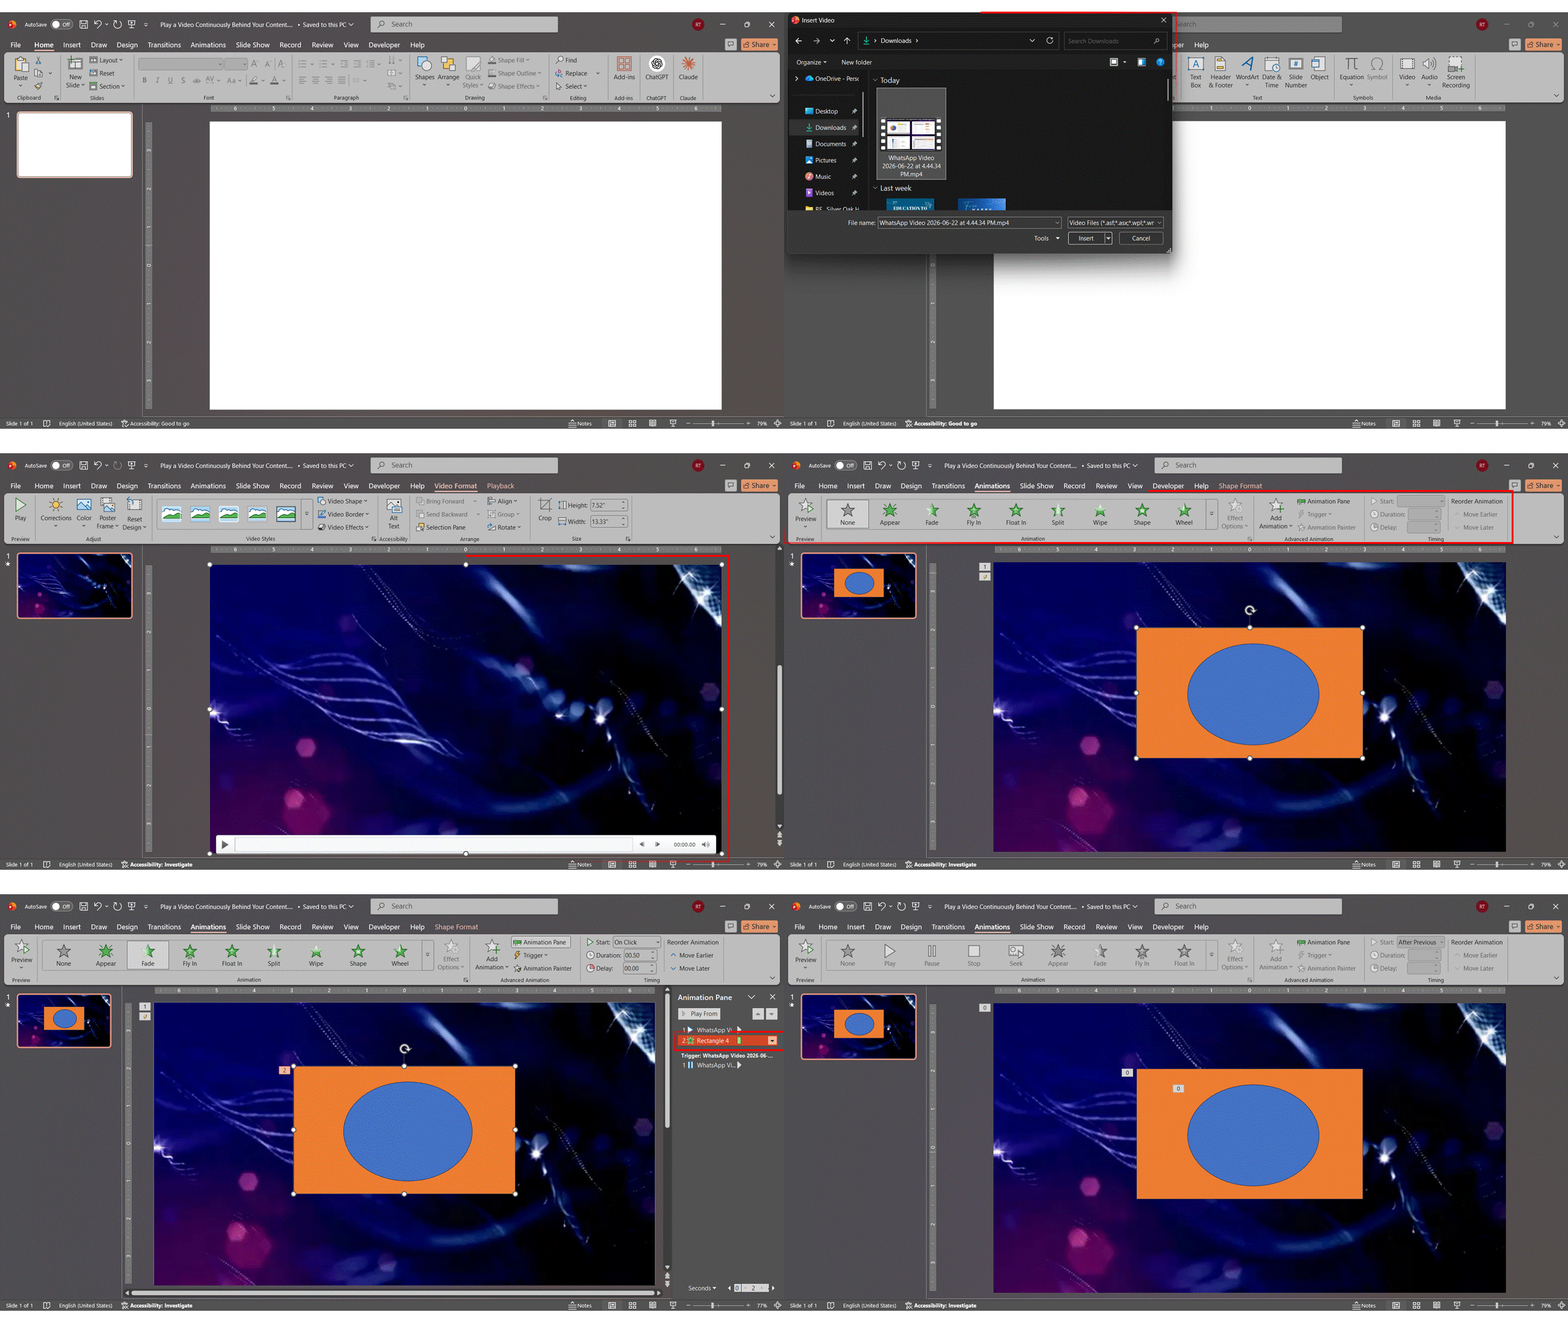
The reliable method (works in Microsoft 365): instead of spreading the video across multiple slides, keep it on one slide and reveal your content on top of it.
- Insert your video on a single slide (Insert → Video → This Device). The video must be a local file — this technique does not work with online or streamed video, such as a YouTube link.
- Size the video to fill the slide (or the area you want it to occupy) and send it to the back (Picture Format / Shape Format → Send to Back).
- Place your text, images, or shapes on top of the video in the order you want them to appear.
- Open the Animation Pane (Animations tab → Animation Pane) and give each content element an Appear or Fade entrance, set to start On Click or After Previous.
- Set the video to Start: Automatically, so it stays behind your content.
As you click through, your points appear one by one while the video plays without interruption — the same effect as “playing across slides,” but it actually works in current versions.
A note on the old method: Older tutorials tell you to use Effect Options → Stop Playing → After X slides. On PowerPoint 2016/2019, this sometimes still works, but in Microsoft 365, it typically fails, because PowerPoint halts all media playback at every slide transition. If you specifically need the multi-slide approach, see our full walkthrough and current workarounds in How to Play Video Over Multiple Slides in PowerPoint.
2. Organize Long Decks with Sections and Summary Zoom
Picture standing in front of a room of clients when someone asks about an earlier slide — and you have to scroll past 30 slides while everyone waits. Sections and Summary Zoom eliminate that entirely and give your deck a clean, navigable structure.
Set up Sections:
- Decide where each logical group of slides begins, and arrange your slides in that order.
- Right-click the first slide of a group in the thumbnail pane and choose Add Section (or use Home → Section → Add Section).
- Name the section and repeat for the rest. Sections can be collapsed, moved, and themed together.
Add a Summary Zoom:
- Go to Insert → Zoom → Summary Zoom. A window shows all your slides.
- Select one representative slide from each section and click Insert.
- PowerPoint creates a Summary slide with clickable shortcuts to every section. Move it wherever you like in the deck.
During the slideshow, clicking a shortcut zooms into that section, runs its slides, then zooms back out to the Summary slide automatically — ideal when time runs short or questions pull you back to an earlier topic.
Version note: Summary Zoom is available in PowerPoint 2019 and Microsoft 365. It is not included in the perpetual PowerPoint 2016 release — confirm against your installed version before relying on it.
For a deeper dive, see How to Create Sections and Summary Zooms, and for a cinematic zoom-into-an-object effect, our Zoom effect using Grow/Shrink animation tutorial.
3. Master a Few High-Impact Keyboard Shortcuts
Clicking through menus for every small action is the slowest way to build a deck. A few shortcuts worth committing to memory right away:
- Ctrl + D — Duplicate selected objects (press again to repeat the spacing)
- Ctrl + M — Insert a new slide
- F5 / Shift + F5 — Start the slideshow from the beginning / from the current slide
- B or W — Black or white the screen during a live slideshow
- Alt + F9 — Toggle drawing guides for alignment
That’s just a teaser. For the complete beginner-to-pro reference — grouping, formatting, font-size, and Presenter View shortcuts for both Windows and Mac — see our full guide: PowerPoint Shortcuts You’ll Wish You Knew Sooner.
4. Control Your Entire Deck from the Slide Master
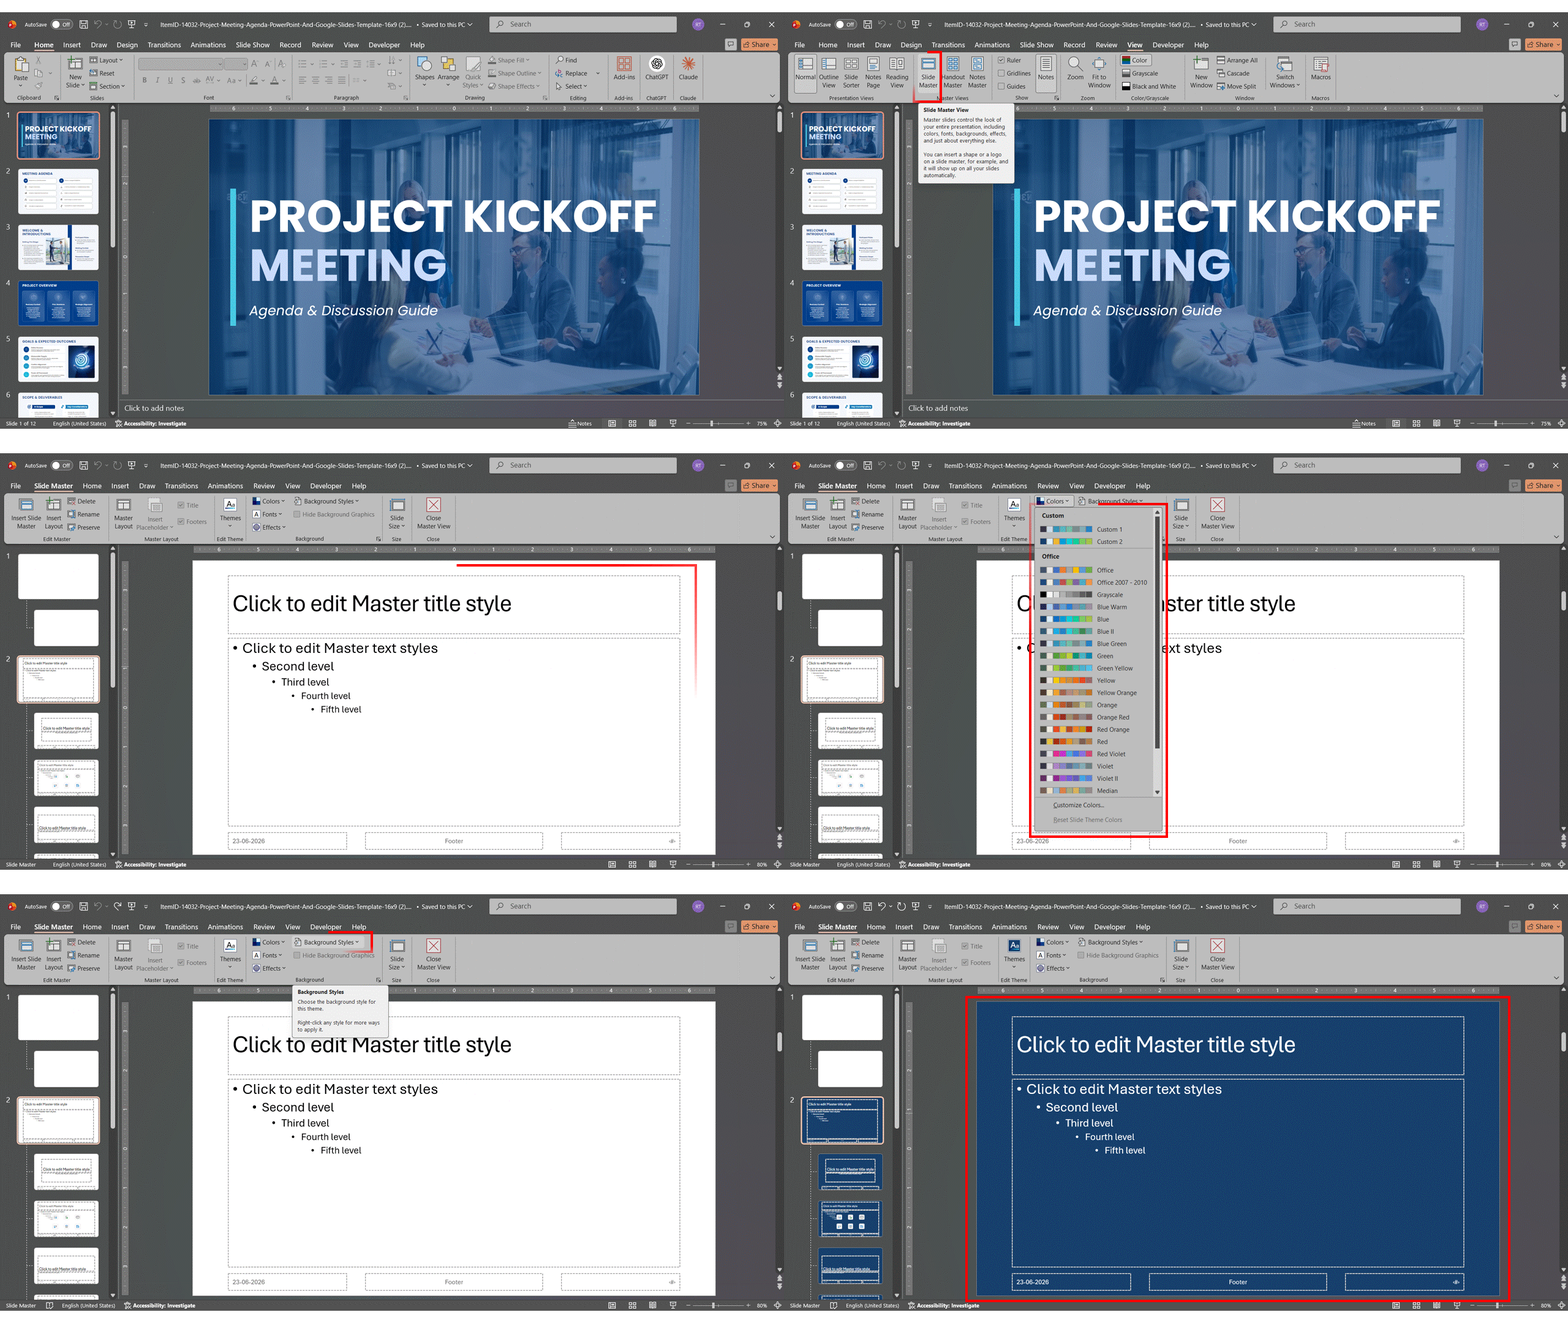
If professional designers rely on one feature above all others, it’s the Slide Master. Go to View → Slide Master to open the master template that governs every slide in your deck. Set your fonts, colors, logo placement, and background once, and the changes propagate everywhere automatically.
This single habit eliminates hours of slide-by-slide formatting and guarantees pixel-perfect consistency across the whole presentation. Use Layout Masters for specific slide types (title, section header, content) so you keep consistency without losing variety. When you download a pre-built template, check its Slide Master first to understand the structure before you start adding content.
5. Start from a Pre-Built Template Instead of a Blank Slide
A blank white slide is the slowest possible starting point. Professional templates give you layouts, color schemes, and font pairings that are already optimised for visual impact — you simply replace the placeholder content with your own.
Browse SlideUpLift’s PowerPoint templates for decks tailored to business, sales, strategy, HR, and more, including a library of animated PowerPoint templates if you want motion built in. Starting from a strong template gets you a polished, on-brand result in a fraction of the time.
6. Deliver with Confidence Using Presenter View
Presenter View is the single biggest delivery upgrade: your screen shows your speaker notes, a timer, and a preview of the next slide, while the audience sees only the current slide — so you get better eye contact and controlled pacing. Turn it on under the Slide Show tab, or launch it instantly with Alt + F5. For the full walkthrough of everything Presenter View shows and how to rehearse with it, see our PowerPoint shortcuts guide.)
7. Embed Fonts Before You Share the File
One of the most common presentation disasters is opening your file on another computer and finding every font swapped for a default. Prevent it: go to File → Options → Save and check Embed fonts in the file (choose Embed all characters if others may edit the file). It adds slightly to the file size but eliminates font-substitution errors entirely — a must before sending a deck or presenting on an unfamiliar machine.
8. Fix Broken Links Before Sharing Your PowerPoint
To fix broken links in PowerPoint, first identify whether the problem is a standard hyperlink or a link to an external file. Links can stop working when a website address changes, a linked file is moved or renamed, or the presentation is opened on another computer that cannot access the original file.
To fix a broken website or document hyperlink:
- Select the linked text, image, or shape.
- Right-click it and choose Edit Hyperlink.
- Replace the incorrect address with the correct URL or file location.
- Click OK, and then test the link again.
For an Excel chart, video, or another externally linked file in PowerPoint for Windows, go to File > Info > Edit Links to Files. Select the broken source, click Change Source, and locate the correct file.
If you no longer need the content to update from its original source, you can select Break Link. Save a backup copy first, because breaking the link removes the live connection and makes the content static.
Before sharing your presentation, test every hyperlink in Slide Show mode. Also confirm that recipients have permission to access any linked cloud files, shared folders, or documents.
Pro Tip: When live source updates are not required, embed important media and charts instead of linking to external files. This reduces the chance of links breaking when the presentation is moved or shared.
9. Let AI Build the First Draft (Designer / Copilot)
PowerPoint’s built-in AI features are among the most powerful modern PowerPoint hacks available. The Designer pane (Design → Designer, formerly “Design Ideas”) automatically suggests professional layouts based on your content. If you have Microsoft 365 Copilot, you can generate entire slide drafts from a text prompt. Use AI to get from a blank slide to a polished layout in seconds, then customize it to match your brand rather than shipping the default.
10. Crop Images Into Shapes for a Dynamic Look
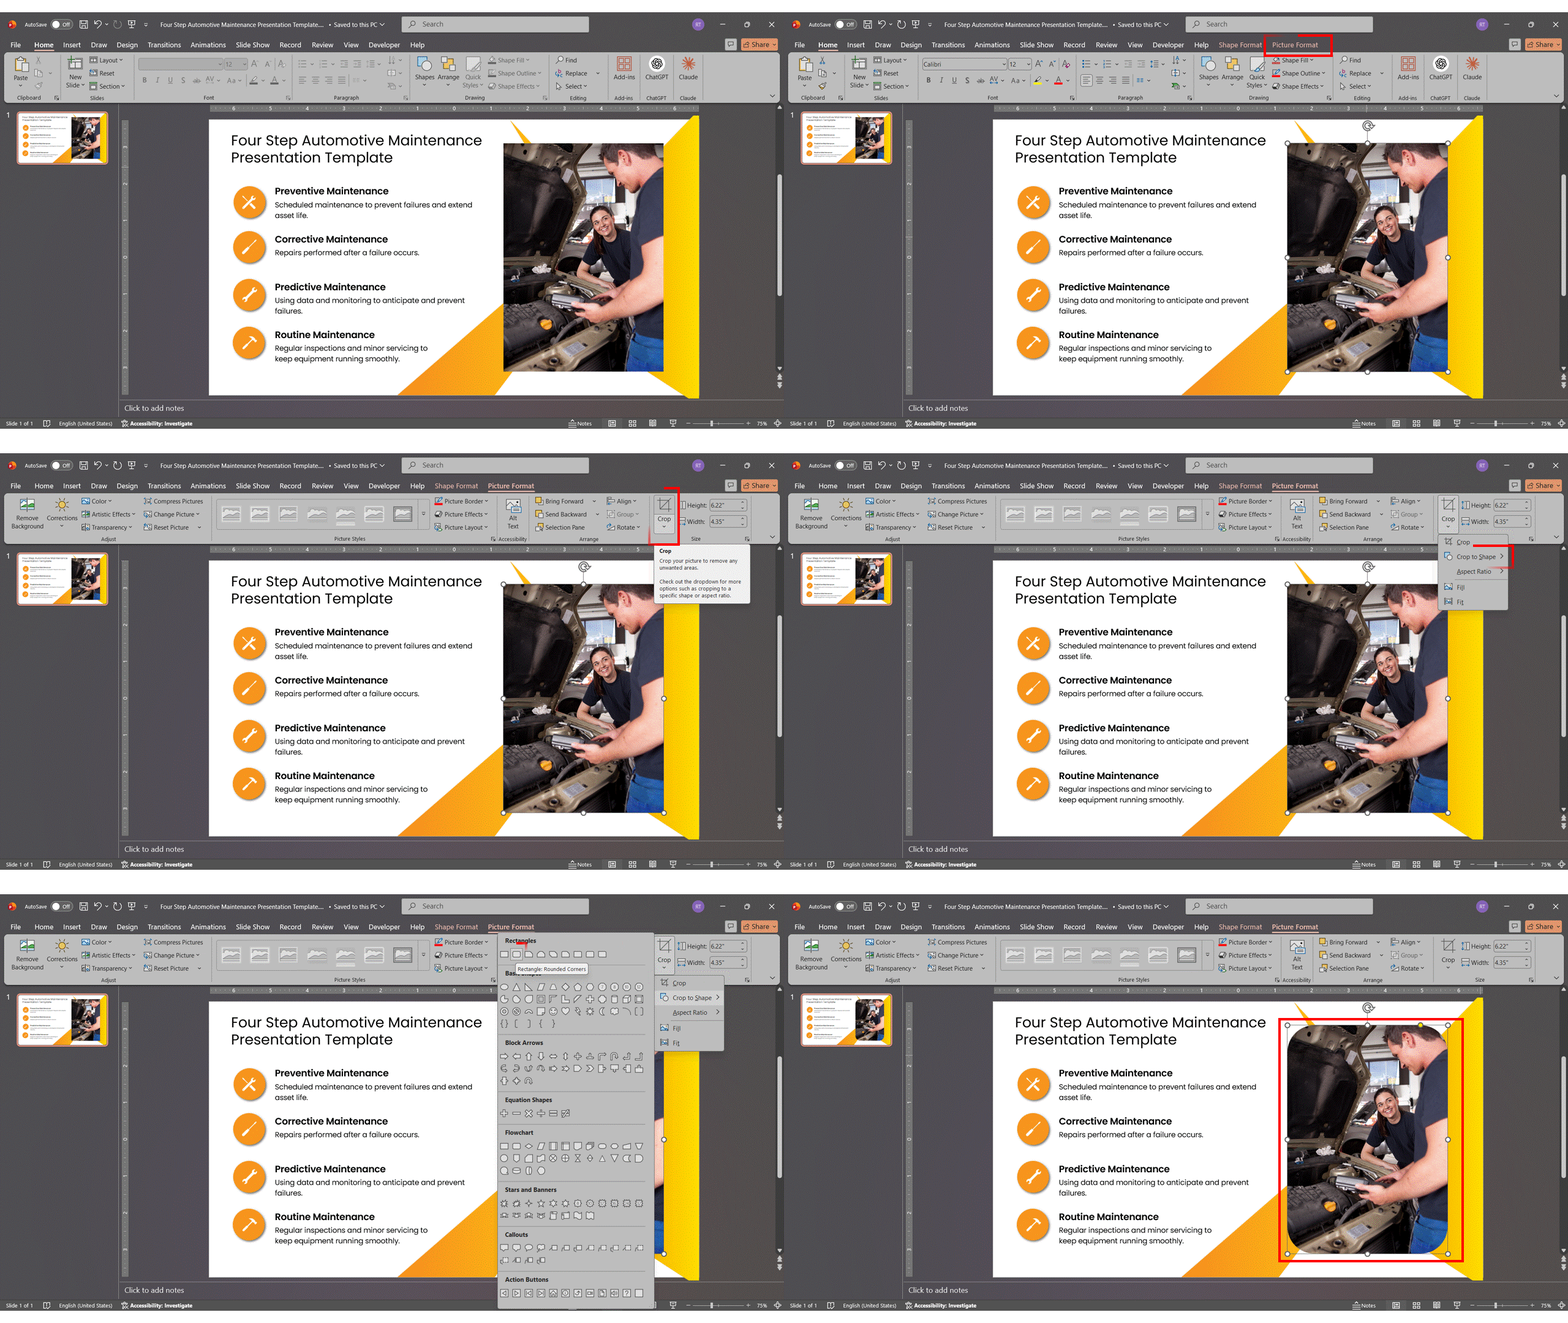
Rectangular images make a deck feel generic. Crop photos into shapes instead: select the image, go to Picture Format → Crop → Crop to Shape, and pick from the gallery (circles, hexagons, arrows, and more). This works beautifully for team headshots, product shots, or any image you want to integrate cleanly into the slide design.
11. Add Cinematic Motion with the Morph Transition
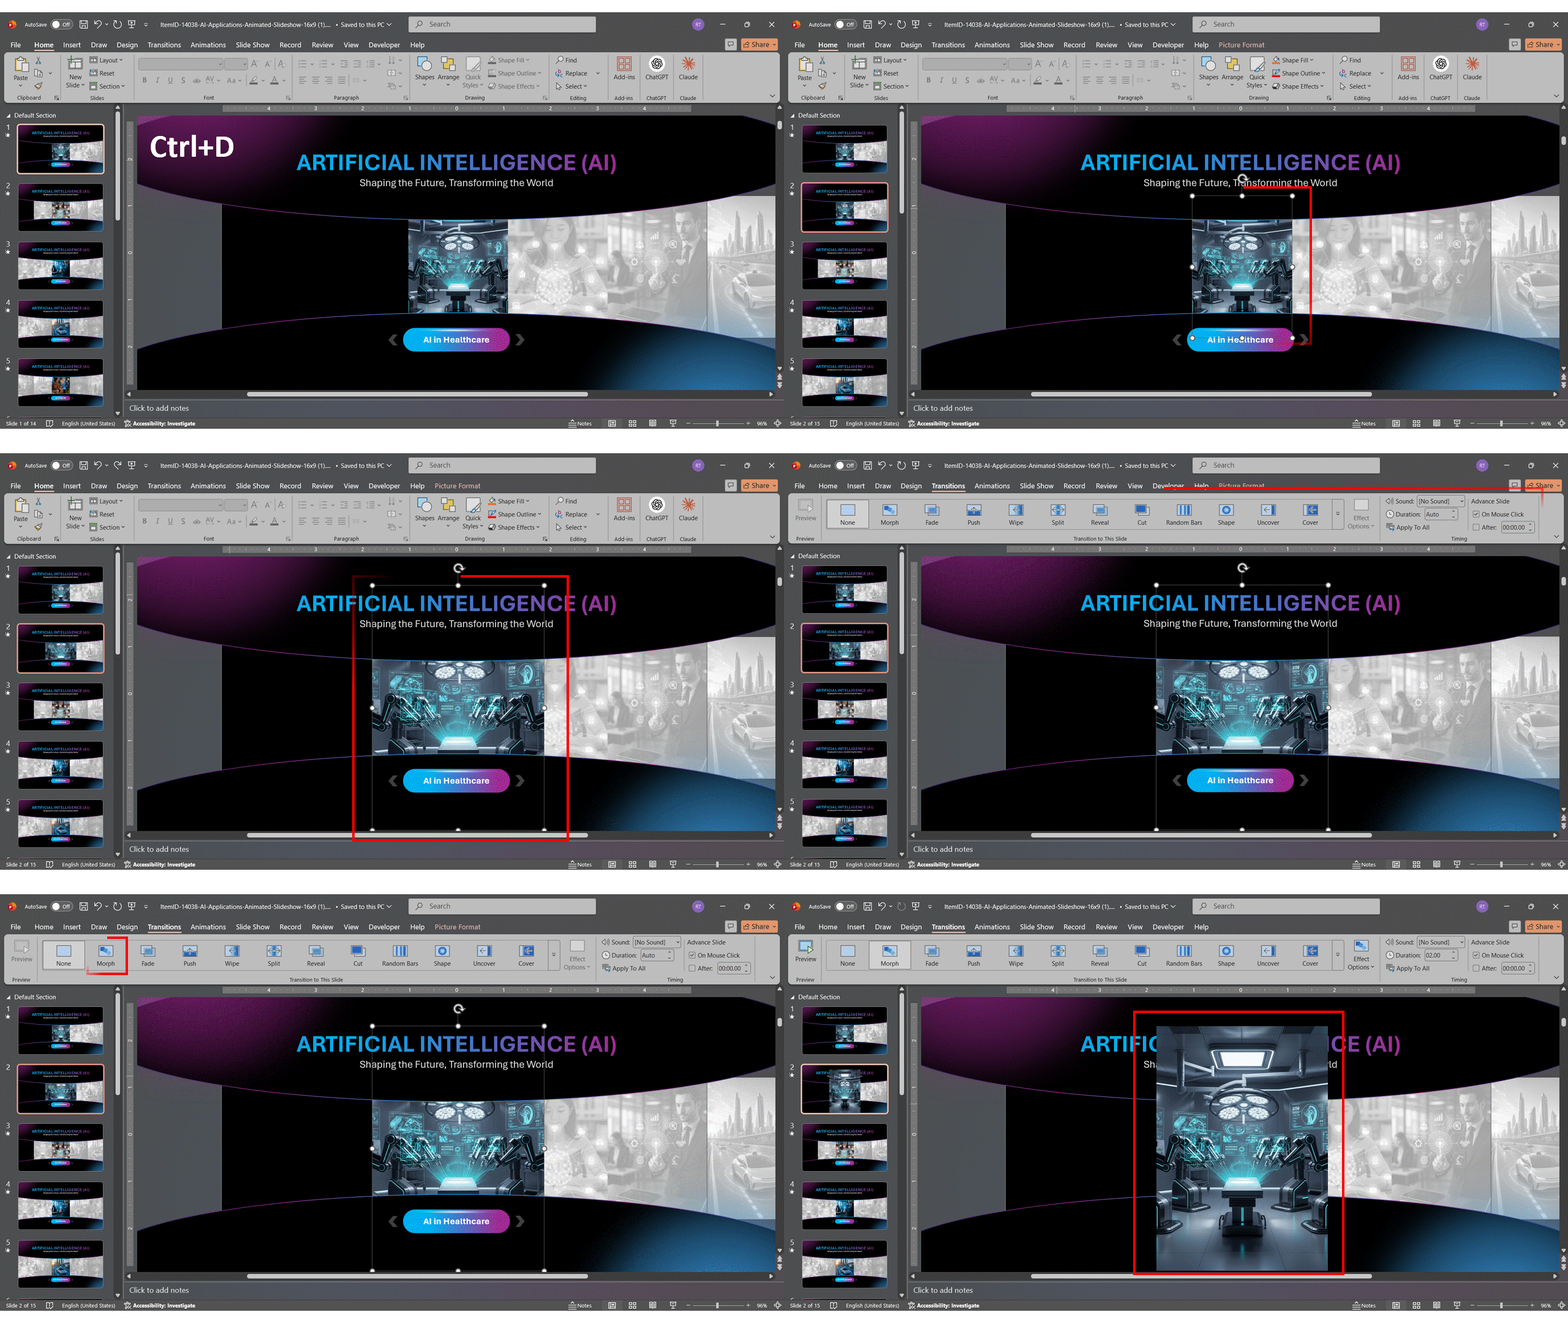
Morph is the easiest way to get smooth, professional animation without building complex timelines — and it’s a favorite trick of designers everywhere. Duplicate a slide, then move, resize, or recolor objects on the duplicate, and apply Transitions → Morph. PowerPoint animates the change between the two slides automatically. It’s perfect for zooming into a chart, flying in a logo, or transitioning between parts of a diagram.
For step-by-step examples, see How to Use Morph in PowerPoint and our guide to adding transitions in PowerPoint.
12. Turn Bullet Lists Into SmartArt Diagrams
Dense bullet points lose audiences fast. The fastest fix is to convert an existing list into a diagram: select your bulleted text, then go to Home → Convert to SmartArt and choose a process, cycle, or comparison layout. In seconds, a flat list becomes a structured visual. Once you’ve picked a style, press Ctrl + Shift + G to ungroup it and fine-tune the colors and text.
13. Replace Bullet Markers with Meaningful Icons
Where SmartArt restructures a whole list, icons upgrade individual points. Go to Insert → Icons (in Microsoft 365) to access thousands of scalable vector icons — a padlock for security, a lightbulb for ideas, a chart for growth. Insert one, recolor it to match your theme, and pair it with a 3–5 word label. Keep the icon style consistent (all outline or all filled) across the deck so it looks cohesive rather than improvised.
Need a head start? Explore SlideUpLift’s PowerPoint icons and the icon template library.
14. Align and Distribute Objects Precisely
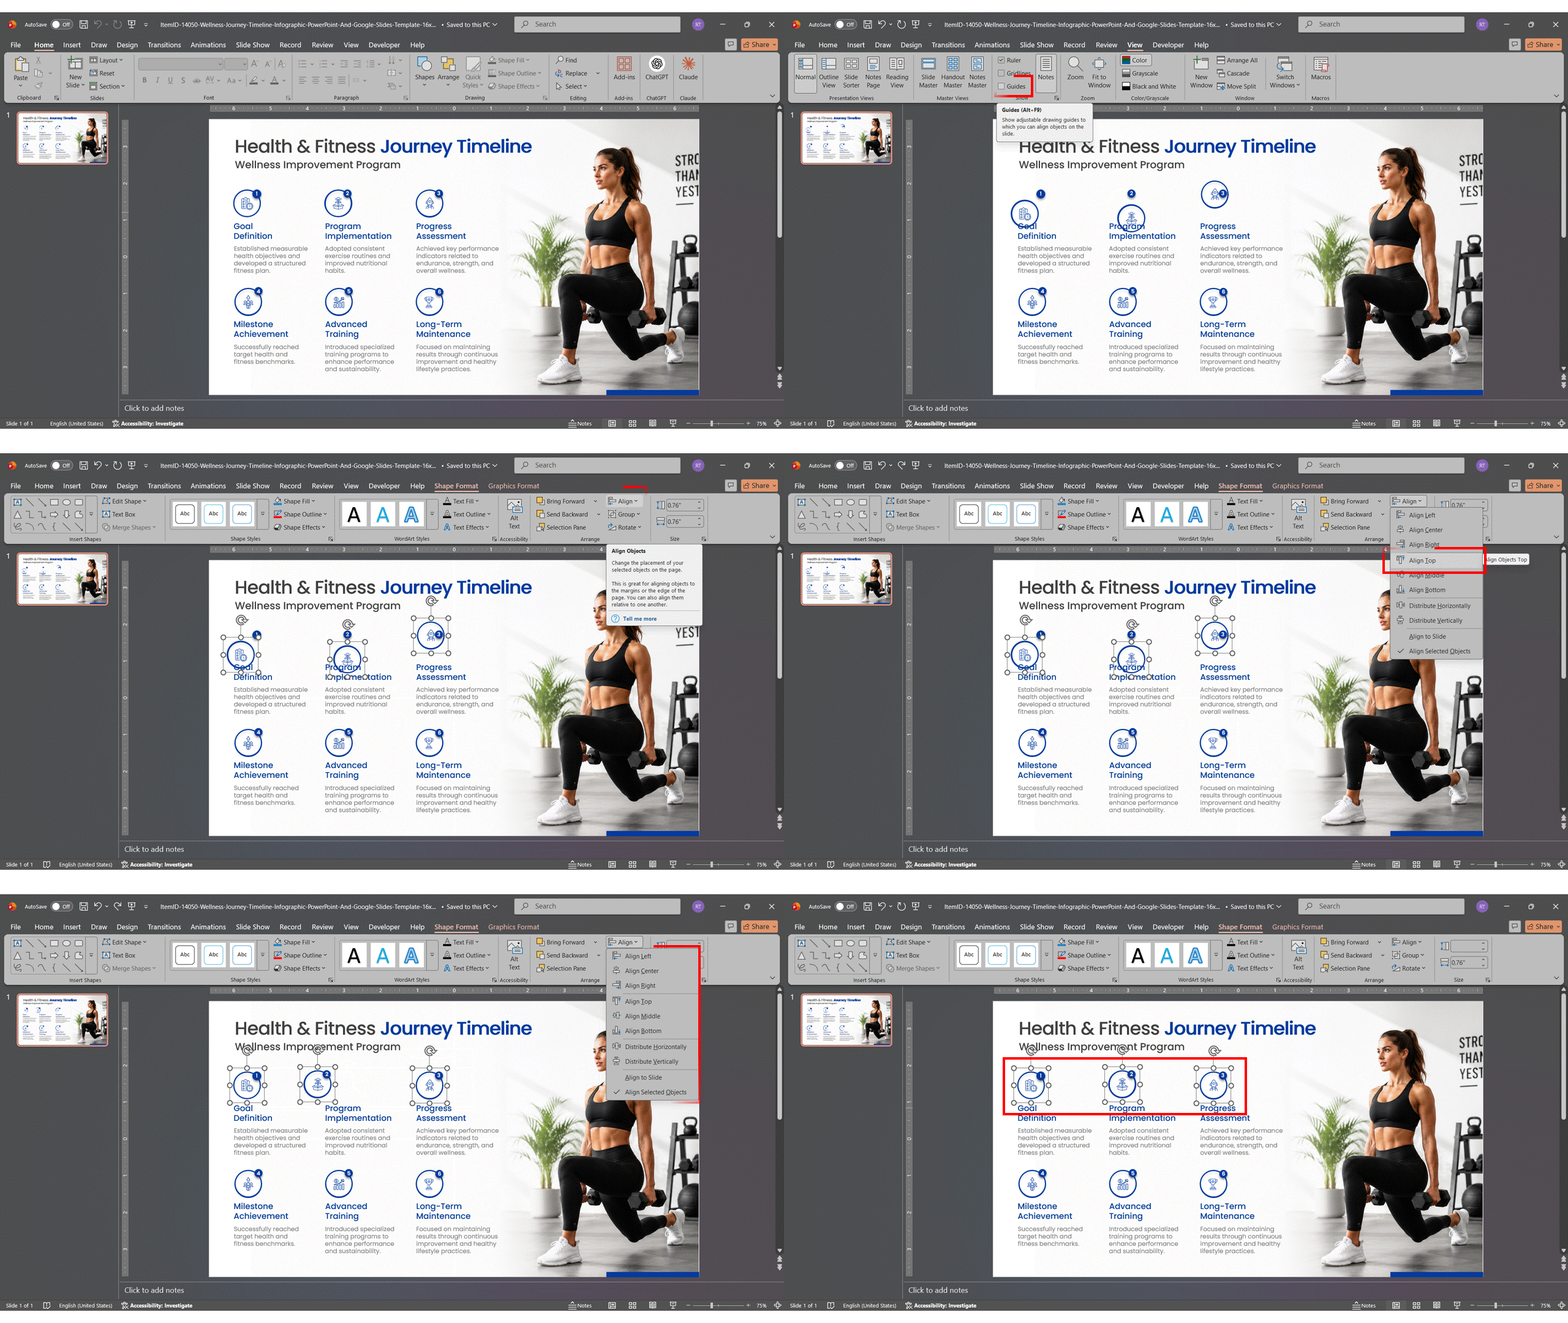
Misaligned elements make even strong content look amateur — and fixing it takes seconds. Enable View → Guides for snap-to guides you can drag into place. To align multiple objects, select them and use Shape Format → Arrange → Align (Align Left, Center, Top, etc.). The Distribute Horizontally / Vertically options are especially handy for spacing a row of icons or images evenly with a single click — no manual measuring.
15. Copy Formatting Instantly with Format Painter
When you’ve styled one object exactly right — font, color, size, spacing — you don’t have to rebuild it. Select it, click Format Painter (Home tab), then click the object you want to match. To apply the same formatting to several objects, double-click Format Painter to lock it on, then click each target in turn. Keyboard equivalent: Ctrl + Shift + C to copy formatting and Ctrl + Shift + V to paste it.
16. Match Brand Colors Exactly with the Eyedropper
This is the hack most people wish they’d found sooner. Open any fill or font color dropdown, choose Eyedropper, and click anywhere on your slide — including inside an image or logo — to sample that exact color. It’s the fastest way to match your slide palette precisely to a brand graphic without ever needing the hex code.
Conclusion
These PowerPoint hacks share a single principle: let the software do the repetitive work so you can focus on your message. Master a few keyboard shortcuts, control your deck from the Slide Master, lean on AI for the first draft, and use Morph, icons, and the Eyedropper to make slides that look intentional. Apply even a handful, and your next presentation will come together faster and look noticeably more professional.
If you’d rather skip the build entirely, browse the SlideUpLift template library — every template is instantly downloadable, 100% editable, and ready in minutes. And if you want your slides to look as polished as they are well-built, see our guide on how to make a PowerPoint presentation attractive.
Happy presenting!
FAQs
-
What are some lesser-known PowerPoint hacks that save time?
Three underused ones: the Selection Pane (Shape Format → Selection Pane) lets you name, hide, and reorder every object on a slide — a lifesaver on complex slides with overlapping elements. F4 repeats your last action (resize, recolor, position), which is perfect for applying the same change to many objects. And Ctrl + P turns your cursor into a pen during a live slideshow so you can circle or underline points on the fly.
-
How can I make my PowerPoint presentations look more professional quickly?
Start from a professional template rather than a blank slide, then limit each slide to one main idea, use no more than two font styles, align everything to a grid, and apply a consistent color palette through the Slide Master. Those few moves make an entire deck look intentional in minutes.
-
What PowerPoint tips do experts recommend to make slides stand out?
Experts consistently recommend the Morph transition for smooth, cinematic motion, replacing bullet lists with SmartArt or icons, and using full-bleed images with a text overlay. Above all: leave plenty of white space. Crowded slides signal a lack of confidence in the message.
-
Which shortcut keys in PowerPoint help speed up the design process?
The most useful for design are Ctrl + G to group, Ctrl + Shift + C / V to copy and paste formatting, Ctrl + [ / ] to decrease or increase font size, and Alt + arrow keys to nudge objects by tiny increments. Tab cycles through every object on a slide, making layered elements easy to select.
-
How do I align objects on a slide more precisely?
Select the objects, go to Shape Format → Arrange → Align, and choose your option. Enable Snap to Grid under View → Guides for automatic snapping, and use Distribute Horizontally / Vertically to space multiple objects evenly without manual measurement.
-
What is one PowerPoint trick most people wish they had known sooner?
The Eyedropper color picker. Open any color dropdown, choose Eyedropper, and click anywhere on your slide — including inside an image — to sample that exact color and match your palette to a logo or photo instantly.
-
How can I use these hacks for work or school presentations?
For work, lean on the Slide Master, Sections, and Summary Zoom to manage long decks, embed fonts before sharing, and use Presenter View to deliver. For school, use Convert to SmartArt and icons to make reports more visual, add a Morph transition to impress with minimal effort, and start from a free template. The common thread either way: one idea per slide, supported by a strong visual.
-
Are there simple hacks for creating engaging animations?
Yes — the simplest is the Morph transition. For object-level animation, stick to a single Appear or Fade entrance per slide; clean effects read as professional, while Fly In, Bounce, and Spin rarely belong in a business deck. Use the Animation Pane to control the order, timing, and triggers precisely.
Table Of Content




Related posts from the same category

10 Nov, 2022 | SlideUpLift
Top 8 PowerPoint Hacks for Consultants
Consulting is the business of selling ideas and concepts, and there's no question that presentations are the primary medium to demonstrate these ideas. Therefore, having a good understanding of dominant

7 Jul, 2025 | SlideUpLift
PowerPoint Shortcuts: The Beginner-to-Pro Keyboard Cheat Sheet
PowerPoint is one of the most powerful tools for creating presentations. However, working in PowerPoint can become time-consuming, especially when you have to click through menus for every small task.

11 May, 2023 | SlideUpLift
9 Types of Presentation You Must Know (+ Tips)
The blog explains nine key types of presentations—from informative, demonstrative, and persuasive to instructional, inspirational, entertaining, sales/pitch, status/progress, and educational/training—clarifying their purposes and when to use each for effective communication;
21 Oct, 2020 | SlideUpLift
The COVID Remote Working Series: 15 Virtual Meeting Etiquettes For Effective Online Presentation
Making live presentations gives a familiar and dreaded feeling of butterflies in the stomach. Online presentations are a step above; they pose more challenges and of a different nature. Consider

10 Dec, 2024 | SlideUpLift
How to Make a PowerPoint Presentation Attractive: 11 Design Techniques (2026)
Quick Answer: Making a PowerPoint attractive comes down to a set of repeatable layout techniques — visual bullets, split layouts, chunking, full-bleed images with overlays, icon systems, focal points, and
8 Feb, 2022 | SlideUpLift
Ten Presenting Styles : What Kind Are You?
Do you feel nervous when it comes to public speaking? Don’t worry; you’re not alone. Do you know that according to research, one of the biggest phobias in 2014 was

18 Aug, 2023 | SlideUpLift
10 Best PowerPoint Templates for Presentations
In today's landscape of the corporate industry, an effective PowerPoint presentation speaks volumes and is paramount. Presentations have evolved into more than just slides and bullet points—they've become powerful tools

4 Feb, 2025 | SlideUpLift
Psychology Approved: The 7-7-7 Rule in PowerPoint for Engaging Slides
The standard 7x7 rule in PowerPoint recommends using no more than 7 lines of text on a slide and no more than 7 words on each line. Its purpose is

6 Oct, 2020 | SlideUpLift
The COVID Remote Working Series: All You Need to Know To Build Effective Presentations In Google Slides
Google Slides is the most convenient presentation platform right now. It is a free program as a part of Google’s web-based software office suite along with Google Docs and Spreadsheets.

2 Aug, 2023 | SlideUpLift
10 Best Business PowerPoint Templates for Presentations
Business PowerPoint Presentations have proven to be a backbone of the corporate industry. Their importance cannot be undermined in the business world. Along with communicating your ideas in a visual