How to Do a Hanging Indent in Google Slides?
Creating presentations in Google Slides is a game-changer for anyone looking to convey their ideas, whether it’s for office work, school or a personal project. It’s a user-friendly platform that offers a seamless experience for crafting visually appealing slides to engage your audience.
Like many top-class templates and animations, you can do a hanging indent in Google Slides to make the text on your slides look more presentable. Indent in Google Slides can be used to showcase certain kinds of citations. In this blog, we’ll walk you through the steps to do a hanging indent in Google Slides.
What is Hanging Indent?
A hanging indent is a term for a text formatting trick. With this text formatting option, you can create a specific type of paragraph alignment where the first line of the paragraph is aligned to the left margin while the subsequent lines are indented inward.

Hanging Indent in Google Slides
It is handy, especially in academic writing styles like Chicago, APA, and MLA. This formatting style is commonly used for lists, bibliographies, and other documents where you want to visually separate the first line from the rest of the text.
READ MORE: How to add bullet points in Google Slides?
How to Make Hanging Indent in Google Slides?
Creating hanging indent in Google Slides can bring a professional touch to your presentations or help you format lists and references more effectively. Let’s explore three different methods step-by-step to add hanging indent in Google Slides:
How to Add a Hanging Indent in Google Slides Using Ruler/First Line Indent Method?
Follow the steps below to add hanging indent in Google Slides:
- Go to Google Slides and open a blank presentation or edit any previous one.
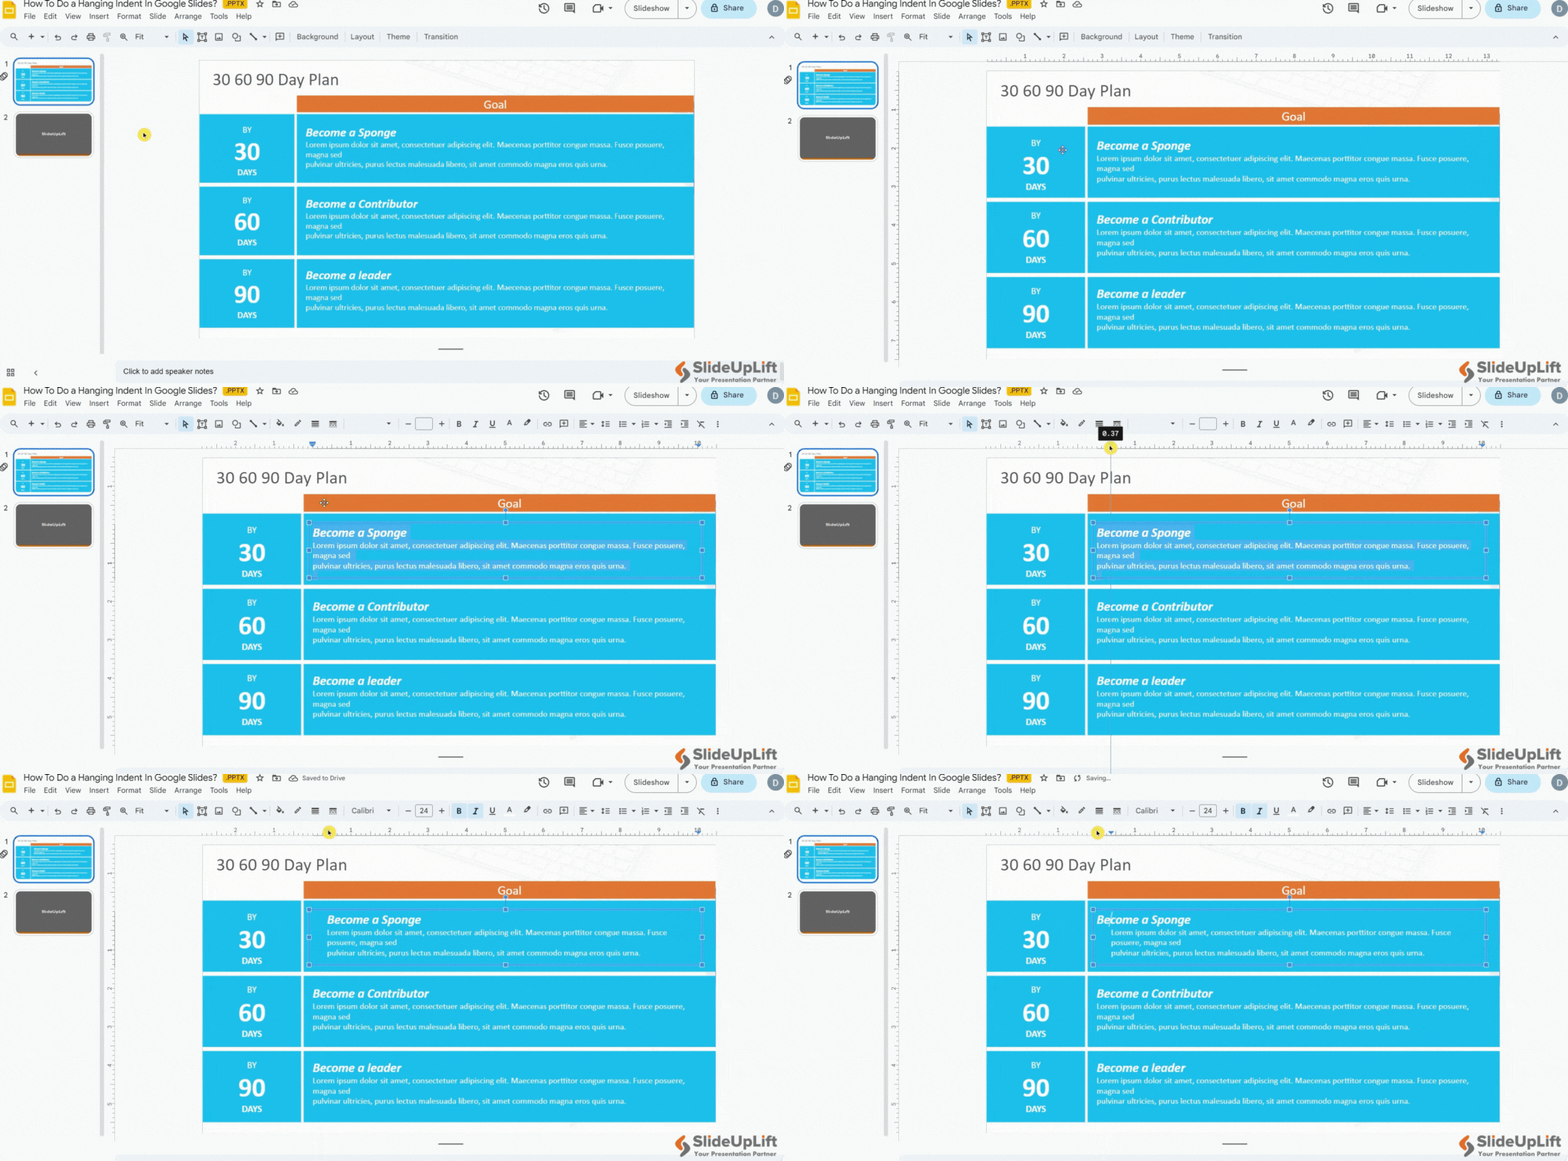
- Go to “View” > click “Show Ruler” to ensure the “Ruler” is in view before starting the indentation process.
- Highlight the text you want to give a stylish indent.
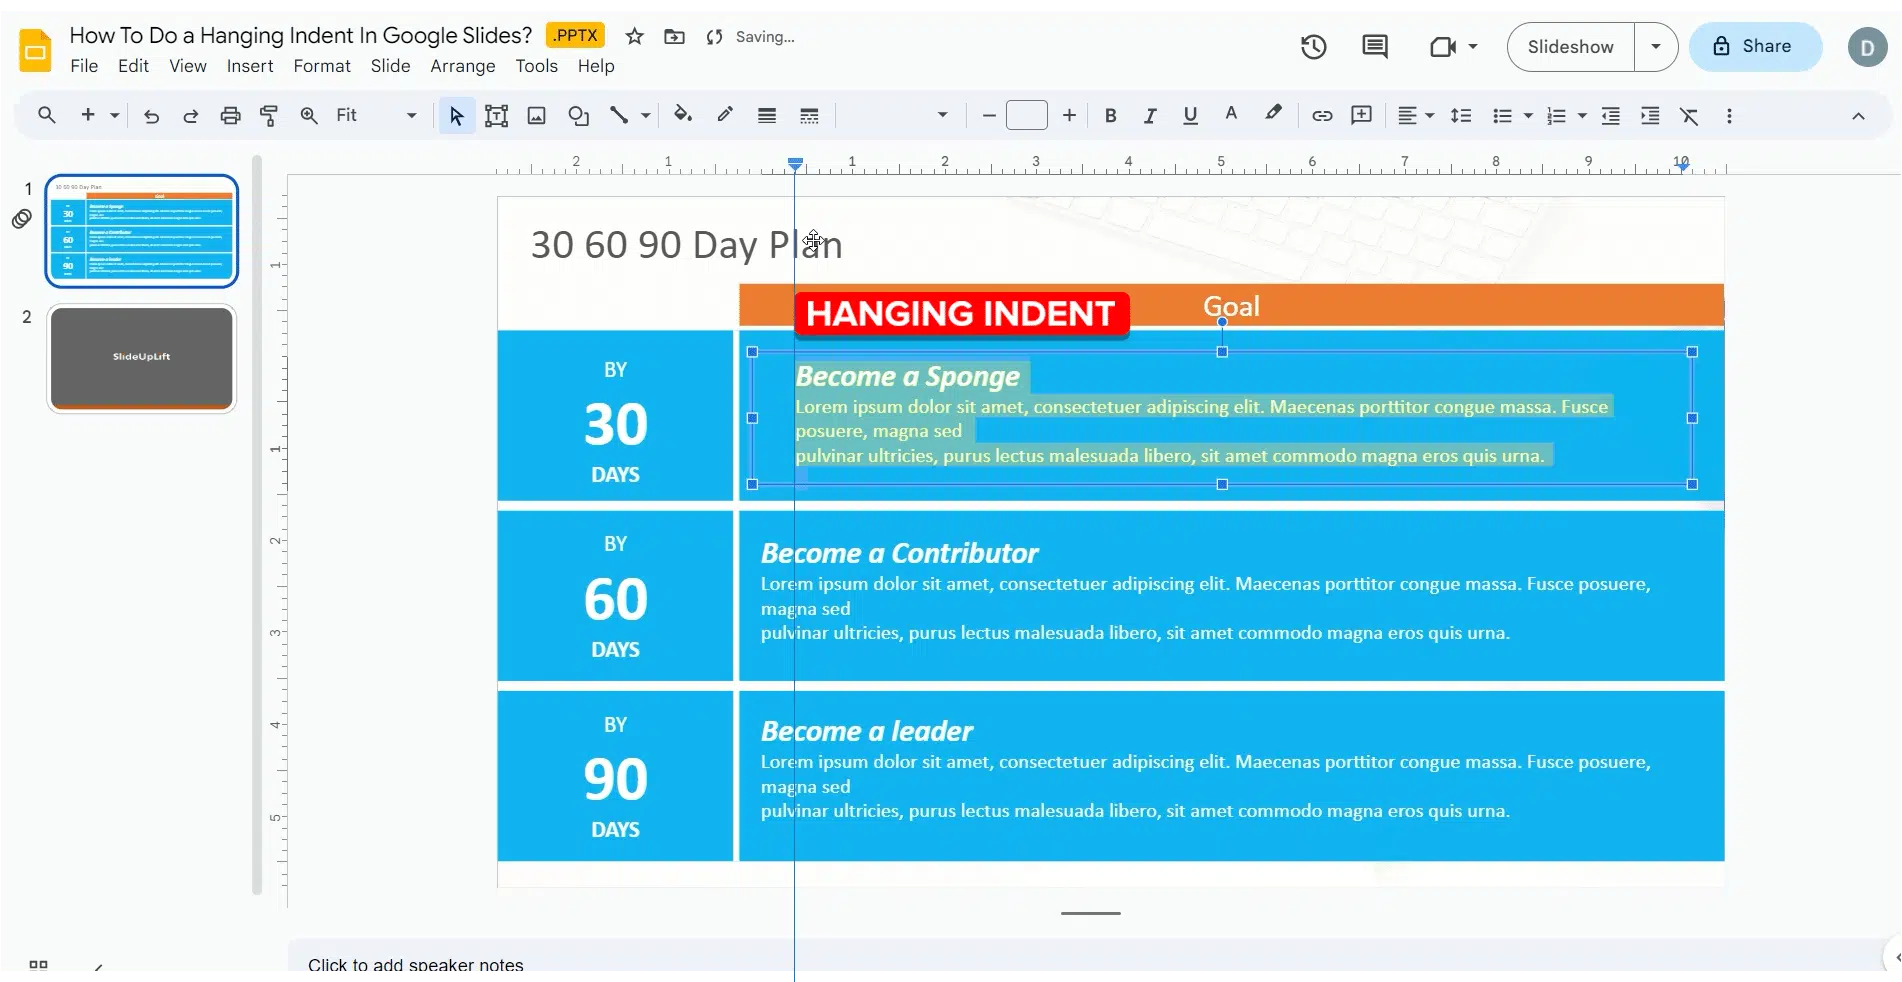
- Click the “Left Indent” icon on the top ruler; it’s a blue down-facing triangle.
- While holding the “Left Indent” control, drag it to where you want your text to start its indentation.
- Click and drag the “First Line Indent” icon above the “Left Indent” icon to where you would like your first line of text to begin.
- Repeat the steps for other lines.

How to Add a Hanging Indent in Google Slides Using Ruler or First Line Indent Method
Creating a hanging indent in Google Slides with the above process is easy and straightforward. Add how many lines you want, the indent added will always stay in place. These steps can be applied to either multiple sentences or paragraphs or even if you change the font.
ALSO READ: How to add fonts in Google Slides?
How to Make Hanging Indent in Google Slides Using Keyboard Shortcut?
Adding hanging indent in Google Slides can also be done by following these steps:
- Go to Google Slides and open a blank presentation or edit any previous one.
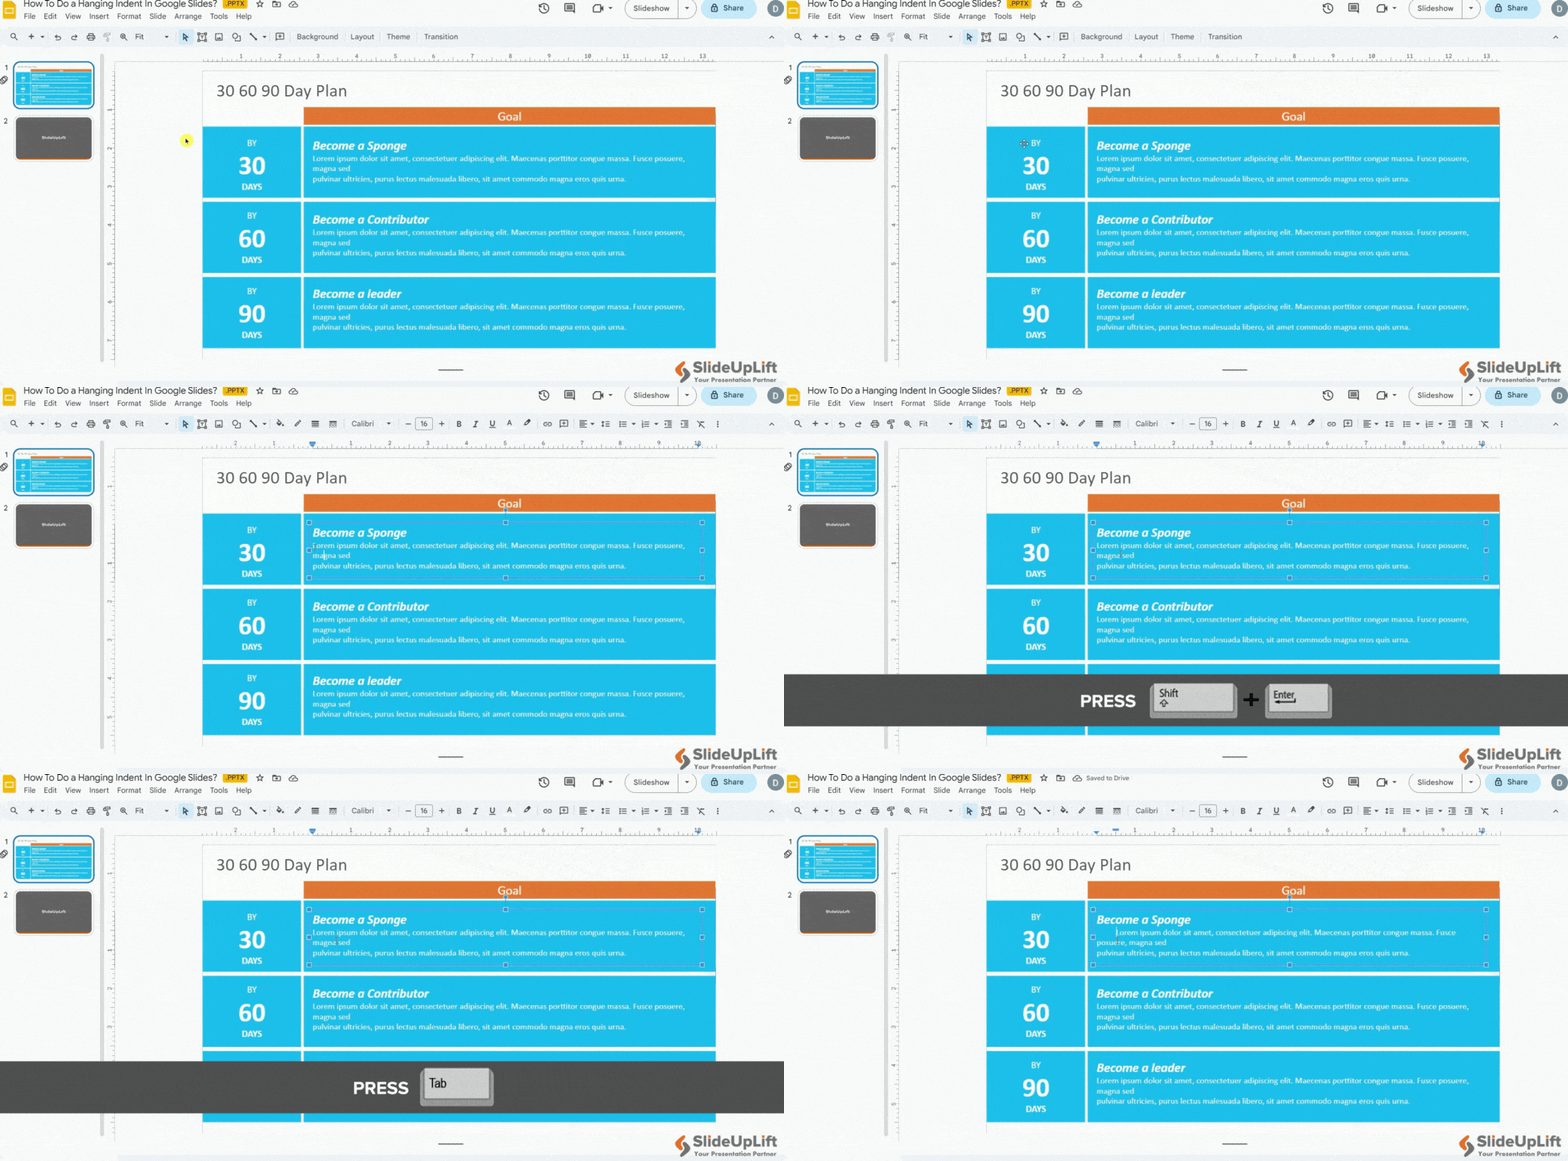
- Put your cursor at the beginning of the text, you want to put the hanging indent.
- On your keyboard, press “Shift” and “Enter” keys together for Windows and “Shift” and “Return” for Mac.
- Next, press the “Tab” key. It will indent a single line.

How to Make Hanging Indent in Google Slides Using Keyboard Shortcut
Note: If you directly apply the indent to the second line, the entire paragraph will get indented.
You can create a hanging indent by repeating this step for every line of the paragraph (except the first one).
Following this alternate way to create hanging indent to your texts is quick and easy. You can also add a hanging indent to your Google Slides using the “Format” tab.
How to Do A Hanging Indent in Google Slides Using Format Option?
To give your Google Slides a slick hanging indent, you can make use of the “Format” tab. Here’s how you do it:
- Open your Google Slides presentation and choose the layout and slide where you want to apply the hanging indent.
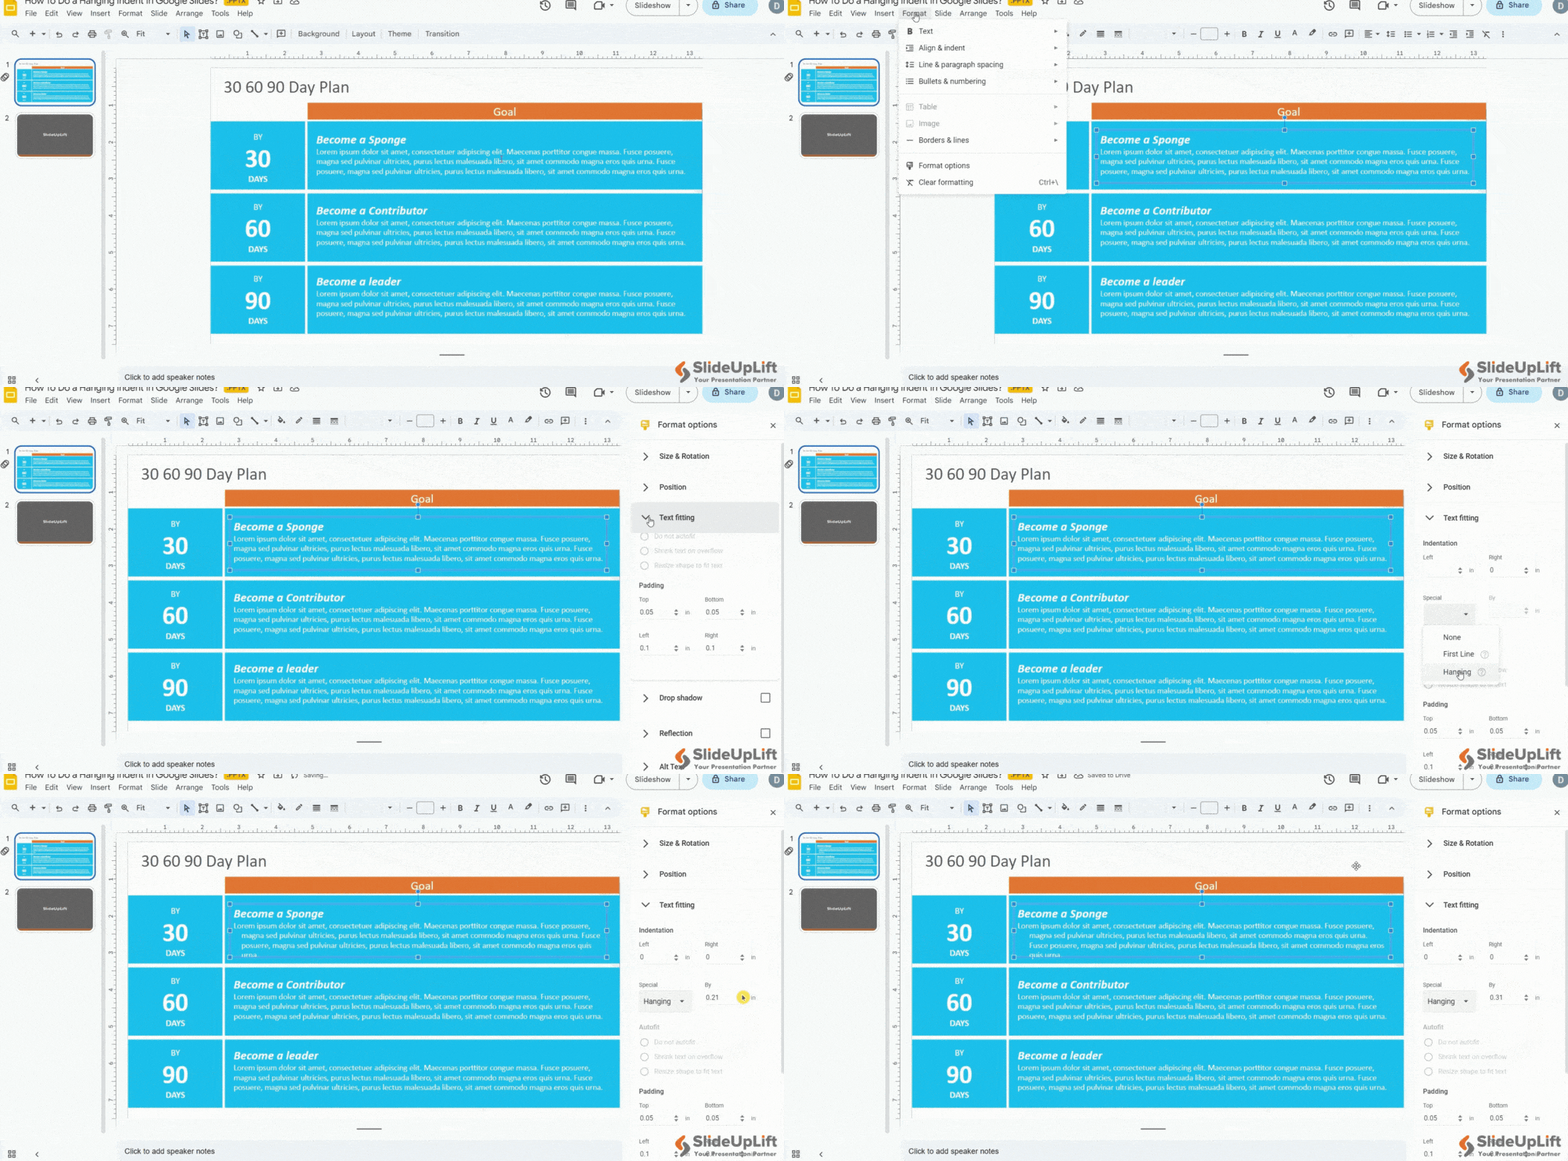
- Go to the “Format” tab and click “Format Options” > “Text Fitting” in the drop-down menu.
- Select the line you want to add the indent to.
- Go to the “Special” box section and select “Hanging” from the list.
- In “Text Fitting” you can adjust the spacing you require with the direction buttons provided.
How to Do A Hanging Indent in Google Slides Using Format Option
ALSO READ: How to check word count on Google Slides?
Mastering the art of hanging indent in Google Slides can significantly enhance your presentations visual appearance. Creating hanging indent is a valuable skill that can help you present information more effectively and make your slides look polished. So, the next time you’re working on a presentation, implement this formatting technique.
You can also elevate your Google Slides presentations with online presentation service providers like SlideUpLift. We offer a wide range of stunning Google Slides templates that are designed to save time, inspire creativity, and leave a lasting impression on your audience. Explore from our vast collection of Google Slides templates and themes to create stunning presentations.
In case you need additional help with creating presentations, you can also explore our presentation design services. Give us a try with our custom-slides service or schedule a call to know more!
FAQs
-
When to use hanging indent?
Hanging indent comes in handy whenever you need to present information with proper references and citations in your Google Slides presentations. It’s all about giving credit where it’s due and making your content look polished.
-
Can I set up a hanging indent in Google Slides on a smartphone?
Unfortunately, if you’re using the smartphone app for Google Slides, you won’t find an option to create a hanging indent. You’ll need to use a computer to work through this formatting style.
-
Can I use a hanging indent for bullet points or numbered lists?
Absolutely! Hanging indent isn’t just for citations. You can apply them to bullet points or numbered lists in your Google Slides to make your content more visually appealing and organized.
-
Are there templates available for Google Slides with hanging indent?
Yes, some Google Slides templates come pre-designed with hanging indent to make your job even easier. You can find these templates through presentation design platforms like SlideUpLift to save time and create professional-looking slides effortlessly.


