

How to Add Background Music in PowerPoint: The Complete Guide (All Versions)
You’ve spent hours building the perfect presentation — your slides are polished, your data is solid, your design is on point. But something still feels flat. That missing ingredient? Background music.
The right audio track can transform a good PowerPoint into an unforgettable one. It sets the mood before you even say a word, keeps your audience engaged during transitions, and gives your presentation a professional, cinematic quality that plain slides simply cannot achieve. If you’ve been wondering how to add music to PowerPoint without any technical headaches, you’re in exactly the right place.
But here’s where most guides fail you: they show you one method for one version, skip the Mac steps entirely, never mention what happens to your file size, and leave you stranded when something breaks. This complete guide on how to add music to a PowerPoint presentation fixes all of that.
Whether you’re using PowerPoint on Windows, Mac, or the web version, whether you need music on a single slide or looping across all 60 of them, this is the only guide you’ll need. Every step is version-specific, every warning is real, and every fix is tested.
Estimated time to set up: Under 5 minutes for most users. Let’s get started.
QUICK ANSWER —
To add background music in PowerPoint: Go to Insert > Audio > Audio on My PC, select your file, click the audio icon, then choose Play in Background on the Playback tab. Works on Windows, Mac, and PowerPoint Online. Need to add background audio to PowerPoint for a single slide or all 60? This one-click method handles both.
This guide covers: All versions (Windows / Mac / Web) • Single slide vs. all slides • Editing & trimming • File compression • Video export • Troubleshooting
Using Google Slides instead? The process is similar but uses different menus. See our parallel guide on how to add audio or music in Google Slides
What You Need Before Adding Background Music to PowerPoint
Before adding background music to PowerPoint, you need three things: an audio file in MP3 or M4A format, that file saved next to your .pptx, and your PowerPoint version identified (Windows, Mac, or Web). The remainder of this section walks through each requirement in detail.
Supported Audio File Formats (Windows vs. Mac vs. Web)
Not every audio format works on every version of PowerPoint. Using the wrong format is one of the most common reasons music fails to play — especially when sharing a presentation across different devices or operating systems.
| Format | Windows | Mac | Web | Best For |
|---|---|---|---|---|
| MP3 | ✅ | ✅ | ✅ | Best all-round choice — use this by default |
| M4A / AAC | ✅ | ✅ | ✅ | High quality, smaller size — great for Mac users |
| WAV | ✅ | ✅ | ✅ | Highest quality but very large file size |
| WMA | ✅ | ❌ | ❌ | Windows only — avoid if sharing with Mac users |
| OGA | ❌ | ❌ | ✅ | Web version only |
| AIFF / AU / MIDI | ✅ | ✅ (AIFF) | ❌ | Legacy formats — limited support |
| M4P (Apple Music) | ❌ | ❌ | ❌ | DRM-protected — not supported anywhere |
Important: M4P files from Apple Music are DRM-protected and cannot be used in PowerPoint on any platform. See the ‘Adding Music from Streaming Services’ section for legal workarounds.
Recommended Audio Quality Settings
The quality of your audio file directly affects how professional your presentation sounds. These settings give you the best balance between sound quality and file size:
- Bitrate: 128 kbps is the minimum for acceptable quality. 256 kbps is ideal for most presentations. Avoid going higher — the gains are not worth the file size increase.
- Stereo vs. Mono: Stereo sounds fuller and is fine for most cases. Mono files are roughly half the size — a good option if file size is a concern.
- Normalize your volume: Use a free tool like Audacity or an online normalizer before inserting. This prevents sudden loud spikes mid-presentation.
- Track length: Ideally, your music should match or exceed your presentation’s total runtime. If it’s shorter, enable looping (covered later).
Where to Get Royalty-Free Background Music (7 Trusted Sources)
You cannot legally use songs from Spotify, Apple Music, or YouTube in your presentations without a license. The good news: there are excellent free alternatives specifically designed for projects like yours. Searching for how to add audio background music in PowerPoint using free, legal tracks? All seven sources below are fully licensed for presentation use.
- YouTube Audio Library (youtube.com/audiolibrary) — Free tracks, no attribution required for most. Filter by mood, genre, and duration.
- Pixabay Music (pixabay.com/music) — 100% free, no sign-up, no attribution required. Excellent quality.
- Mixkit (mixkit.co) — Free high-quality tracks with a simple license. No account needed.
- Incompetech (incompetech.filmmusic.io) — Kevin MacLeod’s legendary royalty-free library. Search by mood, tempo, and feel.
- Bensound (bensound.com) — Professional quality. Free tier available, paid tier for commercial use without attribution.
- Free Music Archive (freemusicarchive.org) — Large catalog. Filter by Creative Commons license type.
- SoundCloud (soundcloud.com) — Search for ‘Creative Commons’ or ‘free to use’ in filters.
Pro Tip: Always search for ‘instrumental’ or ‘ambient’ tracks. Lyrics compete with your spoken words and pull your audience’s attention away from your slides.
Pre-Insert Checklist
Whether you’re learning how to add music to PowerPoint slideshow decks or a single-slide kiosk display, run through this checklist before opening PowerPoint to avoid problems later:
- Audio file is in MP3 or M4A format
- The file is saved in the same folder as your .pptx file
- File size is under 20 MB (compress before inserting if larger)
- You’ve test-played the file on your computer — it opens and plays correctly
- You know which version of PowerPoint you’re using (Help > About)
How to Add Background Music in PowerPoint on Windows
To add background music in PowerPoint on Windows, click Insert > Audio > Audio on My PC, select your MP3 file, click the speaker icon, then click Play in Background on the Playback tab. The full walkthrough below covers both inserting an existing file and recording new audio.
Method 1: Insert Audio from Your PC (Step-by-Step)
This is the standard method and what you’ll use 95% of the time. It embeds the audio file directly into your .pptx, so the music travels with the presentation wherever it goes.
- Open your presentation and navigate to the slide where you want music to start. (For background music across all slides, this must be Slide 1.)
- Click the Insert tab on the ribbon at the top of the screen.
- Click Audio in the Media group, then select Audio on My PC from the dropdown.
- The file browser opens. Navigate to your audio file and click Insert (not Open — Insert embeds the file).
- A small speaker icon appears in the centre of your slide. This confirms the audio is successfully embedded.
- Drag the speaker icon to a corner of the slide so it doesn’t interfere with your content.

Pro Tip: If you click ‘Link to File’ instead of ‘Insert’, the audio will NOT be embedded — it will break on any computer other than yours. Always use Insert.
Method 2: Record Audio Directly Inside PowerPoint
This method is useful for voiceovers, custom narration, or if you want to record a sound directly into your presentation. No microphone? You can use PowerPoint’s Text-to-Speech feature to generate spoken narration directly from your slide text instead.
- Navigate to the slide where you want the recording.
- Go to Insert > Audio > Record Audio.
- In the dialog box, type a name for your recording (e.g., ‘Intro Music’).
- Click the red Record button to begin recording. Speak, or play audio near your microphone.
- Click Stop when done. Click Play to review your recording.
- If happy, click OK. The recording is now embedded on the slide.

Important: Record Audio requires a microphone enabled in your system settings. Check Settings > System > Sound if the option is greyed out.
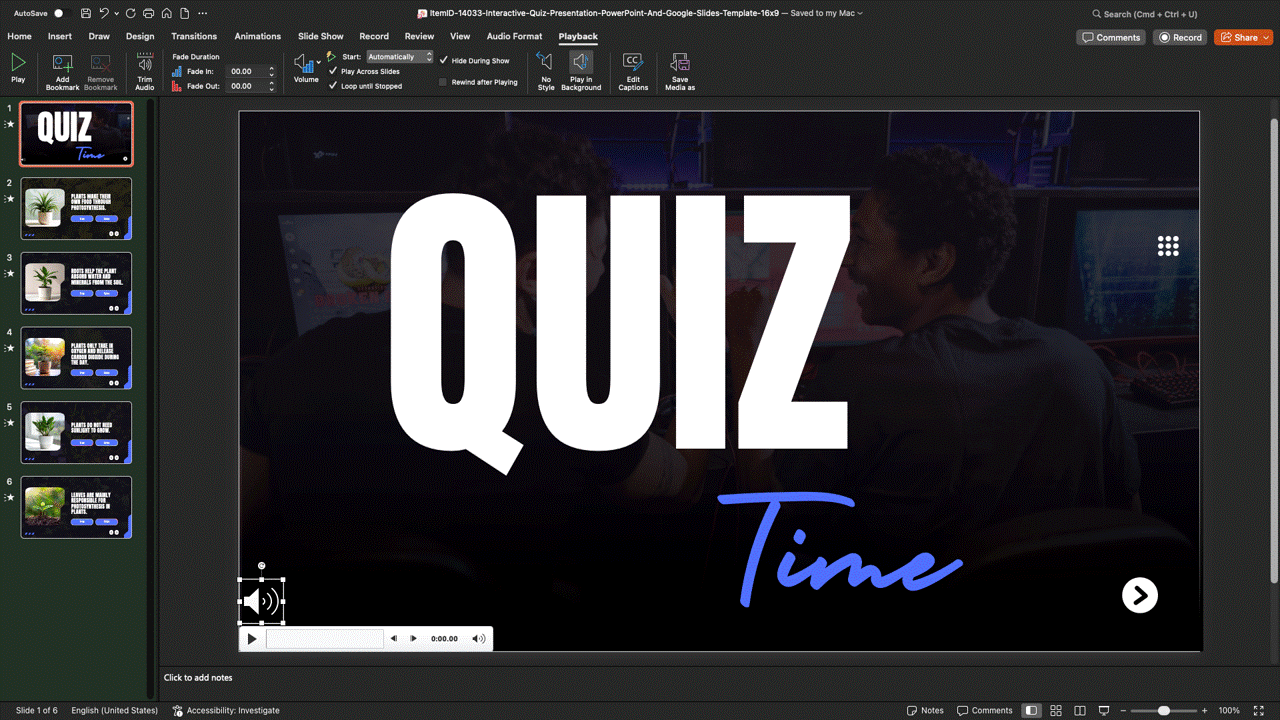
The Playback Tab — Every Setting Explained
After inserting audio, click the speaker icon on your slide. A new Playback tab appears in the ribbon. This tab is your command centre for all PowerPoint background audio settings — from start triggers to looping, volume, and icon visibility. Here is what each option does:
- Start dropdown: Controls when music begins. ‘Automatically’ starts as soon as the slide appears. ‘In Click Sequence’ starts when you click. ‘When Clicked On’ starts only when you click the speaker icon. For background music, always choose Automatically.
- Volume: Sets the default volume level — Low, Medium, High, or Mute. Use Low or Medium for live presentations where you’ll be speaking over the music.
- Play Across Slides: Makes the audio continue playing as you advance through slides. Essential for background music.
- Loop Until Stopped: Restarts the track from the beginning when it ends. Essential when your music track is shorter than your presentation. (To loop the entire slideshow itself — not just the audio — see our guide on how to loop a PowerPoint slideshow — useful for kiosk and lobby screen setups.
- Hide During Show: Makes the speaker icon invisible during the slideshow. Always enable this for a clean, professional look.
- Rewind After Playing: Resets audio to the beginning after it finishes playing. Useful for single-slide audio that may play more than once.
How to Make Music Play Across ALL Slides — The One-Click Method
This is how to add background music to PowerPoint with a single click. It’s also the most reliable way to add background music to PowerPoint slideshow presentations without manually toggling multiple settings — the Play in Background button handles four settings at once.
- Insert your audio file on Slide 1 (must be the first slide for all-slides playback).
- Click the speaker icon to select it.
- Go to the Playback tab.
- In the Audio Styles group, click the Play in Background button.

That’s it. PowerPoint automatically enables: Start (Automatically) + Play Across Slides + Loop Until Stopped + Hide During Show.
Pro Tip: After clicking Play in Background, press F5 to start your slideshow and test that music plays and continues as you advance slides before your actual presentation.
How to Add Background Music in PowerPoint on Mac
To add background music in PowerPoint on Mac, click Insert > Audio > Audio from File, select your MP3 or M4A file, click the speaker icon, then click Play in Background on the Playback tab. The Mac process is nearly identical to Windows with three labeling differences detailed below.
Step-by-Step for PowerPoint for Mac (Microsoft 365 / 2024 / 2021)
- Open your presentation and navigate to Slide 1.
- Click the Insert tab in the top menu bar.
- Click Audio, then select Audio from File (on Mac it says ‘Audio from File’, not ‘Audio on My PC’).
- The Finder window opens. Navigate to your audio file and click Insert.
- The speaker icon appears on the slide. Click it to access the Playback tab.
- Click Play in Background to enable continuous playback across all slides.
Key Differences on Mac vs. Windows
- The Insert Audio option is labelled ‘Audio from File’ instead of ‘Audio on My PC.’
- WMA files will not play on Mac — always use MP3 or M4A when presenting on Apple devices.
- The OGA format is not supported on Mac desktops — only in the web version.
- In some older PowerPoint 2019 for Mac builds, the ‘Play in Background’ button may not be present (it was added in a later update). In that case, manually check ‘Play Across Slides’ and ‘Loop Until Stopped’ separately on the Playback tab.
- The Playback tab layout is nearly identical to Windows in Microsoft 365 and 2021+.
Best Audio Formats for Mac
| Format | Mac Support | Recommended? |
|---|---|---|
| MP3 | Full support | Yes — best choice |
| M4A (AAC) | Full support | Yes — excellent quality |
| WAV | Supported | Only if quality is critical (large file) |
| AIFF | Supported | Legacy — use MP3 instead |
| WMA | Not supported | No — will not play on Mac |
| OGA | Not supported | Web only |
How to Add Background Music in PowerPoint Online (Web Version)
To add background music in PowerPoint for the web, click Insert > Audio, select your file, click the speaker icon, then click Play in Background on the Audio tab. Web supports continuous playback across all slides, but lacks trimming and fade controls — both require the desktop app.
Step-by-Step for PowerPoint for the Web
- Open your presentation at office.com or microsoft365.com.
- Navigate to the slide where you want music to start.
- Click the Insert tab in the ribbon.
- Click Audio and select your audio file, then click Open.
- The speaker icon appears on the slide. Click it to select it.
- In the ribbon, look for the Audio tab (in the web version, this is called ‘Audio tab’, not ‘Playback tab’).
- Click Play in Background to enable continuous playback.
What’s Different — Web vs. Desktop
- The tab is called Audio instead of Playback
- Trim Audio is not available in the web version
- Fade In / Fade Out is not available in the web version
- Supported formats (web only): MP3, WAV, M4A, AAC, OGA
- For all advanced editing (trim, fade, animation pane controls), open the file in the desktop app
If you edit audio settings in the web version and then open the file in the desktop app, all settings are preserved. You can do a basic setup online and fine-tune on a desktop.
Can You Add Background Music in the PowerPoint Mobile App?
The short answer: no, you cannot add audio files using the PowerPoint mobile app on iPhone, iPad, or Android. Microsoft’s official documentation confirms that audio insertion is not supported on iOS or Android — the Insert > Audio menu is either missing or non-functional on mobile.
What the mobile app CAN do:
- Play presentations that already have audio embedded. If you set up background music on a desktop and open the file on mobile, the music plays correctly during your slideshow.
- Display all your slide content, including the speaker icon (in editing view).
- Preserve all your playback settings — Play in Background, Loop, Fade, and Volume settings stay intact when the file is opened on mobile.
What the mobile app CANNOT do:
- Insert new audio files
- Record audio
- Trim, fade, or otherwise edit existing audio
- Change Playback tab settings
The recommended workflow: Build and configure the audio on PowerPoint for Windows or Mac, save the file to OneDrive or your cloud storage, then open it in the mobile app to present. All audio settings transfer automatically. This is the only reliable method for presenting with background music from a phone or tablet.
How to Control Music Playback Across Your Slides
PowerPoint lets you control exactly when music starts, stops, and changes — set “Stop playing After [X] slides” via Animation Pane > Effect Options to limit playback to specific slides, or use Start: After Previous to chain multiple tracks into a seamless playlist.
How to Stop Music After a Specific Number of Slides
This is incredibly useful when you want music only for the first part of your presentation — for example, during an intro sequence — and then silence for a Q&A or data-heavy section.
- Insert your audio file and click the speaker icon to select it.
- Go to the Animations tab in the ribbon.
- Click Animation Pane on the right side of the ribbon to open it.
- In the Animation Pane, click on your audio file’s entry to select it.
- Click the dropdown arrow next to the audio entry and select Effect Options.
- In the dialog that opens, under Stop playing, select After and enter the number of slides (maximum: 999).
- Click OK. Your music will now stop automatically after the slide count you specified.
Pro Tip: This method is perfect for ‘music plays on slides 1–8, silence from slide 9 onward’ setups. Plan your slide count in advance before configuring this setting.
How to Add Multiple Songs for a Long Presentation
If your presentation runs longer than a single music track, you can chain multiple audio files into a seamless playlist — all triggered automatically with no gaps between songs.
- Insert all your audio files one by one on Slide 1. Each will get its own speaker icon.
- Move all speaker icons to the same corner of the slide so they’re out of the way.
- Open the Animation Pane (Animations tab > Animation Pane).
- Set the first audio file to Start: Automatically.
- Set every subsequent audio file to Start: After Previous. This ensures each song begins automatically when the previous one ends.
- Drag the entries in the Animation Pane to set your desired playback order.

Result: A seamless, gapless playlist that runs through your entire presentation without any manual intervention.
How to Add Different Music to Different Sections
For presentations with distinctly different tones per section — a calm opening, an energetic product reveal, a reflective close — you can assign different tracks to different parts.
- Identify the first slide of each section where a new track should begin.
- Insert the appropriate audio file on the first slide of each section.
- For each audio file, set Start: Automatically.
- Use the Animation Pane > Effect Options > Stop playing: After [X] slides to define exactly when each section’s music should end.
- Plan your exact slide counts per section before setting these values.
- Always test by running the full slideshow before presenting.
How to Combine Background Music with Narration
One of the most common audio combinations is layering recorded narration on top of background music — used heavily for video tutorials, e-learning modules, self-running kiosks, and social media exports. The technique requires balancing two audio tracks so the narration stays clearly audible.
Step-by-step setup:
- Add the background music first. Insert your music file on Slide 1 and click Play in Background on the Playback tab.
- Lower the music volume. With the music speaker icon selected, go to the Playback tab and set Volume to Low. This is the single most important step — narration cannot compete with music at full volume.
- Record narration per slide. Go to Slide Show > Record Slide Show > Record from Beginning. PowerPoint records narration slide-by-slide and captures each slide’s timing automatically.
- Verify volume balance. With the narration audio icons inserted (one per slide), set their Volume to High on the Playback tab.
- Test the full slideshow before exporting or presenting — different speakers and headphones reproduce the balance differently.
Pro Tip: For self-running presentations destined for video export, lower the music volume to “Low” AND use a 2-3 second fade-in on the music track. This gives the narrator room to begin speaking before the music reaches full level — the same trick film and TV editors use when scoring dialogue.
Important: If you find narration getting drowned out, do not raise the narration volume — lower the music volume instead. Boosting the narration above “High” causes clipping and distortion that is much more jarring than soft background music.
Editing and Customizing Your Background Music in PowerPoint
PowerPoint’s Playback tab handles the four most common audio edits — trimming, fade in/out, volume adjustment, and hiding the speaker icon — without any external audio software. All edits are non-destructive, meaning your original audio file is never modified.
How to Trim Audio in PowerPoint
Trimming lets you remove unwanted silence at the beginning of a track, skip a slow intro, or cut the audio at a specific point. It’s non-destructive — the original file is unchanged.
- Click the speaker icon to select it, then go to the Playback tab.
- Click Trim Audio in the Editing group.
- The Trim Audio dialog opens with a waveform visualisation.
- Drag the green marker (left side) to set your new start point.
- Drag the red marker (right side) to set your new endpoint.
- Click Play to preview your trimmed version.
- Click OK to apply.

Important: Trim Audio is not available in PowerPoint Online. Open the file in the desktop app to trim audio.
Adding Fade In and Fade Out Effects
Abrupt audio starts and stops are jarring and unprofessional. Fade effects create smooth, cinematic transitions. They take 30 seconds to set up and make a significant difference to the overall quality of your presentation.
- Click the speaker icon, then go to the Playback tab.
- In the Editing group, find the Fade In and Fade Out number boxes.
- Enter a duration in seconds. Recommended values: Fade In 1–2 seconds, Fade Out 2–3 seconds.

The music will now gradually increase in volume at the start and gently decrease at the end. No preview button is needed — run the slideshow to hear the effect.
Pro Tip: For presentations where you’re speaking over the music, a slightly longer fade-in (2–3 seconds) gives you time to begin speaking before the music reaches full volume.
Adjusting Volume Levels
The Volume setting on the Playback tab sets the default playback level. Choose based on your presentation context:
- Low: Best for live presentations where you’re speaking. Your voice should always be the dominant audio.
- Medium: Good for self-running kiosk presentations or when there is no live speaker.
- High: Use for video exports where there is no voiceover and music is the primary audio.
- Mute: Temporarily disables audio without removing the file — useful during dry runs.
Important: The Volume setting is relative to your system volume. Always test on the actual device you’ll present from, as different computers have different baseline volumes.
How to Hide the Audio Icon During Your Slideshow
- Click the speaker icon to select it.
- On the Playback tab, check the Hide During Show checkbox.
The icon is now invisible during your slideshow but remains visible in editing mode. Alternatively, drag the icon completely off the slide canvas in Normal View — it will play but will never appear.
How to Replace Background Music
When adding a new audio track from scratch, removing the old one first ensures your new playback settings start completely clean.
- Click the existing speaker icon and press the Delete key to remove it.
- Insert your new audio file using Insert > Audio > Audio on My PC.
- Reapply your playback settings (Play in Background, volume, fade, etc.).

How to Remove Background Music Completely
- Find the speaker icon on the slide where you originally inserted the audio (usually Slide 1).
- Click it to select, then press Delete.
The audio is now completely removed from the presentation. File size will decrease after you save.

How to Compress Audio and Reduce PowerPoint File Size
To reduce file size after adding music, go to File > Info > Compress Media and select HD (720p) — this typically cuts audio file size by 50-90% with no audible quality loss in a presentation context. For every method to reduce your PowerPoint file size, see our full compression guide.
Why Audio Increases File Size
- PowerPoint embeds audio files directly into the .pptx by default — they’re not linked externally
- A WAV file at CD quality (44.1kHz, 16-bit stereo) runs approximately 10 MB per minute
- A 10-minute WAV track = roughly 100 MB added to your file
- The same track in MP3 at 128 kbps = approximately 9–10 MB — a 90%+ reduction
- Large presentations cause: failed email attachments, SharePoint upload rejections, and stuttering playback on slow machines
You can also insert background music in PPT and compress it immediately after — there is no need to wait until the final export stage.
How to Compress Media in PowerPoint (Windows)
- Go to File > Info.
- Click Compress Media.
- Select a quality level:
- Full HD (1080p) — Best quality, moderate compression. Good for high-stakes presentations.
- HD (720p) — Recommended balance for most presentations.
- Standard (480p) — Smallest file size. Slight quality reduction, but often imperceptible for background music.
- Wait for compression to complete (a progress dialog appears).
- Click Close and save your file.

How to Optimize Media Compatibility
If your audio plays perfectly on your computer but fails on a colleague’s machine or an older version of PowerPoint, this is the fix:
- Go to File > Info.
- If PowerPoint detects compatibility issues, an Optimize Media Compatibility button will appear.
- Click it and wait for the process to complete.
- Save your file before sharing.

Pro Tip: Always run Optimize Media Compatibility before emailing a presentation or uploading it to SharePoint, Teams, or Google Drive. It takes 30 seconds and prevents 80% of ‘audio doesn’t work’ complaints from recipients.
Best Practices to Keep File Size Small
- Always use MP3 instead of WAV — indistinguishable quality for background music, 10x smaller
- Trim your audio to only the length you need before inserting
- 128 kbps MP3 is the sweet spot — higher bitrates add file size with no audible benefit in a presentation context
- Compress media (File > Info > Compress Media) before sharing any presentation with embedded audio
Can You Add Music from Spotify, Apple Music, or YouTube?
No, you cannot legally use Spotify or Apple Music tracks in PowerPoint due to DRM protection, but you CAN use the YouTube Audio Library (free, DRM-free MP3 downloads). Each platform’s options and legal workarounds are explained below
Can You Add Spotify Music to PowerPoint?
Spotify music cannot be directly used in PowerPoint. All Spotify tracks are DRM-protected streams — they cannot be downloaded or saved as audio files for use in other applications.
- There is no legal workaround that preserves Spotify DRM and works in PowerPoint
- Some third-party tools claim to record Spotify audio — this violates Spotify’s Terms of Service
- Legal alternative: Find a similar track on Pixabay Music, Mixkit, or Bensound — many professional-quality tracks are available for free
Can You Add Apple Music to PowerPoint?
Apple Music files use the M4P format with DRM protection. PowerPoint does not support M4P on any platform.
- M4P files from Apple Music are completely unsupported — they will not insert or play
- Songs purchased (not streamed) from the old iTunes Store without DRM may exist as standard M4A files — these can be converted to MP3 and used in PowerPoint
- Third-party converters exist (such as TuneMobie or NoteBurner), but removing DRM may violate copyright laws in your region — check local regulations
- Safest option: Use royalty-free alternatives. Pixabay Music has thousands of professional tracks at no cost
Can You Use YouTube Audio in PowerPoint?
One of the most common questions is how to add music to PowerPoint from YouTube. The key distinction is which YouTube content is legal to use. Using audio from standard YouTube videos violates YouTube’s Terms of Service and copyright law in most countries. However, there is a fully legal path:
- Go to youtube.com/audiolibrary (the YouTube Audio Library).
- Browse tracks by genre, mood, instrument, or duration.
- Filter by ‘No attribution required’ for the simplest license terms.
- Click the download icon — you receive an MP3 file, ready to insert in PowerPoint.
Pro Tip: The YouTube Audio Library contains thousands of high-quality, professionally produced instrumental tracks. It’s completely free, requires no sign-up, and the files are DRM-free MP3s ready to use immediately. Want to take it a step further? Learn how to embed a YouTube Video in PowerPoint and make your presentations even more engaging.
How to Export PowerPoint as a Video with Background Music
To export a PowerPoint as a video with background music, go to File > Export > Create a Video and select “Use Recorded Timings and Narrations” in the dropdown — this single setting determines whether your audio survives the export. For a deeper look at quality settings and export options, see our full guide on how to convert PPT to video.
Step-by-Step: Export as MP4 with Audio on Windows
- Ensure your background music is set up with Start: Automatically on the Playback tab.
- Go to File > Export > Create a Video.
- Select your video quality — Full HD (1080p) is recommended for most uses.
- In the dropdown below quality, select ‘Use Recorded Timings and Narrations’. This is the critical step — it ensures your audio is included in the export.
- Set a slide duration if your slides have no set timings (e.g., 5 seconds per slide).
- Click Create Video, choose your save location, and click Save.
- Wait for rendering. A progress bar appears at the bottom of the PowerPoint window.
Step-by-Step: Export as Video on Mac
- Ensure Start is set to Automatically on the Playback tab.
- Go to File > Export.
- Choose MP4 as the file format.
- Select ‘Use Recorded Timings and Narrations’ from the available options.
- Click Export and wait for rendering.
Why Music Might Not Appear in Your Exported Video
If you export a video and find the background music is missing, one of these is almost certainly the cause:
- Wrong dropdown setting: You selected ‘Don’t Use Recorded Timings’ instead of ‘Use Recorded Timings and Narrations’
- Audio set to manual start: If Start is set to ‘In Click Sequence’ or ‘When Clicked On’, it will not trigger in a video export — change it to Automatically
- Audio icon deleted before export: Check Slide 1 still has the speaker icon
- Fix: Go back to the Playback tab, confirm Start is set to Automatically, then re-export with ‘Use Recorded Timings and Narrations’ selected
Troubleshooting: Background Music Not Working in PowerPoint
The six most common audio problems in PowerPoint — music not playing, stopping between slides, slides not advancing, unsupported format errors, oversized files, and audio not playing on another machine — all have specific fixes detailed below, most of which take under 60 seconds.
Problem 1: Music Is Not Playing During the Slideshow
- Open Playback tab → confirm Start is set to Automatically (not ‘In Click Sequence’)
- Check that your computer’s system volume is not muted or very low
- Confirm the audio format is MP3, M4A, or WAV
- Go to File > Info > Optimize Media Compatibility and retry
- If still failing, delete and re-insert the audio file as a fresh MP3
Problem 2: Music Stops When Advancing to the Next Slide
- Select the speaker icon → Playback tab → check Play Across Slides
- Or click Play in Background, which enables this automatically
- Ensure the audio is inserted on Slide 1 if you want it to play across all slides
Problem 3: Slides Are Not Advancing While Music Plays
- Open Animation Pane (Animations tab) → check the audio trigger settings
- Go to the Transitions tab → confirm each slide has a timing set (e.g., 5 seconds)
- The ‘Stop playing: After [X] slides’ setting in Effect Options may need adjustment
- Check that ‘Advance slide on mouse click’ is enabled on the Transitions tab if you’re advancing manually
Problem 4: Audio File Won’t Insert — Unsupported Format Error
- Convert the file to MP3 using VLC Media Player (free) or Audacity (free).
- In VLC: Media > Convert/Save > Add your file > Choose MP3 as output > Start.
- Alternatively, use cloudconvert.com — free online conversion to MP3, no account needed.
- Re-insert the converted MP3 file.
Problem 5: Presentation File Is Too Large After Adding Music
- Go to File > Info > Compress Media > HD (720p) for a significant reduction
- Delete the current audio and re-insert an MP3 version instead of WAV
- Use 128 kbps MP3 — the file will be 5–10x smaller with negligible quality difference
Problem 6: Music Works on My PC But Not on Another Computer
- Run File > Info > Optimize Media Compatibility before sharing
- Confirm the file is embedded, not linked — re-insert using Insert (not Link)
- Check that the recipient’s PowerPoint version supports your audio format
- Share as a newer .pptx format, not an old .ppt
- Test on a different machine before your presentation, whenever possible
Looking to create more engaging and visually dynamic presentations? Explore our collection of latest PowerPoint templates designed to make every slide more impactful and professional.

Conclusion
Adding background music to PowerPoint is one of the easiest ways to elevate your presentations from functional to genuinely memorable — and now you have every tool you need to do it right.
Whether you’re on Windows, Mac, or the web version, now you know how to add music to PowerPoint for any scenario — a single slide, a full playlist across 100 slides, or a complete video export. The key things to remember: always use MP3 for best compatibility, always insert on Slide 1 for all-slides playback, always click Play in Background for the fastest setup, and always run Optimize Media Compatibility before sharing.
Ready to try it? Pick the section that matches your version above and have your background music running in under 5 minutes. And if you found this guide useful, explore our other PowerPoint tutorials — including how to add animations, how to add transitions, and how to convert PPT to video — to take your presentations even further.
FAQs
-
How do I add music to a PowerPoint?
To add music to a PowerPoint, go to Insert > Audio > Audio on My PC (Windows) or Audio from File (Mac). Select your MP3 file, click Insert, then click the speaker icon and set Start to Automatically under the Playback tab. For all-slides playback, click Play in Background.
-
How to add music to a PowerPoint slideshow?
To add music to a PowerPoint slide show that plays from start to finish, insert your audio file on Slide 1 and click Play in Background on the Playback tab. This enables automatic start, looping, and cross-slide playback simultaneously — no additional configuration needed.
-
How do I add background music to PowerPoint that plays on all slides?
Insert your audio file on Slide 1 (Insert > Audio > Audio on My PC). Click the speaker icon, go to the Playback tab, and click Play in Background. This automatically enables Play Across Slides, Loop Until Stopped, and Hide During Show in one click.
-
How do I add background music in PowerPoint on a Mac?
On Mac, go to Insert > Audio > Audio from File (note: it says ‘Audio from File’, not ‘Audio on My PC’). Select your file, click Insert, then go to the Playback tab and click Play in Background. Use MP3 or M4A format — WMA files are not supported on Mac.
-
Why does my background music stop when I go to the next slide?
This happens when Play Across Slides is not enabled. Click the speaker icon, go to the Playback tab, and check Play Across Slides. Alternatively, click Play in Background, which enables this setting automatically along with Loop and Hide During Show.
-
How do I stop background music after a certain number of slides?
Select the speaker icon, go to the Animations tab, and open the Animation Pane. Click the audio entry, select Effect Options, and under Stop playing, choose After and enter your slide count. This gives you precise control over exactly when music ends.
-
Can I add multiple songs to a PowerPoint presentation?
Yes. Insert all tracks on Slide 1, open the Animation Pane, set the first track to Start: Automatically, and set all subsequent tracks to Start: After Previous. Arrange them in the desired order by dragging entries in the Animation Pane. PowerPoint will play them as a seamless playlist.
-
What audio file formats does PowerPoint support?
Windows supports: MP3, M4A, WAV, WMA, MIDI, AIFF, AU. Mac supports: MP3, M4A, WAV, AIFF, AU (not WMA). PowerPoint Online supports: MP3, WAV, M4A, AAC, OGA. MP3 is recommended for all platforms as it works everywhere and has the smallest file size for its quality.
-
How do I reduce PowerPoint file size after adding music?
Go to File > Info > Compress Media and choose HD (720p) for a good balance of quality and size. Also consider switching from WAV to MP3 — the same audio at MP3 128 kbps is up to 10x smaller than an equivalent WAV file. Run Optimize Media Compatibility before sharing.
-
Where can I find free music for my PowerPoint presentation?
Seven reliable sources: YouTube Audio Library (youtube.com/audiolibrary), Pixabay Music (pixabay.com/music), Mixkit (mixkit.co), Incompetech (incompetech.filmmusic.io), Bensound (bensound.com), Free Music Archive (freemusicarchive.org), and SoundCloud (filter by Creative Commons). All offer instrumental tracks suitable for presentations at no cost.
Table Of Content


Related posts from the same category

22 Dec, 2020 | SlideUpLift
How to make a poster in PowerPoint | PowerPoint Tutorial
Most of the time, we use PowerPoint to create presentations, but did you know you could use PowerPoint to build other elements such as posters? It is quite handy software

7 Feb, 2020 | SlideUpLift
How To Make A Filmstrip Effect In PowerPoint | PowerPoint Tutorial
Learn how to make a cool filmstrip effect. A PowerPoint Timeline Template need not be boring. This tutorial explains step-by-step instructions to create a cool Filmstrip timeline template in minutes.

25 Sep, 2020 | SlideUpLift
How To Add Pictures To PowerPoint Using Stock Images | PowerPoint Tutorial
This PowerPoint tutorial is a quick guide on how to add PowerPoint Images for Free to your presentation using PowerPoint's new feature - a collection of stock images. Microsoft PowerPoint

1 Dec, 2022 | SlideUpLift
How to cite images in PowerPoint
Images can enhance the impact of your professional presentations. You may choose the ideal photos to assist in captivating your readers and giving meaning to your words, but it is

14 Dec, 2020 | SlideUpLift
Quick Tutorial To Remove The Background From An Image And To Make A Background Transparent
PowerPoint has many built-in features that can help you edit images, just like any other professional photo editing tool does. In this tutorial, we will discuss- How To Remove The

3 Nov, 2025 | SlideUpLift
How to Add Animation in PowerPoint Without Messing Slides: Step-by-Step Guide
Have you ever felt your audience needed to be more engaged even after delivering good presentations? Do you think there's something that you should have included in your presentation and

13 Mar, 2026 | SlideUpLift
How to Play Video in PowerPoint Across Single and Multiple Slides
This blog explains how to play a single video across multiple slides in PowerPoint using simple animation and playback settings. It walks through the step-by-step process of inserting the video,

8 Apr, 2026 | SlideUpLift
How to Embed YouTube Video in PowerPoint (2026 Complete Guide)
Most PowerPoint videos fail at the worst moment — they don’t play, lag during playback, or force you to switch tabs mid-presentation. This guide shows you exactly how to embed

24 Oct, 2019 | SlideUpLift
How To Highlight Part Of An Image Using Focus Effect In PowerPoint : Step-By-Step Tutorial
This PowerPoint tutorial explains how to highlight any specific aspect of an image in PowerPoint. A presentation with pictures and infographics is better than a boring-looking textual presentation. Images make

27 Mar, 2023 | SlideUpLift
How To Flip An Image In PowerPoint
Are you looking to add a creative touch to your PowerPoint design? Flipping an image can be a quick and easy way to achieve that. Whether you want to create