How To Loop A PowerPoint Slideshow? Detailed Guide
Microsoft PowerPoint is a popular application for creating and delivering presentations. PowerPoint has numerous options for adding flair and taking your presentations a notch higher, such as the ability to incorporate YouTube videos, GIFs, etc. If you loop your PowerPoint, every slide will display for a predetermined duration. After the presentation, it will automatically resume from the beginning.
But the question is, can you use the looping function effectively? When used correctly, this feature eliminates the need for presenters to click a mouse or computer key to transition between slides. This feature is easy to set up and customize.

Today’s guide will teach us how to loop a PowerPoint slideshow and various tips and tricks for effective looping.
Why You Need to Loop Your Slideshow in PowerPoint?
Before learning how to loop a PowerPoint slideshow, let’s see under what scenarios one needs to loop their slideshow:
One helpful tool in PowerPoint that helps to guarantee a smooth and continuous presentation experience is the ability to loop your slideshow. The constant playback draws and maintains audience attention whether you present information in automated presentations, build interactive kiosks, use the loop feature to showcase presentations in digital signage or show information in exhibitions. Looping makes it possible to communicate information effectively and reinforce essential points for audience members who might join the presentation at different times.
How to Make a PowerPoint Loop?
You can learn how to make a PowerPoint loop through the instructions below. You can use the loop for various events, such as trade exhibitions, information displays, or kiosks.

- Open the PowerPoint presentation that you wish to loop first.
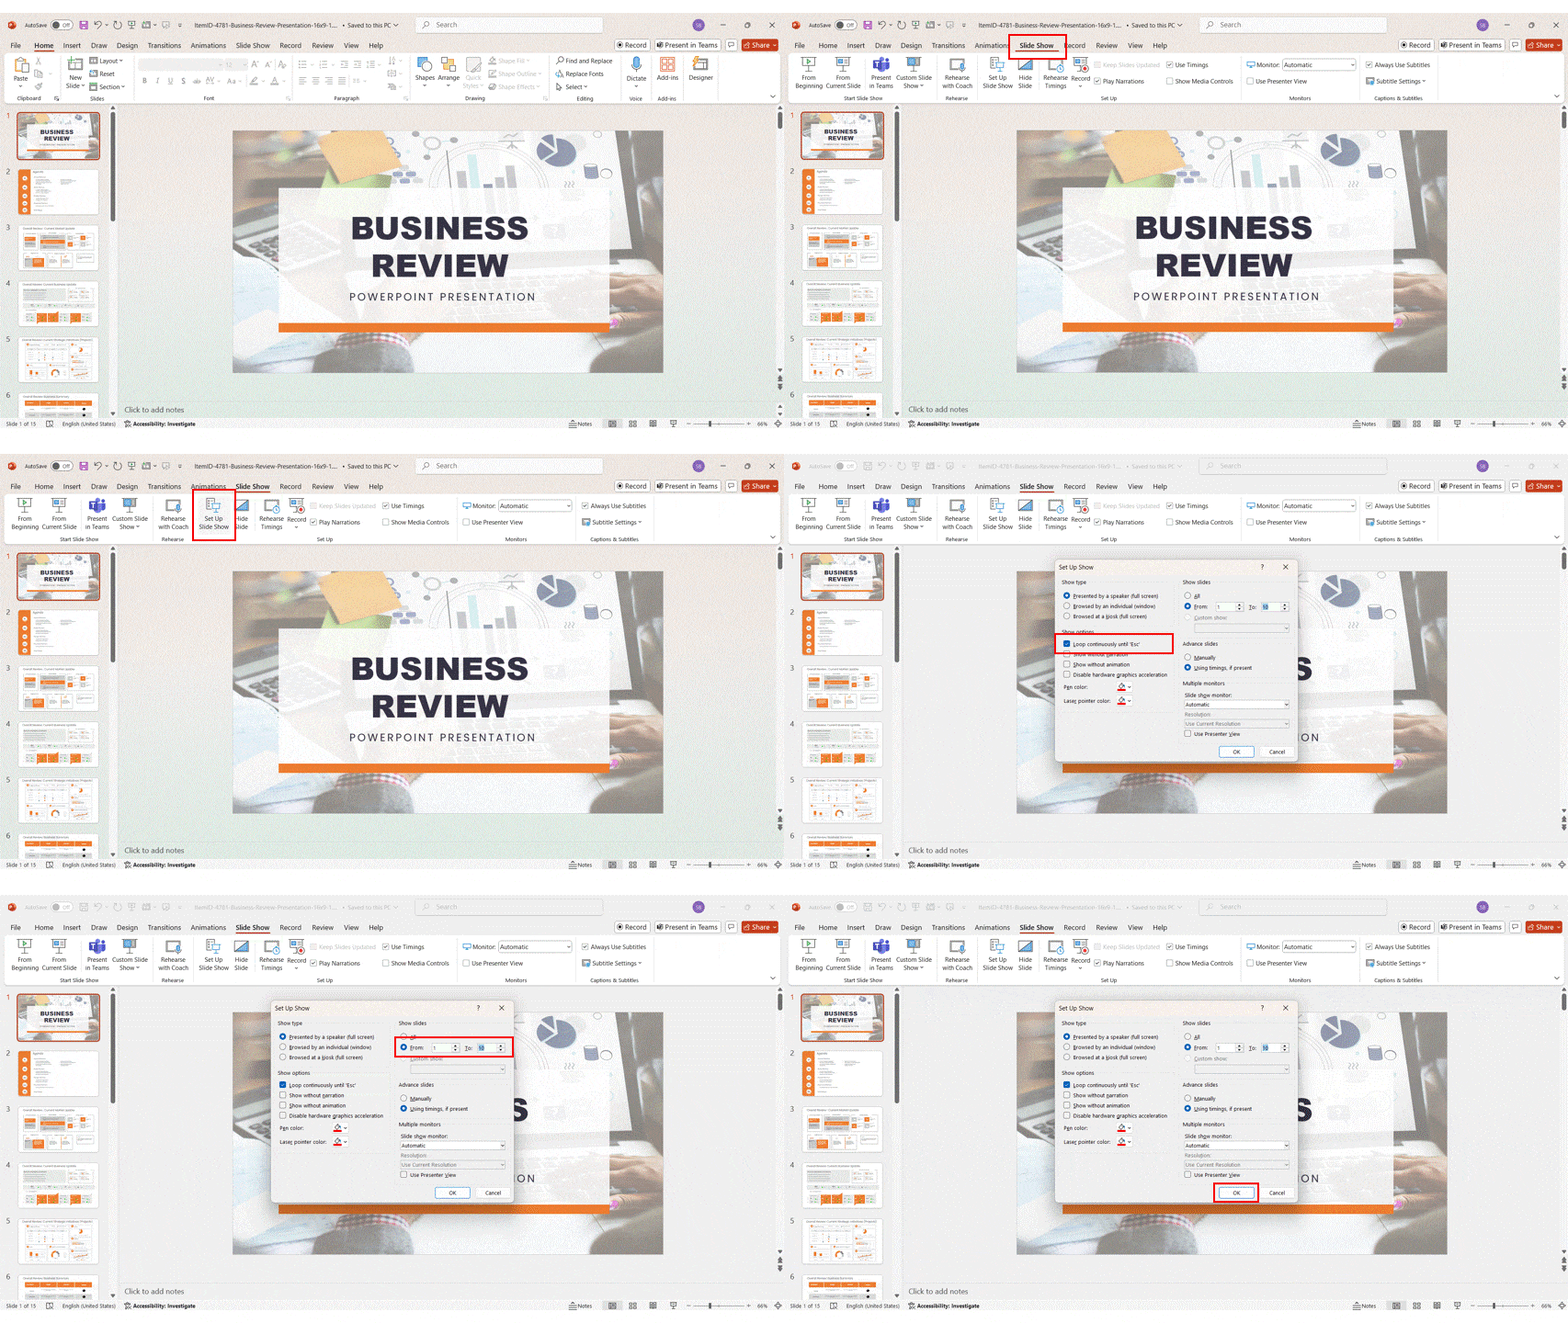
- Go to the Slide Show Tab: The PowerPoint window has several tabs at the top. To access choices relating to presenting your slides, select the “Slide Show” tab.
- Access Setup Show: Several commands and choices are under the “Slide Show” tab. Search for the “Set Up Slide Show” button or menu item in the group labeled “Start Slide Show.” Click on it.
- Select Options for Loops: The “Set Up Show” dialogue box will open with several options. Make sure to choose the following options to establish a loop:
- Display Type: Select “Presented by a speaker (full screen).”
- Preview slides: If you want the slides to play automatically, select “Manually” or enter the desired duration for each slide’s PowerPoint presentation loop timing.
- Enable your presentation to loop indefinitely unless you manually end it by hitting the Escape (‘Esc’) key by enabling this option.
- Click OK: After adjusting these settings to store your options, click the “OK” button.
- Begin Your Loop: Your slides will be set to loop unless you manually stop it by pressing the ‘Esc’ key. To stop it, click “From Beginning” or “From Current Slide” under the “Slide Show” tab to begin your presentation.
How to Loop a PowerPoint Slideshow from Selected Slides
You can choose which slides you want to loop around in PowerPoint. Eliminating manual intervention and maintaining audience interaction can be achieved by carefully choosing which slides to show throughout the presentation. Follow these steps to learn how to loop a PowerPoint slideshow from selected slides:
- Select the “Slide Show” option to start a loop for a particular set of slides. To initiate the loop, click the first slide in the thumbnail pane on the left.
- Click the final slide you wish to add to the loop while holding your keyboard’s “Shift” key. Next, select “Setup Show” and turn on the looping feature.
- Choose the “Custom Show” option and give it a name in the “Set Up Show” dialogue box. Navigate to the “Slide Show” menu and select “Custom Slide Show” to begin your looping presentation from the selected slides.

How to Set Up Auto-Loop for Continuous Playback
Now you know how to loop a slideshow in PowerPoint from selected slides, let us see how you can set up auto-loop for continuous playback:
- Select the Slide Show tab.
- Press the Set Up Slide Show button. You’ll see an options window appear.
- Keep clicking Loop till you reach “Esc.”
Note: Under Show Type, select Presented by a speaker or Browsed by an individual if you want the speaker or individual to continue controlling the presentation and clicking between slides. Clicking “Browsed” at a kiosk checks the Loop until the “Esc” box appears continuously. Moreover, auto-looping may annoy your viewers if your presentation is very repetitive. Use it with discretion and only when it makes sense for your writing subject.
How to Loop A PowerPoint SlideShow Using 2007 Version (older versions).
Use these detailed instructions to loop your slides if you’re using an older version of Microsoft PowerPoint:
- Open your PowerPoint presentation on your 2007 Microsoft PowerPoint.
- Select the tab labeled Slide Show. Select the “Set Up Slide Show” option from the “Set Up” menu.
- Go to the “Show options” section and select “Loop continuously until ‘Esc'” from the dialogue box that appears. Click Ok.
- Select your initial slide from the “Slides” preview side panel. To select your final slide, press and hold Shift.
- Select the tab labeled “Animations.” Turn off “On Mouse Click” and check the “Automatically After” box.
- The “After” box in the “Timing” panel has up and down arrows that you can use to change the time each slide appears. It will automatically loop back to the first slide when your slideshow reaches the last one.
How to Stop or Pause your Slideshow loop at any point.
Learning how to make a PowerPoint loop is of no use if you don’t know how to stop or pause your slideshow loop at any point:
You can use simple keyboard commands to pause or stop your slideshow loop at any time during a PowerPoint presentation. You can manually stop the looping slideshow by hitting the “Esc” key (also known as the Escape key) on your keyboard. It gives presenters a simple and quick option to stop the continuous playback so they can answer queries, have conversations, or go to particular slides that are not playing continuously.
Advanced Techniques for Creating a Seamless Loop in PowerPoint
One of the techniques used for creating a seamless loop in PowerPoint is incorporating videos and GIFs. PowerPoint’s animations, transitions, and triggers can create seamless looping. Here is how:
- Select the video you imported and added to a slide.
- Open the “Animations” tab from the main menu.
- Choose “Play” from the animation gallery’s “Media” section after clicking the “Add Animation” button.
- On the right side of the screen, click the “Animation Pane” to open it.
- Right-click the “Play” button and choose “Timing” in the “Animation Pane.”
- Choose “Until End of Slide” or “Until Next Click” as the “Repeat” option in the “Timing” tab.
- Use Triggers to adjust the start and stop times of the video.
Tips and Tricks for Effective Slideshow Looping in PowerPoint
As you can see, creating a PowerPoint loop video couldn’t be easier. It only takes three easy steps to complete. Nonetheless, there are always specific tips you may apply to improve the appeal and attention-grabbingness of your videos.

1. Selecting the Right Video
The length and content of the video are the primary considerations when discussing the “right” video. Therefore, consider the duration of your video when creating a continuous loop.
Yes, longer videos can be more captivating, but they may add to the presentation’s file size and degrade performance. Shorter video clips, however, are less likely to affect performance and can loop more naturally. Regarding the video’s substance, make sure it supports the main idea of your presentation and is pertinent to the subject of your talk. The video aims to increase viewer comprehension and engagement without becoming overbearing or intrusive.
2. Compressing Video Files
Large videos can detract from the overall image of your presentation by making it excessively slow and challenging to share. Therefore, consider using a specialized video compression tool or the built-in PowerPoint compression feature to optimize your presentation by compressing the files. It doesn’t always imply that your presentation will look grainy. Still, it can cause a noticeable quality loss, so keep that in mind when creating the presentation in the first place.
3. Examining the Presentation
Make sure the video loops accurately and smoothly by testing it before you deliver your presentation. Go over the entire presentation, looking for any inconsistent or problematic playback. If you complete your testing on time, you can safely make all the required changes and retest it until the loop video functions as planned.
4. Looping Videos to Create Ambience and Background
You can also use videos that loop to set the mood for your presentation. For instance, a natural setting or a soft animation can produce an aesthetically pleasing and captivating ambiance. Nevertheless, the presentation’s general subject and the background clip are complementary rather than distracting.
Conclusion
To sum up, looping your PowerPoint slideshow is simple. PowerPoint’s “Set Up Slide Show options” allow you to program it to loop indefinitely for a predetermined number of times.
Use transitions carefully, arrange your slides in the correct order, and adhere to best practices while making your looping PowerPoint to give it a polished, professional appearance. Your looping slideshow can operate flawlessly at events without supervision with the correct settings.
FAQs
-
How to Loop Slideshow In Powerpoint?
To loop a slideshow in PowerPoint, go to the “Slide Show” tab, select “Set Up Slide Show,” check “Loop continuously until ‘Esc’,” and click “OK.”
-
Can I loop specific slides within my PowerPoint presentation?
Yes, PowerPoint allows you to loop specific slides.
-
How do I stop or pause a looped slideshow in PowerPoint?
To interrupt a looped slideshow at any point, simply press the “Esc” key on your keyboard.
-
Can I customize the duration of each slide in a looped PowerPoint presentation?
Yes, you can control the timing of each slide by adjusting the slide transition settings, allowing for a tailored and dynamic looping experience.
-
Can SlideUpLift templates be used in looped presentations?
Yes, SlideUpLift provides PowerPoint templates that are compatible with looped presentations. These professionally designed templates can enhance the visual appeal of your slides, making your looped presentation more engaging and impactful.


