

How To Move A Slide In Google Slides?
Are you someone who loves to deliver professional-looking pitches or presentations? Then you must know that sometimes you may need to change your slides to a different position in your presentation to make it look more appealing.
Whether using a computer, an Android phone, iPhone or iPad, learning how to move a slide in Google Slides can save you time and help you create more polished slideshows. In this blog, we will show you a step-by-step process to rearrange slides in Google Slides on any device so you can present your ideas more creatively to your audience.
Where Is Moving Or Rearranging A Slide Helpful In Google Slides?
Here is why rearranging a slide can be helpful in Google Slides:
- By moving a slide in Google Slides, you can create a better narrative flow or group related content together to adjust the order of your slideshow.
- Moving slides can help with the layout or design. You can rearrange the elements on a particular slide to improve its visual appeal.
- Lastly, rearranging slides can help organise your content to make it easier for your audience to understand.
How To Move A Slide In Google Slides On A Computer?
Below we have given a step-by-step process of moving a slide in Google Slides on a computer:
- Open the Google Slides presentation on your computer containing the slide you want to move.
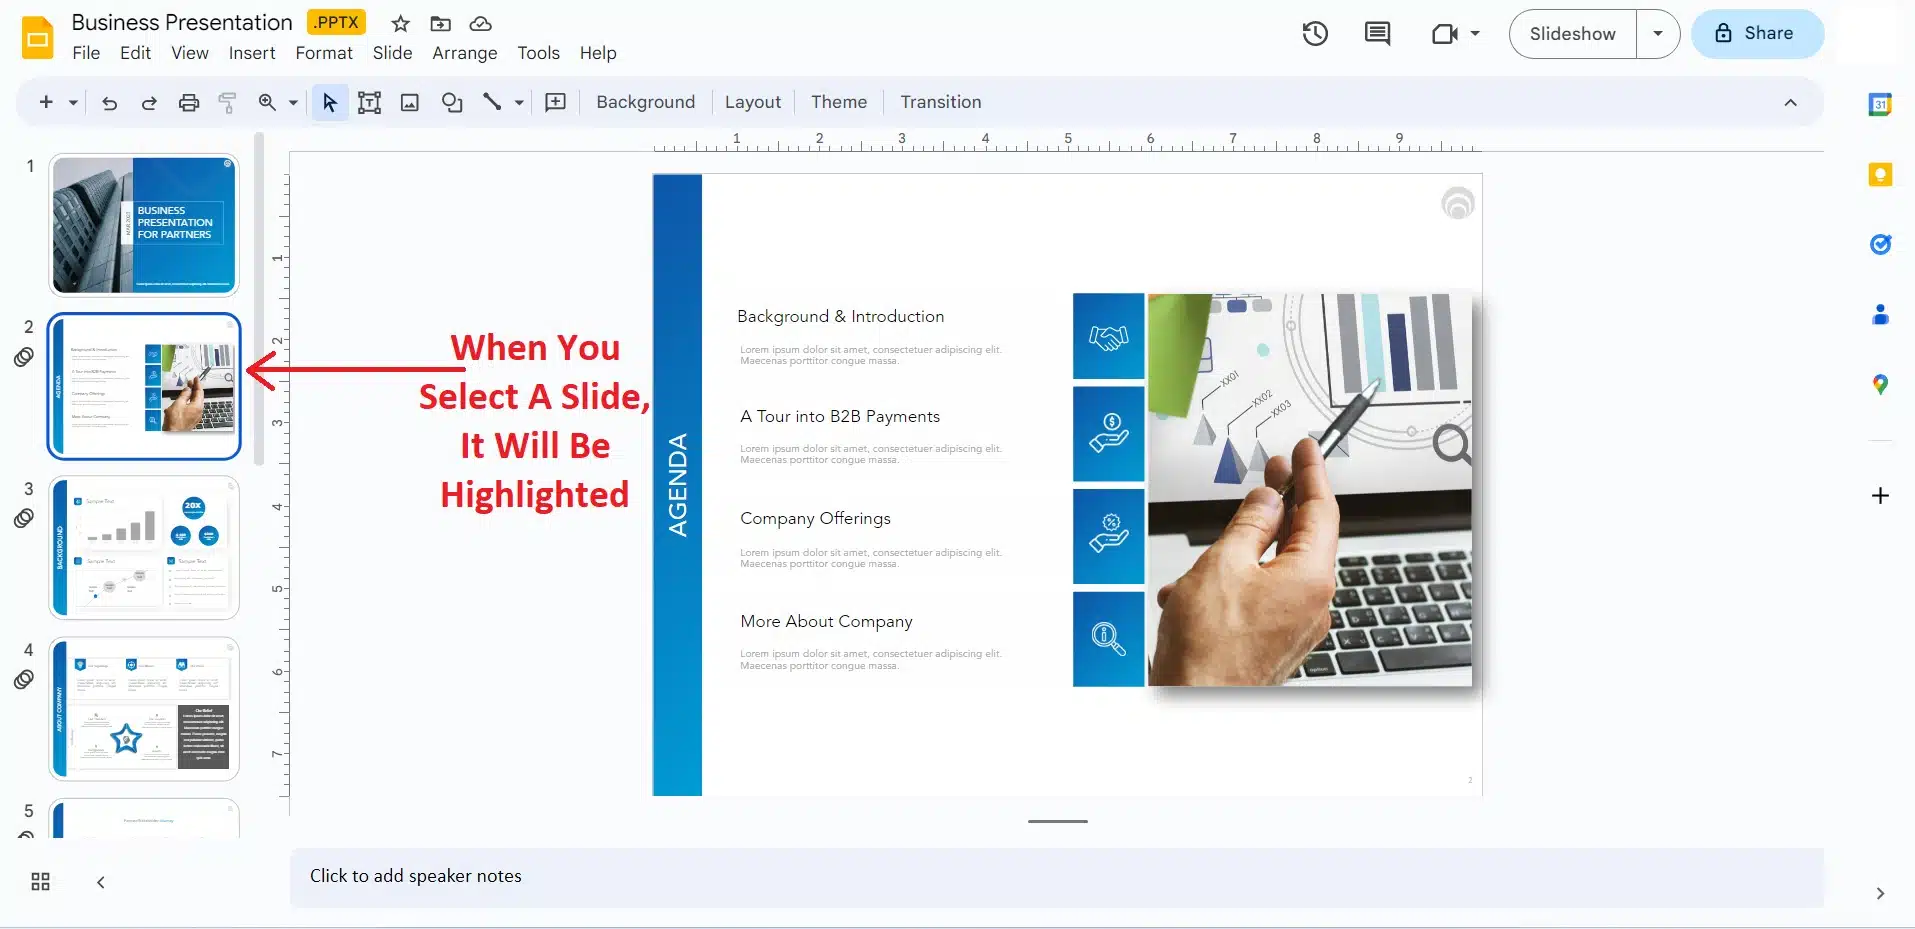
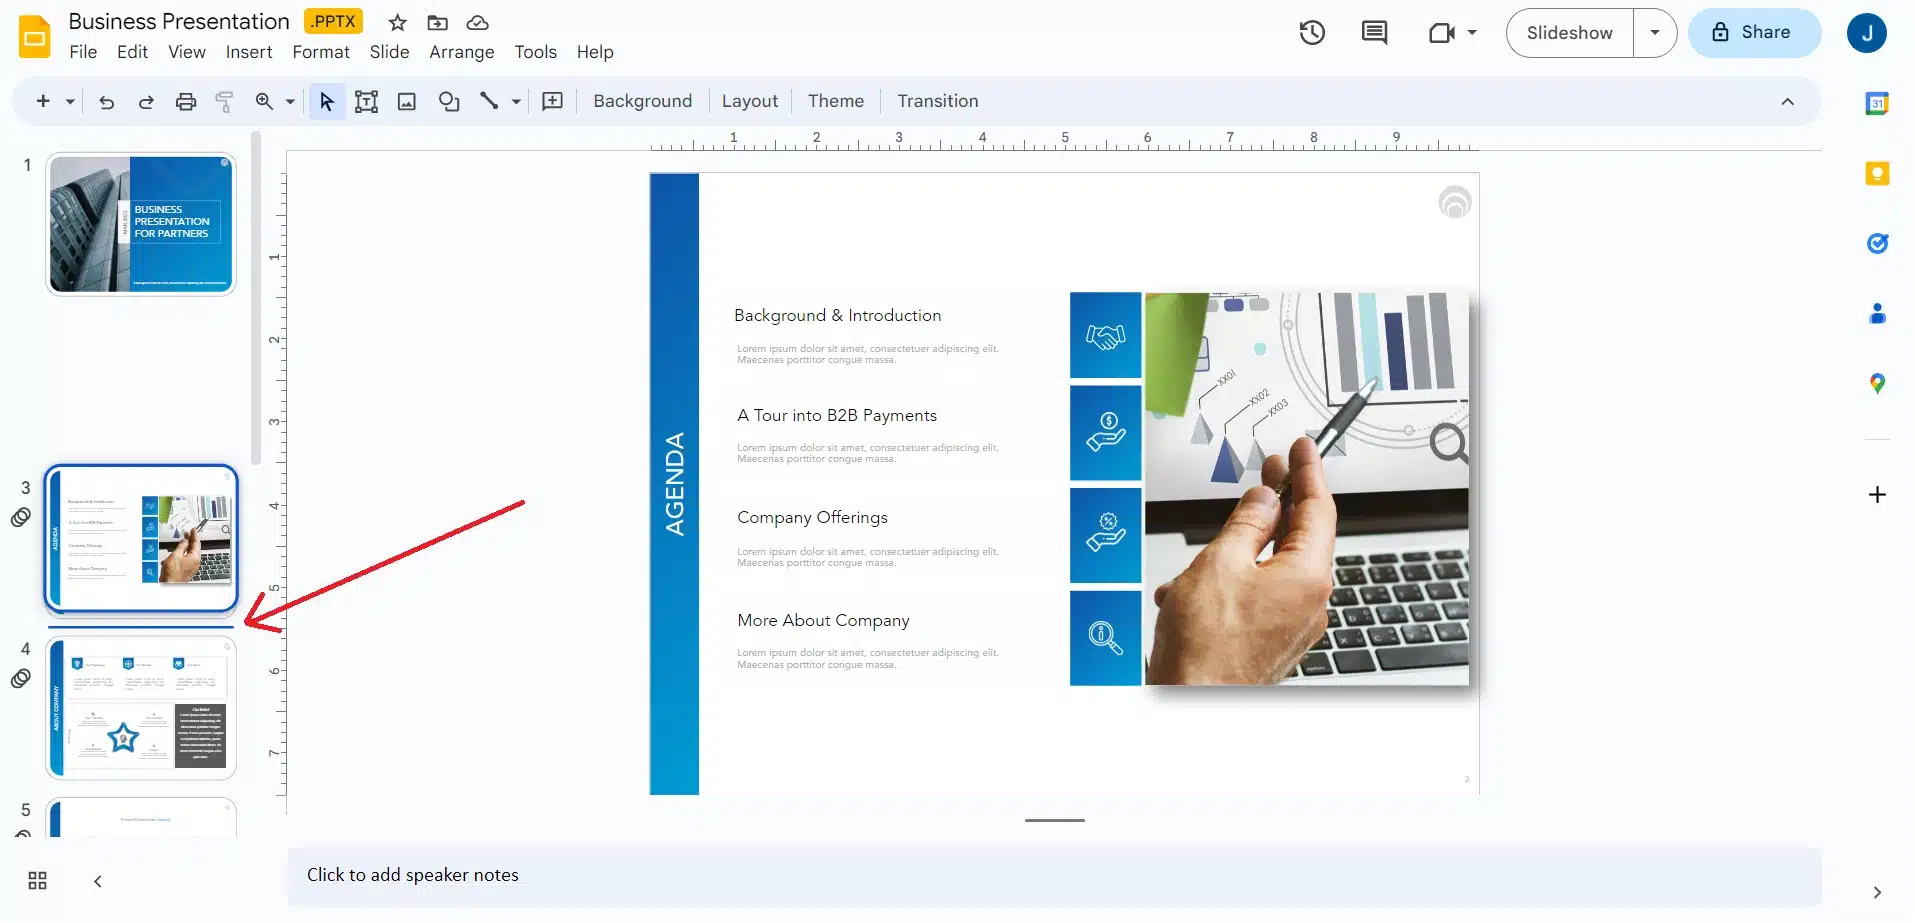
- In the left-hand pane, click on the slide you want to move to select it.

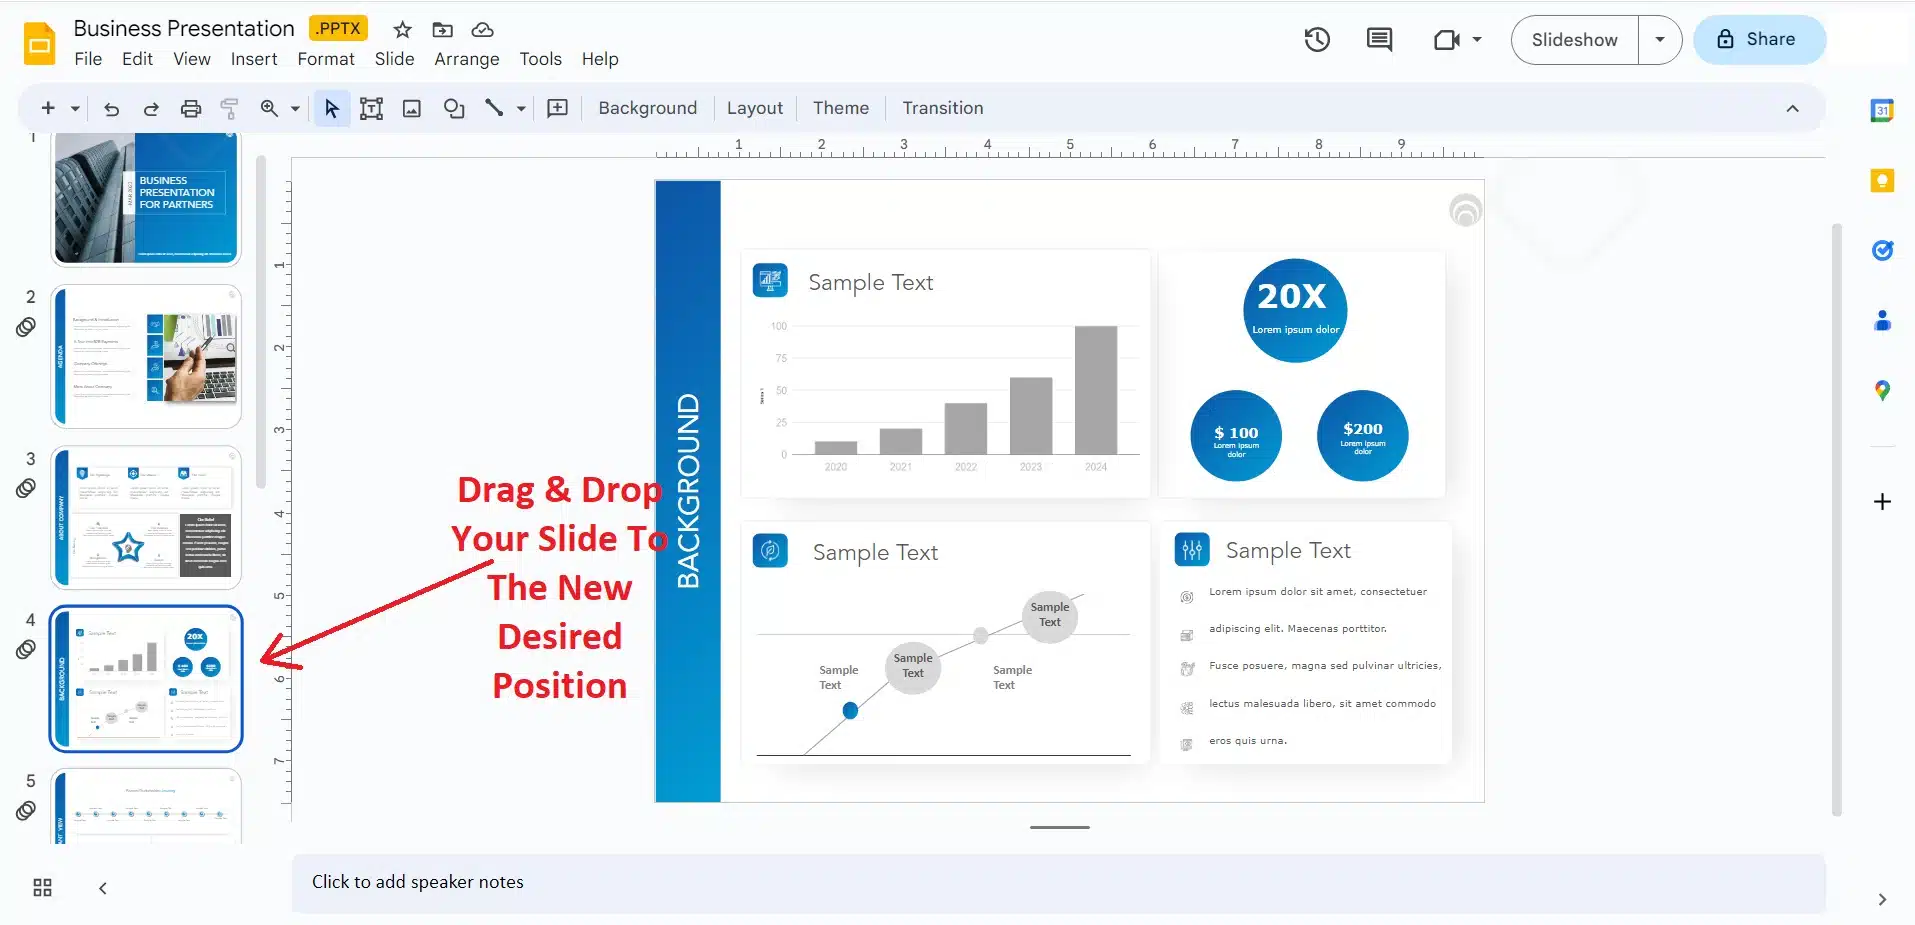
- Drag and drop the slide to the new position where you want it to appear. You can do this by clicking and holding the slide with your mouse or trackpad and then dragging it up or down to the new location. As you move the slide, you will see a horizontal line appear to indicate where the slide will be inserted when you release it.

- Release the mouse or trackpad button to drop the slide in its new position.

Now your slide will be moved to its new position in the presentation.
READ MORE: How To Add A New Slide In Google Slides?
How To Move A Slide In Google Slides On Android?
Here is a step-by-step process of how to make your slide move in Google Slides on an Android device:
- Open the Google Slides app on your Android device and click on the presentation you want to edit.
- Tap the thumbnail view icon in the top right corner of the screen.
- In the thumbnail view, find the slide you want to move and tap and hold on to it until it lifts slightly.
- While holding the slide, drag it to the new position where you want it to appear. As you move the slide, you will see a horizontal line appear to indicate where the slide will be inserted when you release it.
- Release your finger to drop the slide into its new position.
How To Move A Slide In Google Slides On iPhone/iPad?
Let’s see how to change the order of a slide in Google Slides on an iPhone:/iPad
- Open the Google Slides app on your iPhone/iPad and click on the presentation that contains the slide you want to move.
- Tap the thumbnail view icon on the top right corner of the screen.
- In the thumbnail view, find the slide you want to move and tap and hold on to it until it lifts slightly.
- While holding the slide, drag it to the new position where you want it to appear. As you move the slide, you will see a horizontal line appear to indicate where the slide will be inserted when you release it.
- Release your finger to drop the slide into its new position.
Note: You can also move multiple slides at once by selecting them using the checkbox icon in the top right corner of each slide and then dragging and dropping them to the new position. Whether you use inbuilt Google Slides Templates or from a third-party website like ours, the process of moving the slides does not change.
Here is a short video tutorial:
Conclusion
Mastering how to move a slide in Google Slides is essential for anyone who wants to create engaging presentations. With just a few simple clicks, you can rearrange your slides, reorganize your content, and bring your ideas to life. Learning how to move a slide in Google Slides is a great place to start if you want to spice up your next presentation. And with the step-by-step process mentioned in this article, you can learn how to do it effectively. Lastly, if you want to know more about the detailed process of creating amazing slideshows in Google Slides, do give our other articles a read!
FAQs
-
How Do You Move A Slide In Google Slides On Both Desktop And Mobile?
. To move a slide in Google Slides, you can use the drag-and-drop method on desktop and mobile devices.
-
How Can You Select Multiple Slides On Google Slides On A Computer?
. You can move multiple slides at once by selecting them using Shift+Click or Ctrl+Click, and then dragging and dropping them to the new position.
-
Will Moving A Slide Affect The Content On The Slide In Google Slides?
. No, moving a slide will not affect the content on the slide in Google Slides. The content will remain in the same place, and only the order of the slides will change.
-
Can I Move A Slide Between Two Different Presentations In Google Slides?
Using the copy-and-paste method, you can move a slide between two different presentations in Google Slides. First, copy the slide from the original presentation, then go to the new presentation and paste it where you want it to appear.
-
What If I Accidentally Move A Slide To The Wrong Position In Google Slides?
. If you accidentally move a slide to the wrong position in Google Slides, you can simply move it again to the correct position using the drag-and-drop method. If you have made other changes to the presentation since moving the slide, you can use the undo button (Ctrl+Z on Windows, Command+Z on Mac) to revert the changes and start again.
Table Of Content


Related posts from the same category

16 May, 2023 | SlideUpLift
How To Add A New Slide In Google Slides
Google Slides is an easy way to create group projects and presentations. Many people can work together at a time on a project to make a great presentation. Moreover, you

18 Feb, 2026 | SlideUpLift
How to Copy a Slide in Google Slides: Step-by-Step Guide
Learn how to duplicate, copy, and paste a slide in Google Slides using simple, step-by-step methods. This guide covers desktop shortcuts, right-click options, toolbar methods, and mobile steps for Android

9 Jun, 2023 | SlideUpLift
How To Delete A Slide In Google Slides?
Google Slides is a great place to make fantastic presentations for school, college, or work. But keeping your presentation minimal and decluttered is very vital. It is necessary not to

11 Mar, 2026 | SlideUpLift
How to Hide a Slide in Google Slides: Complete Guide
Learn how to hide and unhide slides in Google Slides without deleting them in this step-by-step guide. The blog explains simple methods like using the Skip Slide option, toolbar, and

12 Feb, 2025 | SlideUpLift
How To Link Slides In Google Slides?
Have you ever wanted your presentations to go beyond monotonous slides and really engage your audience in an amazing interactive experience? Imagine if your audience could jump to key sections,

16 May, 2023 | SlideUpLift
How To Move A Slide In PowerPoint
PowerPoint is an excellent presentation software that helps you create eye-catching yet informative slideshows. Whether you are making a business presentation or a school project, knowing how to move a

17 Apr, 2024 | SlideUpLift
How To Change Slide Size In Google Slides? [Easy Guide]
Don’t let a mismatched canvas be the obstacle to your dreams! Learn how to change slide size in Google Slides to make space for your innovation and creativity. Let the

29 Dec, 2023 | SlideUpLift
How to Make Checkboxes in Google Slides?
Google Slides is one of the most widely used presentation tools today. It is used for creating simple text and picture presentations and complex presentations. You can create surveys and

23 Sep, 2022 | SlideUpLift
How To Add Drop Shadows In Google Slides
Google Slides provide effects like drop shadows, which is an effective feature for presentation design. They can assist in making a flat image, text, or object more interesting by making

18 Nov, 2023 | SlideUpLift
How to Select Multiple Slides in Google Slides Presentations?
The feature to select multiple slides in Google Slides is a game-changer for anyone looking to boost efficiency in presentation creation. It enables you to make bulk edits, apply consistent