
How To Group & Ungroup In Google Slides (Step-by-Step Guide)
This blog walks you through how to group and ungroup elements in Google Slides in a simple, practical way. It covers grouping images, shapes, text boxes, and objects, along with shortcuts, tips, and troubleshooting solutions. If you’re searching for anything related to organizing, editing, or managing objects in Google Slides, this guide has you covered from start to finish.
Introduction
Creating clean, organized slides becomes easier when you know how to group in Google Slides. This guide covers how to group on Google Slides for better layout control. You’ll also learn how to group things on Google Slides efficiently. We explain Why Group Elements in Google Slides for smarter design decisions.
You’ll also discover How To Ungroup in Google Slides step by step. The tutorial explains how to ungroup images in Google Slides correctly. It also covers how to ungroup objects in Google Slides without errors. Plus, we share practical Tips for Effective Grouping and Tips for Ungrouping.
How To Group in Google Slides (Step-by-Step Guide)
If you’re wondering how to group in Google Slides while organizing your slide layout, the good news is that it’s quick and works the same for images, shapes, text boxes, and icons in Google Slides. Whether you’re trying to group a few pictures or figuring out how to group things on Google Slides for better alignment, the steps are simple.
Grouping allows multiple items to behave as one single object, so you can move, resize, and format them together.
Step 1: Select the Items You Want to Group
Before grouping, you need to highlight all the objects that should move together.
- Click on the first object.
- Hold the Shift key and click the other items.
OR - Click and drag your cursor across multiple objects to select them at once.
If you’re exploring how to group on Google Slides efficiently, selecting everything correctly is the most important first step.
Step 2: Group the Selected Objects
Once everything is selected, you can combine them into a single unit using any of these methods:
- Right-click on any selected item → Click Group
- Go to Arrange in the top menu → Click Group
- Use the shortcut:
- Windows: Ctrl + G
- Mac: Cmd + G
Once grouped using these Google Slides shortcuts, the items will move and resize together as one unit.

Why Group Elements in Google Slides?
- Move multiple items at once – Keeps related objects together without shifting layout.
- Maintain alignment – Prevents spacing and positioning from getting disturbed.
- Resize proportionally – Scale several elements together while keeping design consistent.
- Improve design efficiency – Saves time when adjusting complex slide layouts.
- Keep captions with images – Ensures text stays attached to visuals.
- Create structured layouts – Helpful for infographics, timelines, and process slides.
- Avoid accidental misplacement – Reduces the risk of moving one item out of alignment.
- Easier slide duplication – Copy and paste grouped sections without rearranging them again.
Grouping helps maintain clean layouts, especially when working with professionally designed Google Slides templates.
Tips for Effective Grouping
- Align objects before grouping – Ensure everything is properly positioned using Arrange → Align.
- Maintain consistent spacing – Balanced gaps make grouped elements look professional.
- Group only related elements – Keep images with captions, icons with labels, or shapes within the same section.
- Avoid grouping the entire slide – Over-grouping makes future edits difficult.
- Carefully check your selection – Confirm that only the intended objects are selected before grouping.
- Use keyboard shortcuts for speed – Ctrl + G (Windows) or Cmd + G (Mac).
- Test the group after creating it – Slightly move the group to confirm everything moves together.
- Regroup after editing – If you ungroup to modify something, group again to maintain layout consistency.
How To Ungroup in Google Slides (Step-by-Step Guide)
If you’re wondering how to ungroup in Google Slides, whether it’s images, objects, shapes, or other elements, the process is exactly the same in Google Slides.
Ungrouping allows you to separate previously grouped items so you can edit, move, resize, or delete them individually. Follow these simple steps:
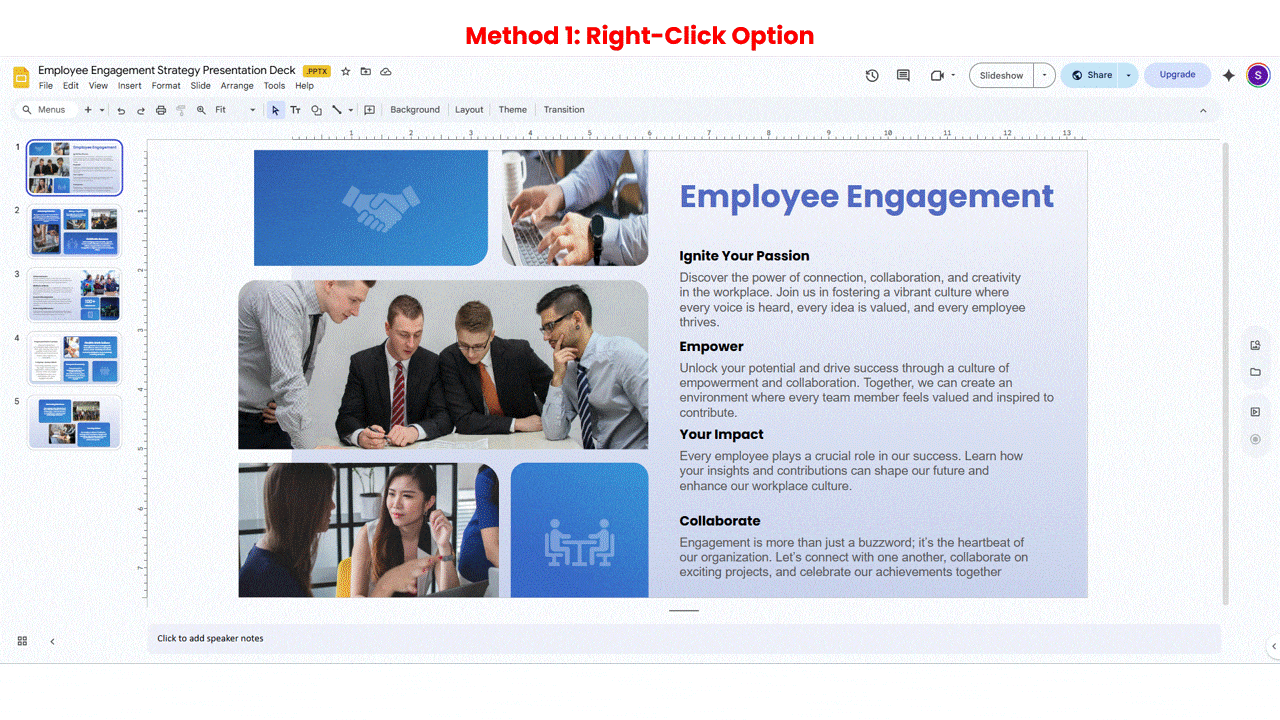
- Method 1: Right-Click Option
- Step 1: Open your presentation in Google Slides.
- Step 2: Click on the grouped element (it will be selected as one object).
- Step 3: Right-click on it.
- Step 4: Click Ungroup.
The grouped elements are now separated.
- Method 2: Using the Top Menu
- Step 1: Select the grouped object.
- Step 2: Go to the top menu and click Arrange.
- Step 3: Select Ungroup.
- Keyboard Shortcut (Fastest Way)
- Windows: Ctrl + Shift + G
- Mac: Cmd + Shift + G
Just like elements, images, and objects follow the exact same ungrouping steps in Google Slides.
How To Ungroup Images in Google Slides
If you grouped multiple images together and want to edit them separately:
- Select the grouped images
- Right-click → Click Ungroup
OR - Go to Arrange → Ungroup
How To Ungroup Objects in Google Slides
Whether you grouped shapes, text boxes, icons, or photos, the method for ungrouping objects in Google Slides remains identical:
- Select the grouped object
- Right-click → Ungroup
OR - Use the shortcut Ctrl + Shift + G (Windows) / Cmd + Shift + G (Mac)
Pro Tip: If the Ungroup option is greyed out:
- The item may not be grouped
- It could be a single image
- Or it might be part of a master slide
Tips for Ungrouping in Google Slides
- Make sure the object is grouped first – If “Ungroup” is greyed out, the items may not be grouped.
- Click once to confirm selection – A grouped object will highlight as a single unit with one bounding box.
- Use the shortcut for speed – Ctrl + Shift + G (Windows) or Cmd + Shift + G (Mac).
- Check Slide Master – If you can’t ungroup something, it might be part of the master layout.
- Ungroup step-by-step – If objects were grouped multiple times, you may need to ungroup more than once.
- Be careful with formatting – After ungrouping, alignment and spacing might shift slightly.
- Regroup if needed – After editing individual elements, you can group them again using Ctrl + G.
- Zoom in for precision – Helps when working with tightly arranged icons or shapes.
Mastering these simple tips will help you ungroup objects in Google Slides Templates smoothly, avoid common errors, and edit each element with complete control and precision.

Conclusion
Mastering grouping and ungrouping in Google Slides helps you design cleaner, more organized presentations. These simple techniques improve alignment, save time, and maintain layout consistency. Whether you’re arranging images, shapes, or text boxes, grouping keeps everything structured. Ungrouping gives you flexibility to edit elements individually when needed. With these tips, you can create more polished and professional slides effortlessly. Want to design faster across tools? Check out our complete guide to PowerPoint shortcuts for smarter presentation workflows.
FAQs
-
How to Group Objects in Google Slides?
- Open your presentation in Google Slides.
- Select multiple objects using Shift + Click or drag your cursor.
- Right-click on the selected items.
- Click Group.
- Or use the shortcut: Ctrl + G (Windows) / Cmd + G (Mac).
-
What is the easiest way to group images in Google Slides?
The easiest way to learn how to group images in Google Slides is by using the shortcut method in Google Slides:
- Select multiple images using Shift + Click.
- Press Ctrl + G (Windows) or Cmd + G (Mac).
This instantly groups the selected images into one single object.
-
How do I ungroup elements after grouping them in Google Slides?
If you’re wondering how to ungroup in Google Slides, the process is simple in Google Slides:
- Click on the grouped object.
- Right-click and select Ungroup.
- Or go to Arrange → Ungroup.
- You can also use Ctrl + Shift + G (Windows) or Cmd + Shift + G (Mac).
This will separate the elements so you can edit them individually.
-
Why is the group option missing in my Google Slides?
If the Group option is missing in Google Slides, it’s usually because:
- Only one object is selected (you need at least two).
- The item is part of the Slide Master or a placeholder.
- The objects are already grouped.
- A temporary browser issue (try refreshing).
Select multiple editable objects, and the Group option should appear.
-
Can I group text boxes and shapes together in Google Slides?
Yes, you can group text boxes and shapes together in Google Slides.
- Select the text box and the shape using Shift + Click.
- Right-click and choose Group.
- Or go to Arrange → Group.
- You can also press Ctrl + G (Windows) or Cmd + G (Mac).
Once grouped, they will move and resize together as one object.
-
How do I organize slides into sections in Google Slides?
In Google Slides, you can organize slides into sections to manage large presentations more easily.
- Go to the left slide panel.
- Right-click between two slides.
- Click Add section.
- Rename the section for better organization.
- Drag slides into different sections as needed.
Sections help you structure your presentation and navigate quickly during editing.
-
Is there a shortcut key to group objects in Google Slides?
Yes, Google Slides provides a quick keyboard shortcut to group objects:
- Windows: Ctrl + G
- Mac: Cmd + G
Simply select multiple objects first, then use the shortcut to group them instantly.
-
Can I group slides themselves in Google Slides or only objects?
In Google Slides, you can only group objects, not the slides themselves.
Slides cannot be grouped like shapes or images. However, you can organize slides using Sections:
- Right-click between slides in the left panel.
- Click Add section.
- Rename and manage slides within that section.
So, grouping works for elements on a slide, while sections help organize the slides themselves.
-
What should I do if grouping doesn't work in Google Slides?
If grouping doesn’t work in Google Slides, try these quick fixes:
- Select at least two objects – Grouping won’t activate for a single item.
- Check Slide Master – Items in the master layout can’t be grouped in normal view.
- Ensure objects are editable – Placeholders or locked elements may restrict grouping.
- Ungroup first if needed – The objects might already be grouped.
- Refresh your browser – Temporary glitches can disable options.
After checking these, try selecting the objects again and pressing Ctrl + G (Windows) or Cmd + G (Mac).
-
Are there any tips for managing groups in complex Google Slides presentations?
Yes, managing groups smartly in Google Slides can keep large presentations organized and easy to edit.
- Align and space elements properly before grouping to avoid layout shifts.
- Group related items only (e.g., icon + label, image + caption).
- Avoid nesting too many groups, as multiple layers can complicate edits.
- Ungroup carefully when editing, then regroup to maintain structure.
- Duplicate grouped sections instead of rebuilding layouts from scratch.
Using these practices helps maintain consistency and saves time in complex slides.
Table Of Content


Related posts from the same category

25 Oct, 2021 | SlideUpLift
Learn How To Make Quiz In Google Slides | Google Slides Tutorial
One of our greatest fears as presenters is a bored audience. We’re always looking for new ways to entice, engage, and excite the onlookers, whether they’re live participants in front

9 Nov, 2021 | SlideUpLift
Learn How To Apply Filters To The Picture In Google Slides | Google Slides Tutorial
Google Slides is an excellent tool for creating a professional-looking presentation. Images are the most significant item you can incorporate in your presentation to provide visual attention. Using incorrect images

1 Dec, 2022 | SlideUpLift
How to Add a Border in Google Slides
Google Slides is an incredible presentation tool that enables you to craft proficient, eye-catching business presentations. This tool offers users a variety of ways to enhance their presentations, including the

30 Mar, 2021 | SlideUpLift
How to use Google Slides | Google Slides Tutorial
One of the biggest challenges during the pandemic has been adapting to the changes in how we work and give presentations. What we need is a platform that allows us

29 Dec, 2023 | SlideUpLift
How to Make Checkboxes in Google Slides?
Google Slides is one of the most widely used presentation tools today. It is used for creating simple text and picture presentations and complex presentations. You can create surveys and

23 Sep, 2022 | SlideUpLift
How To Add Drop Shadows In Google Slides
Google Slides provide effects like drop shadows, which is an effective feature for presentation design. They can assist in making a flat image, text, or object more interesting by making

1 Oct, 2025 | SlideUpLift
Insert Calendar In PowerPoint And Google Slides: Quick Guide For Smarter Planning.
Do you want your presentations to be more organized, attractive, and professional? Learning how to add a calendar in PowerPoint or Google Slides will take boring schedules and deadlines and

18 Nov, 2022 | SlideUpLift
Learn How To Add Bullet Points In Google Slides
In today’s dynamic world, people have very less attention span to read and absorb information. Be it blogs, posts, or presentations, people generally scan through the information. To get people

6 Jan, 2023 | SlideUpLift
How to Add Header and Footer in Google Slides?
Google Slides is a powerful presentation tool allowing users to create professional-looking presentations easily. One important aspect of any presentation is the header and footer, which can provide context and

24 Jan, 2024 | SlideUpLift
How To Insert A Fraction in Google Slides?
Google Slides is not just a versatile tool for conveying ideas and strategies but also numbers and complex data. Some numbers and data are part of advanced equations, including fractions.