A Complete Guide to VBA PowerPoint: Download 10 Free Automation VBA Codes for Presentations!
Struggling with repetitive tasks in PowerPoint? There’s a smarter way to work.
Visual Basic for Applications (VBA) is Microsoft’s built-in programming language that allows users to automate tasks and customize functionality across Office applications, including PowerPoint. With just a few lines of VBA code, you can streamline workflows, manipulate slides programmatically, and add interactive elements to your presentations.
In this guide, we’ll walk you through the fundamentals of using VBA in PowerPoint. You’ll learn what VBA code is, how to write and run it, and how to access and navigate the VBA editor. We’ll also explore key components of the VBA environment, how to create and use macros, and how each piece works together to supercharge your presentation efficiency. Whether you’re a beginner or a business professional looking to save time and elevate your slides, this guide will give you the tools to get started with confidence.
What is VBA, and why use it for presentations? (VBA PowerPoint)
VBA, short for Visual Basic for Applications, is like a special language hiding inside Microsoft Office. It lets you really change things and automate stuff in your presentations. Unlike just using themes and transitions, powerpoint VBA code gives you total control over how your presentation looks and acts.
So, why bother with VBA powerpoint? If you make presentations for work, it can make your life easier by doing those repetitive tasks and simplifying your workflow.
Repetitive tasks like,
- Consistent Formatting (fonts, colors, styles)
- Logo and Branding Insertion
- Data Updates in Charts and Tables
- Standard Slide Layout Application
- Generating Reports from Presentations
- Batch Exporting Slides (images, PDFs)
- Creating and Managing Custom Shapes
- Automated Table Creation and Formatting
- Customizing Slide Transitions and Animations
- Generating Speaker Notes
- Updating Dates and Times
- Creating Interactive Elements (basic)
- Bulk File Operations
- Rearranging Slides
- Checking for Inconsistencies
After years in the presentation world, we at SlideUpLift have seen how PPT automation using VBA can free up your time to focus on what matters: your message.
Let us begin by understanding the most basic components of a VBA code and then the VBA editor. Later, we will learn in detail how to use each!
Basic Components of VBA You Should Know:
When you code VBA to automate PowerPoint presentation tasks, you’ll use key building blocks. Think of them as simple tools for a specific job in your PowerPoint VBA code.
1. Objects: The Items You Control
In Microsoft PowerPoint VBA, everything you work with is an object: slides, shapes, text boxes, and charts. Each has properties (how it looks) and methods (what it can do).
Example: A Slide object has a Background property. A Shape object has a Delete method. You use VBA code to change these or make them happen.
2. Properties: Object Settings
Properties are the settings of an object: color, size, and text. You change these with VBA code to customize your PowerPoint presentation.
Example: A text box Shape has a Text property. You can use VBA code to change the Text.
3. Methods: Object Actions
Methods are what an object can do. You use VBA code to tell an object to perform a method.
Example: The Slides collection has an Add method to add a slide. A Shape has a Copy method.
4. Variables: Temporary Storage
Variables are like temporary containers to hold data (numbers, text, objects) while your VBA scripts run.
Example: A variable can store the slideCount (number of slides).
5. Procedures: Code Blocks for Tasks (Subs & Functions)
Procedures are chunks of VBA code that do specific things.
Subs: Blocks of VBA code between Sub and End Sub that perform actions. Most VBA macros are Subs.
Example:

Functions: Like Subs, but they return a value.
Understanding these basics – Objects, Properties, Methods, Variables, and Procedures – is key to writing VBA code and automating your PowerPoint presentations. As you use VBA PowerPoint, you’ll see how they work together.
Now that we have the basic components of a VBA code, let’s write one!
Let us assume a very simple presentation with 3 slides, with titles like ‘Introduction’, ‘Key Points’, and ‘Summary’.
Here’s a VBA code for the presentation. I have kept the topic simple, so we can work with a simple VBA code; the more detailed and lengthy your presentation gets, the heavier and longer your VBA code gets!
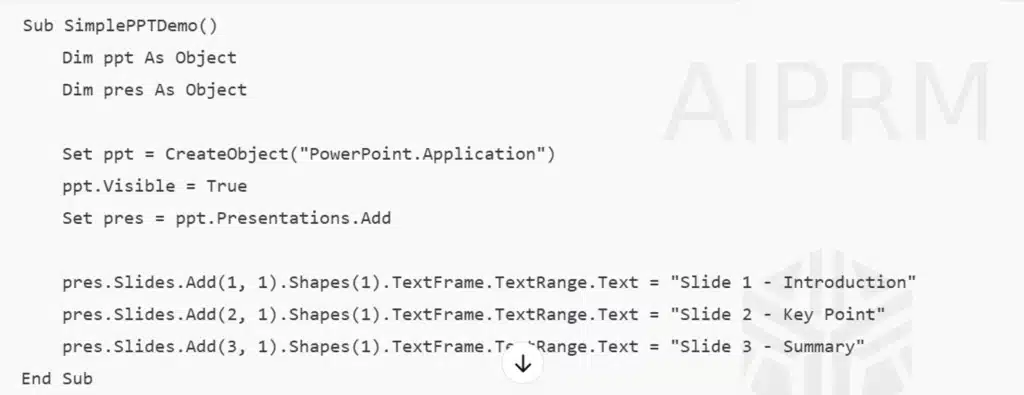
Our sample VBA Code: You can simply copy this code, and we will run it together.
Sub SimplePPTDemo()
Dim ppt As Object
Dim pres As Object
Set ppt = CreateObject(“PowerPoint.Application”)
ppt.Visible = True
Set pres = ppt.Presentations.Add
pres.Slides.Add(1, 1).Shapes(1).TextFrame.TextRange.Text = “Slide 1 – Introduction”
pres.Slides.Add(2, 1).Shapes(1).TextFrame.TextRange.Text = “Slide 2 – Key Point”
pres.Slides.Add(3, 1).Shapes(1).TextFrame.TextRange.Text = “Slide 3 – Summary”
End Sub

Great! Now that we have the code!, Let’s run it in the VBA Editor in powerpoint! Simply copy it for now. A quick tip, you can also create a VBA code using AI. You can ask ChatGPT to create a VBA code describing the kind of resultant presentation you want (something beyond the scope of this blog, but is discussed in this blog, ‘How to use ChatGPT to create a PowerPoint presentation?). You can check our YouTube tutorial on how to create a PPT using ChatGPT here.
Even if you are someone who has never seen the VBA code editor, be it Excel or PowerPoint, you will still be able to successfully run your code today!
Let’s understand the basic components of a VBA editor, and then let’s actually run this code here, okay?
Let’s dive in!
Components Of A VBA Editor
Using The VBA Editor:
To start writing or using VBA code in your Visual Basic editor for your PowerPoint presentation, you first need to open the VBA Editor. Here’s how:
Entering the VBA Editor:
Using the Developer Tab:
Make sure the Developer tab is visible on your PowerPoint Ribbon. If it’s not, go to File > Options > Customize Ribbon. In the right-hand pane, check the box next to Developer and click OK.
Once the Developer tab is visible, click on the Visual Basic button. This will open the VBA Editor in a separate window.
Using the Shortcut Key:
- The quickest way to open the VBA Editor from within PowerPoint is by pressing the shortcut keys Alt + F11.

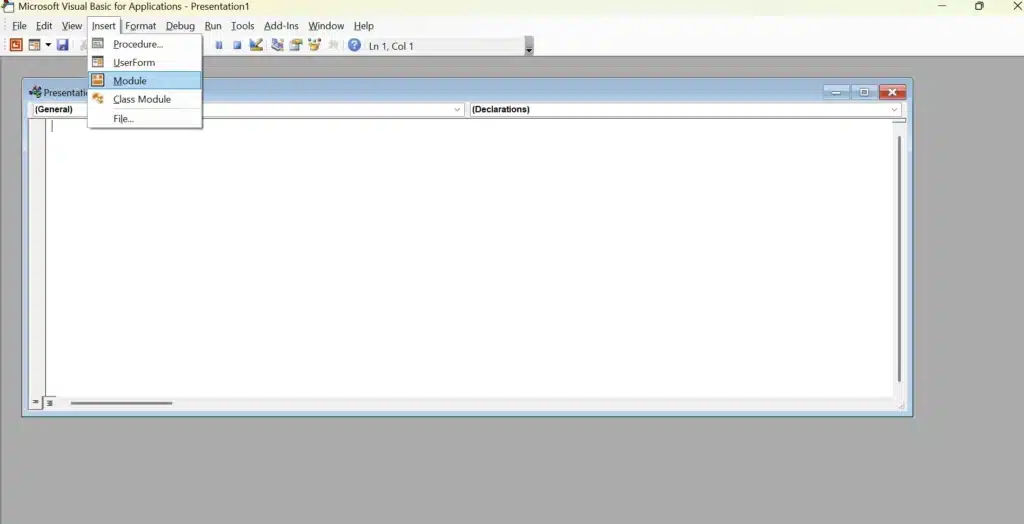
- Locate a Module: In the Project Explorer window, find your presentation file. If you don’t see a folder labeled “Modules,” you’ll need to insert one. Go to Insert > Module. A new module (usually named “Module1”) will appear.Open the Code Window: Double-click on the module where you want to paste the code. This will open the Code Window.Paste the Code: Place your cursor in the Code Window and press Ctrl + V (or right-click and select “Paste”) to paste the VBA code into the module.
Finally, let’s run the Code:

- From within the VBA Editor: Place your cursor anywhere within the VBA code you want to run (if it’s a Subroutine – starts with Sub and ends with End Sub). Then, press F5 or click the “Run” button (the green triangle) on the toolbar.From PowerPoint (as a Macro): Close the VBA Editor. In PowerPoint, go to the Developer tab and click Macros (or press Alt + F8). In the “Macro” dialog box, select the name of the macro you just pasted and click Run.Assign to a Shape or Text: You can also assign the macro to a shape or text box on your slide so that it runs when you click it (as we discussed earlier).


Remember to save your PowerPoint presentation as a Macro-Enabled Presentation (*.pptm) to ensure that your VBA code is saved with the file.Now that you have run the code, your powerpoint file is already created, it opens as a new PPT tab in your system’s PowerPoint.
PowerPoint Macros and VBA in Excel vs. PowerPoint


While VBA is used in both Excel and PowerPoint, it serves different primary purposes. In Excel, VBA automates calculations and data manipulation. In PowerPoint, it’s used to enhance presentations with automation and interactivity. Think of macros, which are sets of VBA instructions, as your shortcuts. Instead of repeatedly clicking through the same steps (like formatting titles or inserting logos), you record those actions as a macro using PPT VBA code. Then, you simply run the macro, and it executes those steps instantly.
In PowerPoint, macros can control slide transitions (powerpoint presentation VBA), adjust layouts with code, and power interactive buttons. Knowing VBA and macros allows you to automate tasks in both Excel and PPT, even enabling you to use Excel VBA to PowerPoint for easy data updates.
Yes, macros are like the individual working units you create within a VBA script.
Essentials Needed to Start with VBA
- Install Microsoft Office: Make sure you have Office installed, allowing access to the VBA Editor in PowerPoint.
- Show Developer Tab: Enable the Developer tab in PowerPoint’s ribbon via File > Options > Customize Ribbon.
- Understand Basic Automation: A general grasp of how automation works will help as you create macros and manage code.
Step-by-step Guide to Your First VBA Script
To write your first VBA script in PPT, you’ll create a macro for a frequent, simple task. Open the VBA Editor via Developer -> Visual Basic and insert a new module to write your code. Start with basic commands, like automatically advancing slides. Run your script with ALT+F8 or the Macro button to see your automation in action. Testing and adjusting help you learn VBA for more advanced uses.
Step 1: Open the VBA Editor
A quick revision on accessing the VBA editor,
- Enable Developer Tab: Go to File > Options > Customize Ribbon, check Developer, and click OK.
- Open VBA Editor (Method 1): Click the Visual Basic button on the Developer tab.
- Open VBA Editor (Method 2): Press the shortcut keys Alt + F11.
Step 2: Writing Your First Macro
Running Copied Macro (Different from Code Window Execution):
1. Open VBA Editor (Alt + F11).
2. Insert Module (Insert > Module) and paste your code.
3. Run the Macro (Outside the Code Window):
– In PowerPoint, go to Developer > Macros (Alt + F8).
– Select your macro’s name (e.g., SimplePPTDemo).
– Click “Run”. ‘ <— This executes the macro within PowerPoint.
4. Note: Pressing F5 in the Code Window runs the code directly within the editor, which might not interact with your current presentation as expected.
5. Running via the Macros dialog (Alt + F8) executes it within the PowerPoint environment.
6. Save as Macro-Enabled Presentation (*.pptm).
How to run a powerpoint presentation VBA Macro
Running a VBA macro is an easy and useful way to automate tasks in PowerPoint. First, go to the Developer tab. Then, click the Macros button or press ALT+F8 to open the Macro window.
Next, pick the macro you’ve created from the list and click Run to start it. You’ll immediately see the changes happen on your PowerPoint slide. This could be automatic formatting or updates to how you move through the slides that you set up with VBA code.
Keep in mind that macros only work in files saved as Macro-Enabled Presentations (*.pptm).
How to assign VBA script macros to buttons in powerpoint
- Insert a Button (Shape/Object):
Add a shape or object to your slide that you want to click. - Select the Button:
Click on the shape or object you just inserted. - Go to Action Settings:
Go to Insert > Action on the Ribbon. - Choose “Run macro”:
In the “Action Settings” box, under “Mouse Click,” select “Run macro”. - Pick Your Macro:
From the dropdown list, choose the VBA script macro you want the button to run. - Click “OK”:
Confirm your selection by clicking “OK”. - Test in Slide Show:
Run your presentation in Slide Show mode and click the button to test if your macro works.
Transform Your Workflow: Automate, Interact, and Brand with PowerPoint VBA
You can significantly enhance your PowerPoint presentations by leveraging VBA code and macros for various crucial aspects. Automating repetitive tasks, like consistent formatting across all slides or quickly updating information in multiple presentations, saves considerable time and ensures a professional look.
Furthermore, VBA code empowers you to create engaging user interactions by adding dynamic elements such as clickable buttons and content that adapts, significantly improving audience engagement and information retention.
Finally, maintaining a consistent brand identity across every slide becomes streamlined with VBA code, allowing for the easy implementation and updating of logos, brand colors, and fonts, ensuring all your presentations reinforce your company’s professional image efficiently.
10 VBA Ideas and Examples for PowerPoint Users

These are the sample VBA Codes for different PowerPoint actions you might need, you can simply copy these vba scripts and run them for your presentations.
Heads up! You might notice that after your first macro or VBA script runs, others get blocked. This is due to Microsoft Office’s built-in security, often called the “Security Soup,” which protects you from potentially harmful code. Let’s explore what this “Security Soup” is and how to adjust your settings so all your future scripts run without a hitch.
What is a Security Soup in VBA PowerPoint?
PowerPoint’s “Security Soup” is its built-in protection that often blocks VBA code (macros) when you open a presentation. To allow your VBA PowerPoint presentation features to work, you need to adjust the Macro Settings in the Trust Center.
Quick Steps to Change Macro Security:
- Go to File > Options > Trust Center > Trust Center Settings… > Macro Settings.
- Choose a setting:
- Disable with notification (default, gives you a warning).
- Disable except digitally signed (more secure if you trust the signer).
- Enable all macros (use with caution!).
- Consider adding folders you trust to Trusted Locations in the Trust Center.
- Click OK to save your changes.
Conclusion
To wrap things up, learning VBA powerpoint can really make your presentations much better. It helps you automate those tasks you do all the time, making your presentations more engaging and keeping your brand consistent. By following the steps in this guide, you can learn the basics of VBA and start using some pretty advanced features. This will turn your presentations into powerful tools that will impress your audience. So go ahead, dive into the world of VBA and see how it can change your presentations for the better. If you want even more tips and tricks to improve your skills, don’t hesitate to reach out for a free chat!
FAQs
-
What exactly can VBA do for my PowerPoint presentations?
VBA (Visual Basic for Applications) allows you to go beyond standard PowerPoint features by automating repetitive tasks like formatting and data updates, enhancing user interaction with clickable buttons and dynamic content, and ensuring consistent branding across all your slides.
It essentially lets you customize and supercharge your presentations to be more efficient and engaging.
-
I'm new to coding. Is it difficult to start using VBA in PowerPoint?
While it might seem daunting at first, getting started with VBA in PowerPoint is manageable by focusing on the basics.
The first steps involve enabling the Developer tab and opening the VBA Editor. You can begin by creating simple macros to automate tasks you frequently perform.
Numerous online tutorials are available to guide you through the learning process, and with practice, you’ll gradually move to more complex VBA projects.
-
Is using VBA in PowerPoint a security risk?
Using VBA does come with potential security considerations. Microsoft Office includes security features (the “Security Soup”) that often disable macros by default to protect against malicious code.
It’s crucial to adjust your Trust Center settings carefully and only enable macros from trusted sources. Testing VBA code on a safe computer first is always a good practice to mitigate risks.
-
How do I run a VBA macro in PowerPoint?
Running a VBA macro is straightforward. First, ensure your presentation is saved as a Macro-Enabled Presentation (*.pptm). Then, you can run a macro by going to the Developer tab and clicking the Macros button (or pressing Alt + F8).
Select the desired macro from the list and click “Run.” You can also assign macros to buttons or shapes on your slides for easy, interactive execution during a presentation.


