


PowerPoint Shortcuts: The Beginner-to-Pro Keyboard Cheat Sheet
PowerPoint is one of the most powerful tools for creating presentations. However, working in PowerPoint can become time-consuming, especially when you have to click through menus for every small task. Therefore, instead of searching through the tabs and menus, the most convenient solution is to use PowerPoint keyboard shortcuts. They come in handy and are easy to remember, so you do not end up sitting for hours just to get that alignment right or keep copy-pasting elements on your slides. They’re efficiency tools hidden in plain sight.
By using these PowerPoint shortcuts, you can cut repetitive actions down to a single keystroke. In this blog, we will help you learn these amazing shortcuts with easy-to-follow steps so you can reclaim those hours spent formatting and aligning your presentation and focus more on the content. Stay until the end to unlock the master key to PowerPoint wizardry.
Let’s start with the basic shortcuts and make our way to the advanced key shortcuts in PowerPoint.
Basic PowerPoint Key Shortcuts:
Being a new user of PowerPoint can slow down your process. Knowing some basic shortcuts will help you save time and make learning more interesting. These basic shortcuts are the building blocks of working in PowerPoint. These commands, like how to start a PowerPoint show from a shortcut, the shortcut key for new slide in PowerPoint, help you navigate and manage your slides quickly without reaching for the mouse every time.
| Action | Shortcut | Use Case |
| New presentation | Ctrl + N | Start a fresh deck |
| Open file | Ctrl + O | Access existing presentations |
| Save | Ctrl + S | Prevent data loss |
| Undo/Redo | Ctrl + Z / Ctrl + Y | Fix mistakes quickly |
| Black screen | B | Pause attention |
| White screen | W | Spotlight moment |
| Exit slideshow | Esc | Stop presenting |
Slide Creation and Navigation Shortcuts:
Once your presentation is set up, you may need to make frequent changes to the slides, such as moving and duplicating elements throughout the presentation, from time to time. These shortcuts, like the PowerPoint full-screen shortcut, the PowerPoint strikethrough shortcut, etc., can help you edit the structure with greater ease. No need to click around slide-by-slide. Just tap a few keys and go!
| Action | Shortcut | Use Case |
| New slide | Ctrl + M | Quickly add new slides |
| Duplicate slide | Ctrl + D | Save layout setup time |
| Move slide | Ctrl + Shift + ↑/↓ | Rearrange quickly |
| Start slideshow | Shift + F5 | Present from the beginning |
| Zoom in | Ctrl + Mouse scroll | Zooms in and out on the slide view |
Text Formatting Shortcuts:
These handy shortcuts help you work efficiently with the content you use in your presentation. You will not have to click on the ribbons every now and then to use these perks. Just select the text and use the following shortcuts:
| Action | Shortcut | Use Case |
| Bold | Ctrl + B | Emphasize key text |
| Italic | Ctrl + I | Add stylistic emphasis |
| Underline | Ctrl + U | Highlight important words |
| Text resize | Ctrl + Shift + >/< | Increases/decreases the text size |
Object & Formatting Shortcuts:
These shortcuts work directly on objects — shapes, images, icons, and text boxes — so you can duplicate, reformat, and reorganise a slide’s elements without leaving the keyboard.
| Action | Shortcut | Use Case |
| Duplicate object | Ctrl + D | Copy an object in place, then press again to repeat spacing |
| Repeat last action | F4 | Reapply your last change to the next object |
| Copy formatting (Format Painter) | Ctrl + Shift + C | Grab font, color, size, and effects from an object |
| Paste formatting | Ctrl + Shift + V | Apply that formatting to another object |
| Open Selection Pane | Alt + F10 | Name, hide, and reorder objects on a busy slide |
Here are some advanced PowerPoint shortcuts:
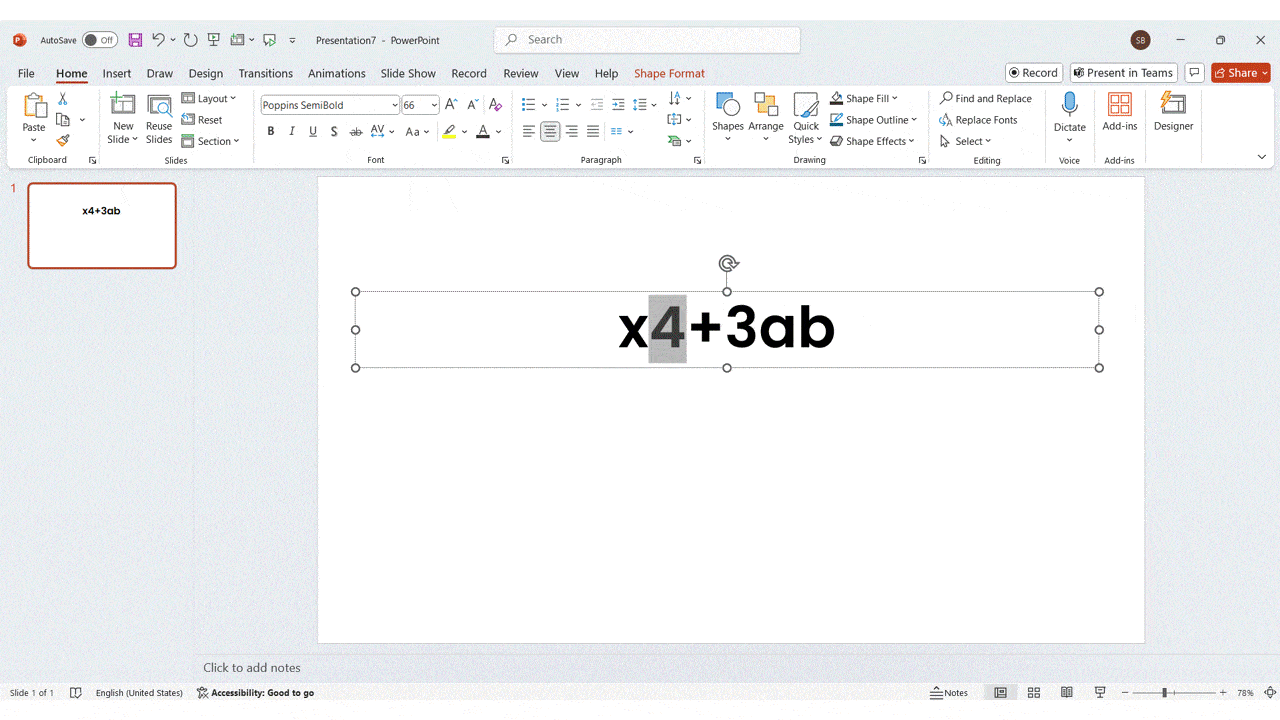
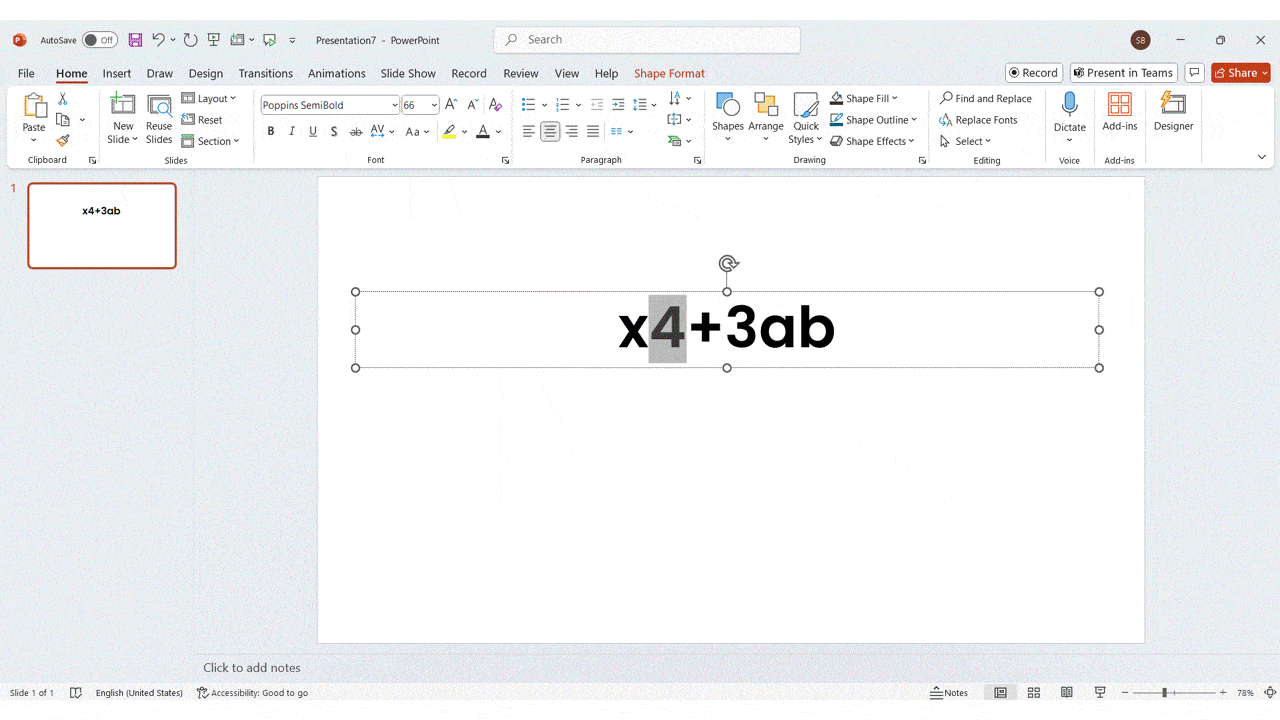
Superscript Shortcut in PowerPoint:
Superscript is when a letter, number, or symbol is made smaller and raised slightly above the normal line of text.
For example: normal- x2, with superscript- x² [the 2 goes up and looks smaller]
This is usually used in math formulas ( E = mc²), ordinals (1ˢᵗ, 2ⁿᵈ), and footnotes (Like this¹). In PowerPoint, you can make any text into superscript to make your slides look cleaner and more professional.
Here are the steps you can follow:
Step 1: Select the character or text you want to turn into a superscript.
Step 2: Make sure you are in the ‘Home’ tab. In the ‘Font’ group, click the small arrow in the bottom-right corner. This will open the launcher.
Step 3: In the ‘Effect’ section, click on ‘Superscript.’ And you are done!
Or, you can use this simple keyboard shortcut for superscript in PowerPoint for that: Ctrl + Shift + + [plus key].
Subscript Shortcut in PowerPoint:
Subscript in PowerPoint is when a letter, number, or symbol is made smaller and lowered slightly below the normal line of the text.
For example: normal- H2O, with subscript- H₂O [the 2 goes down and looks smaller]
This PowerPoint subscript shortcut is often used for science (chemical formulas), math-related slides (math expressions), or footnotes (Text₁) when you want to lower any character from the main line. Here’s how you can do that:
Step 1: Select the character or the text you want to subscript.
Step 2: Make sure you are in the ‘Home’ tab. Now, expand the launcher in the font group.
Step 3: In the ‘Effect’ section, click on ‘Subscript’ and click on OK. And you are good to go.
Or, you can use this simple keyboard shortcut for that: Ctrl + = (equal sign key)
Strikethrough PowerPoint Shortcut:
When you want to draw a line through your text, as if you are slicing it horizontally, you can use a strikethrough shortcut for that. This is often used to show something that is done or removed. Or for crossing out mistakes or old ideas from the list.
Follow the steps given below:
Step 1: Select the text you want to strike out.
Step 2: Go to the ‘Home’ tab.
Step 3: In the ‘Font’ group, click the small arrow in the bottom-right corner. This will open the launcher.
Step 4: In the ‘Effect’ section, click on ‘Strikethrough’ and click on OK.
Note: PowerPoint doesn’t have a native keyboard shortcut for strikethrough — the menu steps above are the fastest way to apply it.
Presenter Tools in Slideshow mode:
An interactive presentation in real time leaves a positive impact on the audience. PowerPoint offers built-in tools that smartly highlight the key points while you are presenting:
| Tool | Shortcut | Description |
| Laser Pointer | Ctrl + L | Turns your cursor into a red laser pointer to guide the audience visually |
| Pen Tool | Ctrl + P | Activates the pen so you can draw or annotate during the presentation |
| Eraser Tool | E | Erases pen marks made during slideshow mode |
Hyperlinking in PowerPoint:
One of the most underrated yet powerful features in PowerPoint is hyperlinking. With just a few clicks, you can allow the users to jump between slides and open websites, all of this from within your deck.
This amazing feature lets you connect your slide content to:
- Another slide in the same presentation.
- A website.
- An email address.
- A file or document on your computer.
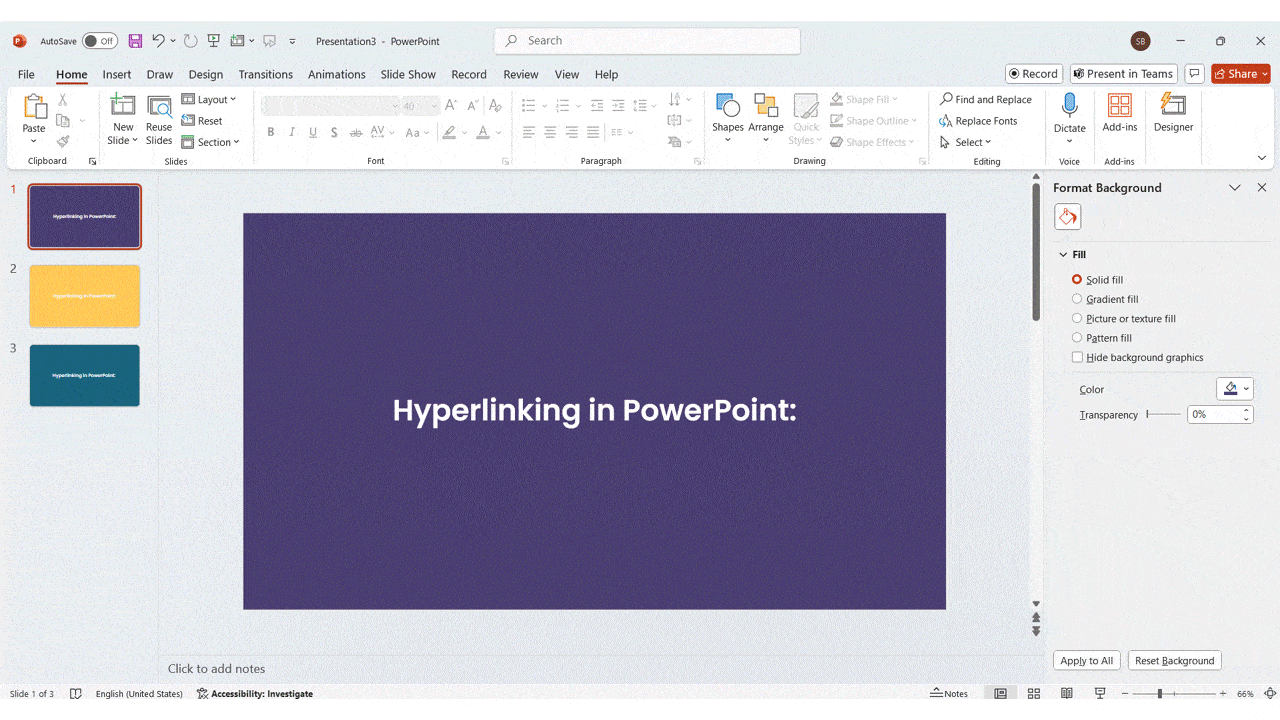
When you click on it during the presentation, the hyperlink takes you directly to the linked slide. This makes the whole presentation more interactive and well-connected. Here are the steps on how you can do it:
Step 1: Select the text, image, or shape you want to turn into a link.
Step 2: Right-click and select ‘Link’ or ‘Hyperlink.’ Or press ‘Ctrl + K’ to open the dialog box.
Step 3: From the set of options that appear in the ‘Link to:’ section, select ‘Place in this document’.
Step 4: In the next box, select a location in the document where you want the link to appear.
Step 5: Select the slide number and click on ‘OK.’
Pro-Level PowerPoint Key shortcuts:
At SlideUpLift, we believe great presentations start with great tools and smart techniques. These advanced shortcuts will give you speed, control, and zero mouse drama in your game and make you a PowerPoint wiz. These incredible shortcuts will give you access to the ultimate elements that separate casual users from true presentation pros. More like a total slide control at your fingertips.
| Action | Shortcut | Use Case (In Simple Words) |
| Move the slide up/down in the slide sorter | Ctrl + ↑ / ↓ | Rearranges your slide order quickly without dragging |
| Open PowerPoint options/settings | Alt + F + T | Opens the settings/preferences window for PowerPoint |
| Resize while keeping a proportion | Shift + Drag | Resizes images or shapes evenly from its corners |
| Switch between open presentations | Ctrl + Tab | Jumps to another open PowerPoint window |
| Justify text alignment | Ctrl + Shift + J | Aligns text evenly on both left and right sides (clean blocks) |
| Open font formatting dialog | Ctrl + T | Opens a box where you can change font style, spacing, etc. |
| Open the Paste Special menu | Ctrl + Alt + V | Gives you paste format options like image, text, or object style |
When you are preparing for a presentation, it is not about having great slides; it is also about how well you deliver them. To deliver it properly, you would need to have notes prepared or be ready before the next slide comes up. What if I told you that there is an amazing shortcut that you can use for that?
The shortcut, which enables this in a single slide, is ‘Alt + F5’. This special shortcut opens a special screen called the ‘Presenter View’ that gives you full control over your presentation, all in just one screen. This is a smart way to practice, rehearse, and stay organized during your speech.
This screen view lets you see:
- Your current slide
- The next slide
- Your speaker notes
- A clock/timer
- Tools like- laser pen, pen, zoom in/out slide, white/black screen, and more options to use.
This shortcut enables the user:
- To practice presentation with all the notes visible.
- To see which slide is coming next.
- To test animations or transitions before going live.
- To prepare, if you are using two screens, even when you just have one.
Conclusion:
Mastering PowerPoint does not mean endlessly clicking through the menus. It means working smarter, not harder. These PowerPoint shortcut keys may seem small, but they really help you build, edit, and present your slides faster and with more confidence. The more you use them, the more natural they will feel. They may take some practice to use each time you work in PowerPoint. However, they will be much better than clicking the mouse endlessly.
If you want to make your presentation-making skills stronger and impactful, browse through our series of PowerPoint tutorials and strengthen your game to ace every room you present in. Shortcuts are just one way to speed things up — for the bigger feature-level tricks like Morph, Slide Master, and playing video behind your content, see our guide to PowerPoint hacks you didn’t know.
FAQs
-
What are the most useful PowerPoint shortcuts everyone should know?
They are quick keyboard commands that make working in PowerPoint easier. These PowerPoint presentation shortcuts make tasks like copying, formatting, or aligning elements in a presentation faster. Instead of clicking around with your mouse, you can press a few keys to save a lot of time.
-
What are the most essential PowerPoint shortcuts for beginners?
There are many basic shortcuts that can be used in PowerPoint. They include creating a new presentation (Ctrl + N), adding a new slide (Ctrl + M), starting the presentation (Shift + F5), and undoing all the mistakes (Ctrl + Z). They are great to learn in the beginning as they help you handle slides and fix errors quickly.
-
What is the shortcut to start a PowerPoint presentation?
To start your slideshow from the beginning, press F5 or Shift + F5. For practicing with the speaker notes and a timer, you can press Alt + F5 to open the Presenter View.
-
What is the shortcut to center a picture in PowerPoint?
To center a picture or any object in the presentation for that matter, select the picture or object you want to center. Then use Alt + H, then G, then A, and finally press C. This will align it to the center. It horizontally aligns it to the middle of the slide.
-
How do I group or ungroup objects with keyboard shortcuts?
To group the objects, press Ctrl + G. And to ungroup them, press Ctrl + Shift + G. Grouping the objects will help you move and format multiple items at once, like icons, shapes, or images.
-
Is there a shortcut to increase or decrease font size?
There absolutely is. Use Ctrl + Shift + > to increase the font size and Ctrl + Shift + < to decrease it. You can now do this without opening the menus all the time.
-
Can I customize or create my own PowerPoint shortcuts?
Not exactly. Powerpoint does not allow you to create brand-new keyboard shortcuts from scratch. But, you can tweak it up a little by using the Quick Access Toolbar (QAT) and then access them using keyboard shortcuts. This is how you can do that. First, go to PowerPoint:
- Click the small down arrow on the top-left corner (above the File tab).
- Select “More Commands.”
- Choose any command (like Align Center, Insert Shape, or Selection Pane).
- Click Add >> to move it to the Quick Access Toolbar.
- Reorder them as needed.
- Hit OK.
-
Can I use PowerPoint shortcuts to improve accessibility or productivity?
Certainly, shortcuts help reduce the need to depend on the mouse, which is helpful for users with mobility challenges. And the bonus point is that it speeds up the common yet painful tasks like formatting, navigating, and presenting. This makes you more productive and focused during your work.
Table Of Content


Related posts from the same category

28 Jan, 2022 | SlideUpLift
Present TED-style: Six Things TED Presenters Do That You Can Copy And Use In Your Next Presentation
It's a harsh reality of the digital age: capturing and maintaining another person's attention is becoming increasingly difficult. While there is minimal factual information on the typical person's attention span

11 May, 2023 | SlideUpLift
9 Types of Presentation You Must Know (+ Tips)
The blog explains nine key types of presentations—from informative, demonstrative, and persuasive to instructional, inspirational, entertaining, sales/pitch, status/progress, and educational/training—clarifying their purposes and when to use each for effective communication;

25 Mar, 2019 | SlideUpLift
15 PowerPoint Hacks You Didn’t Know for More Effective Presentations
Quick Answer: The most useful PowerPoint hacks include playing a video continuously behind your content, using Sections and Summary Zoom for smooth navigation, applying Morph transitions, embedding fonts before sharing,

8 Feb, 2022 | SlideUpLift
Ten Presenting Styles : What Kind Are You?
Do you feel nervous when it comes to public speaking? Don’t worry; you’re not alone. Do you know that according to research, one of the biggest phobias in 2014 was

6 Jan, 2021 | SlideUpLift
How To Start a Presentation : Make A Strong First Impression
Presenting well requires preparation, and the first step is mastering the art of the opening statement. You may pique your audience's curiosity by crafting a captivating introduction to your presentation.

16 Nov, 2022 | SlideUpLift
15 Presentation Ideas to Engage Any Audience in 2026
Your audience is one notification away from leaving you. That's the reality every presenter works against in 2026: attention is scarce, patience for slow, data-heavy slide decks is gone, and

22 Aug, 2024 | SlideUpLift
Best Professional Presentation Examples To Inspire You [+ Premium Templates]
It’s crucial for professionals to deliver outstanding and engaging presentations that convey essential information to their teams and stakeholders. Most professional PowerPoint themes are the backbone of corporate presentations and

30 May, 2024 | SlideUpLift
10 Best Free PowerPoint Templates You Need To Check Out
The internet is full of templates for presentations, but finding a free template that matches your needs and compatibility is frustrating. Not anymore! We have compiled a list of our

10 Nov, 2022 | SlideUpLift
Top 8 PowerPoint Hacks for Consultants
Consulting is the business of selling ideas and concepts, and there's no question that presentations are the primary medium to demonstrate these ideas. Therefore, having a good understanding of dominant

20 Aug, 2021 | SlideUpLift
Storytelling Tips to Change the Way You Present Ideas
A piece of oft-given advice surrounding making presentations is that in order to engage an audience, your presentation and speech need to have a narrative. And we wholeheartedly agree with