


Step-by-Step Guide: How to Create a PowerPoint Template
If you use PowerPoint often to make professional presentations, you probably have realized that the built-in PowerPoint Library doesn’t have sufficient PowerPoint templates available for all types of presentation needs.
As it turns out, though, you can make your custom PowerPoint template at any time, so that when you need a similar presentation again, you just have to open the template. In this blog, we will learn how to create a PowerPoint template from scratch, covering everything from selecting the right design elements to ensuring brand consistency and enhancing visual appeal for your presentations.
What is a PowerPoint template?
A PowerPoint template is a blueprint of a slide or group of slides that we save as a .pptx file. Templates can contain layouts, color themes, PowerPoint backgrounds, fonts, shapes, graphs, and even content. Learning how to create a template in PowerPoint allows you to develop reusable templates and store them. Whether for internal reports, client proposals, or executive updates, templates streamline your presentation process.
Why should you use a PowerPoint template?
Knowing how to create a presentation template in PowerPoint helps your team work smarter. It gives you a head start on a lot of things while boosting your speed, increasing consistency, and all the features you need for your presentation to stand out. Using it:
- Saves time and boosts Efficiency.
- Maintains Brand Consistency.
- Enhances Professionalism & Visual Appeal.
- Reduces Errors & Design Inconsistencies.
- Improves Collaboration & Onboarding.
- Adapts Easily to Different Needs.
- Engages the Audience More Effectively.
Once you learn how to create a PowerPoint template, you can design reusable templates for different business needs. A well-organized template library allows anyone in the company to create professional presentations that reflect your brand identity.
Below, we will explain how to build a simple PowerPoint template that you can use to create your presentations.
Above is an example of a simple PowerPoint template that can be used to create your brand presentations. We will make the same PowerPoint presentation template in this tutorial to explain the step-by-step process with screenshots. You will be able to create your own custom PowerPoint template for your brand for different presentation needs.
How to create a Template for PowerPoint?
Here are two ways to create a template on PowerPoint:
- From scratch or
- From an existing template.
Creating one from scratch allows you to design every aspect according to your specific needs and preferences, giving you full creative control. On the other hand, using an existing template can save time and provide you with a professional layout that you can easily customize to fit your content. Both methods have their advantages, and the choice depends on your comfort level and the time you have available.
Step-by-Step Guide: How to create a Custom PowerPoint Template from scratch?
Understanding how to create a custom PowerPoint template from scratch can be a rewarding process. It allows you to systematically decide how you want your presentation to look. Customizing all the features that are used to create a template not only ensures full control but also gives you an opportunity to align every visual element with your brand identity and communication goals.
In this guide, we’ll walk you through everything you need to know about how to create a custom PowerPoint template tailored to your needs, one that’s not only functional but also flexible enough to suit a variety of business needs.
So, let’s get on with it!
Step 1: Open The Slide Master View
Start by opening the Slide Master view. This is a crucial step in the process of creating a PowerPoint template. This is the feature that allows you to make universal changes, later applying to all the slides in your presentation.
- To access the Slide Master, go to the “View” tab and click on the “Slide Master.”
In this view, customize the main slide to set the foundation for your presentation. Changes to background, fonts, or logos here will automatically apply to all other slides, saving you time. Begin by choosing brand-aligned fonts and colors.
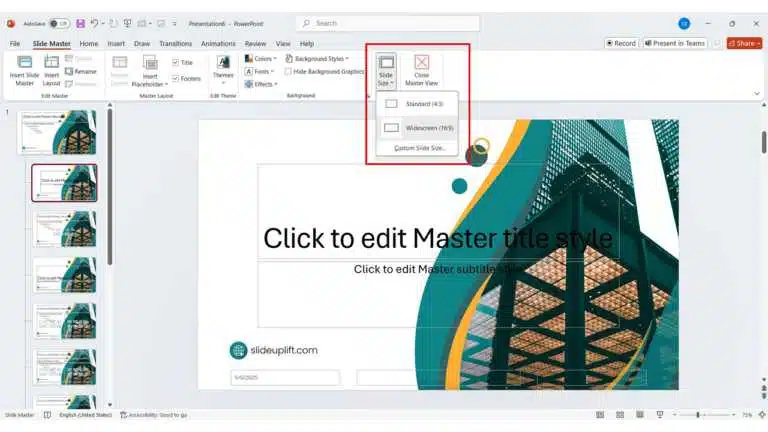
Step 2: Set Your Slides Size
This step ensures that your presentations are appropriately formatted for intended display, whether a standard screen or a widescreen format. It’s a flexible way to alter your presentations to ensure optimal display and readability.
- To adjust your slide size, navigate to the “design” tab and select the “Slide Size” option.
You can choose from predefined sizes such as “Standard (4:3)” or “Widescreen (16:9)”, or opt for a custom size by entering your desired dimensions.
Step 3: Design Your Layout Slides:
To create a comprehensive PowerPoint template, design your layout slides next. These layout slides are the individual templates for different types of content, such as title slides, content slides, and section dividers. Keep it consistent across all the layouts to achieve a balanced look.
Consider the specific needs of your presentation and create layouts that accommodate them, including text, images, charts, and graphs. This will facilitate clear message conveyance.
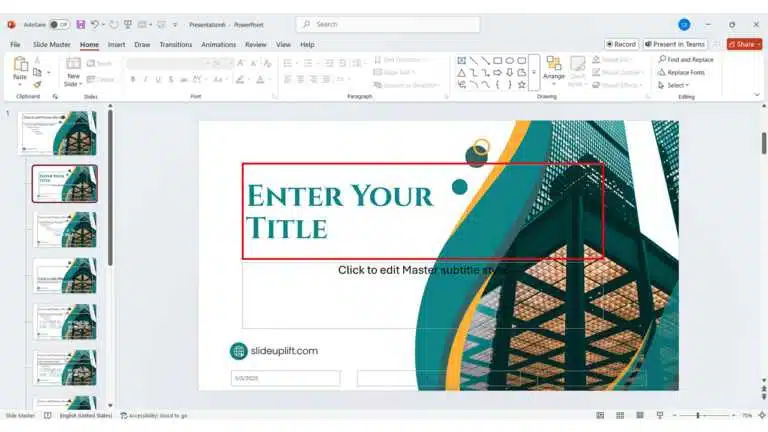
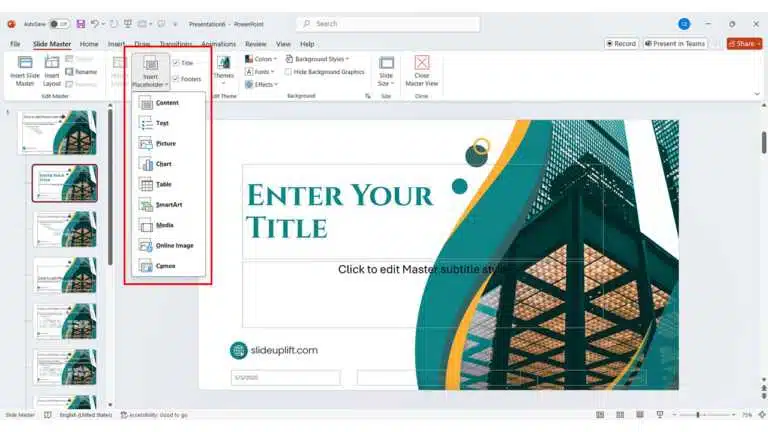
Step 4: Edit the Placeholders
Placeholders are the areas where you can insert text, images, or other content.
- To begin, navigate to “Master Layout” and select “Insert Placeholder.”
Resize and reposition placeholders to create a user-friendly and visually appealing layout for easy information input and display.
Step 5: Set Up a Custom Color Palette
Setting up a custom color palette is important for maintaining brand consistency while presenting a unified look.
- To do this, select “Colors.”
Be sure to apply these colors consistently across all elements of your slides, including text, backgrounds, and graphics, to create a professional and polished presentation.
Step 6: Choose a Custom Font Set
To create a seamless and professional PowerPoint template, choosing a custom font set will impact the readability and overall aesthetics.
- To customize your font set, click on “Fonts.”
Make sure to select the fonts that complement each other, for instance, a bold font for headings and a lighter font for body text can create a striking contrast.
Step 7: Customize the Background
Customizing a well-designed background will enhance the visual appeal and ensure that text and graphics stand out effectively. Choose solid colors, gradients, or even images that resonate with your brand identity.
- Start by clicking on “Background Styles” and select ‘Format Background.”
You can also use a subtle watermark of your logo to reinforce brand recognition. Additionally, using contrasting colors for text and background can improve readability and engagement.
Step 8: Add your Company Logo
Incorporating your company logo into your Slide Master is a strategic way to enhance brand recognition. To add your logo, navigate to the Slide Master view and select the slide where you want to paste it.
- Go to the “Insert Placeholder” tab, choose “Pictures,” and select your logo file.
Position your logo in a strategic area, such as the corner of the slide, where it won’t interfere with your content. This simple step contributes to a polished and aligned presentation style.
The Quick Method: Using an Existing PowerPoint Template
If you’re short on time but need to create a presentation quickly, using an existing PowerPoint template is a smart choice. PowerPoint offers a variety of built-in templates that you can customize to fit your needs. Simply browse through the available options in the “Design” tab, select a template that resonates with your content, and start editing.
You can modify the colors, fonts, and layouts to align with your professional needs. Learning how to create a slide template in PowerPoint is particularly useful for those who may not have extensive design skills but still want to create engaging presentations efficiently.
Individual Slides Templates
An individual slide template is a pre-structured layout for a single slide within a larger presentation template. It provides a structured framework with placeholders for various types of content like text, images, and charts.
This gives you the flexibility to organize your presentation as needed, not just in a linear way, and ensures each slide looks professional, whether you’re making a quick point or explaining something in detail.
Presentation Deck Templates
Presentation deck templates are ready-made sets of slides that follow a clear structure, like a cover slide, agenda, section breaks, and content slides, making it easy to build a polished, professional presentation. A good template often includes visual elements like icons, charts, and graphics to keep your audience engaged.
Using a well-designed presentation design template can save you time and help your slides look clean and on-brand. You can always customize it by adding your content and tweaking the colors to match your style.
Elements of a PowerPoint Corporate Template
A well-structured PowerPoint corporate template not only reinforces brand consistency but also enhances the credibility and clarity of your presentations. Each element, when thoughtfully designed, helps deliver your message with professionalism, making it easier for your audience to follow, trust, and engage with your content. These elements
- Cover Slide: The introductory slide sets the tone and first impression of your presentation.
- Title of the presentation
- Presenter’s name and date
- Company logo
- Visually appealing background with brand colors
- Optional tagline or brief description
Used for: Capturing attention at the start, establishing brand identity and context, and introducing the presenter and topic.

- Table of Contents Slide: A slide that outlines the full structure of the presentation, similar to a document index. It includes:
- Titles of all major sections or chapters
- Optional page numbers or slide numbers
- Clickable links (in digital decks) for easy navigation
Used for: Helping viewers navigate a longer presentation, especially when reading independently; offering a quick structural overview.

- Agenda Slide: A slide that outlines the key sections or topics to be covered in the presentation. They provide:
- Bullet points or a numbered list of main topics
- Icons or simple graphics for visual interest
- Clean layout consistent with brand design
Used for: Guiding the audience through the structure, setting expectations for what’s to come, enhancing clarity and flow.
- Section Divider: A transition slide that separates different segments of a presentation. They aid with:
- Bold, clear section titles
- Visual cues (colors, icons, or imagery)
- Consistent layout and typography
Used for: Signaling a shift in topic, giving the audience a mental break between sections, maintaining visual engagement, and organization.
- Content Slides: They are the main slides where you present your core information, data, and insights. They help with:
- Headings, subheadings, and bullet points
- Charts, graphs, images, or tables
- Consistent font style, size, and alignment
- White space to improve readability
Used for: Communicating key messages, supporting storytelling with visuals, and making complex information digestible.
Advanced Slide Master Customization Techniques
It involves a deeper understanding of PowerPoint’s Slide Master feature, which allows users to create an advanced form of slides in a presentation.
- Use Custom Layouts: Create multiple layout types (e.g., image-heavy, quote slides, data-focused) for flexible slide design.
- Design Unique Backgrounds: Incorporate branded elements or subtle textures to enhance visual identity.
- Tailor Font Styles: Set consistent, brand-approved fonts in the Slide Master for headings, subheadings, and body text.
- Add Placeholder Types: Insert specific placeholders (charts, tables, images) to guide consistent content placement.
- Utilize Multiple Slide Masters: Create separate Slide Masters for different departments or presentation styles within one file.
- Lock Design Elements: Fix logos or background elements in place to prevent accidental changes.
- Save as Template (.potx): Export your customized deck as a .potx file to reuse it across multiple presentations.
Incorporating Accessibility into PowerPoint Templates
When creating PowerPoint templates, it’s essential to consider accessibility to ensure that all audience members can engage with your content effectively. This involves using high-contrast color schemes for better visibility, selecting legible fonts, and providing alternative text for images. Utilizing slide layouts that accommodate screen readers and ensuring that any audio or video content has captions can greatly enhance the experience for individuals with disabilities.
Additionally, to support color-blind users, avoid using color alone to convey meaning, opt for color-blind–friendly palettes, and consider adding patterns or labels to charts. Testing your slides with accessibility tools like PowerPoint’s built-in Accessibility Checker or color-blind simulators can further ensure visual clarity for all viewers. By prioritizing accessibility, you not only broaden your audience but also demonstrate a commitment to inclusivity in your presentations.
FAQs
-
How do you apply a PowerPoint template to an existing presentation?
To apply a PowerPoint template to an existing presentation, open the file, go to the “Design” tab, and click “Browse for Themes” to select your template. The template will update your slides, though you may need to adjust slide content to fit the new design. This is a quick way to refresh your presentation and maintain brand consistency.
-
What are the common mistakes in PowerPoint Template Creation?
When designing a PowerPoint template, it’s essential to steer clear of common pitfalls that can detract from your presentation’s effectiveness.
- Avoid overcrowding slides: Too much text or too many visuals can overwhelm your audience. Aim for simplicity and clarity to highlight your key messages.
- Maintain consistency in fonts and colors: Inconsistent design elements can create a disjointed look. Use a uniform style throughout your template.
- Consider your audience’s needs: Tailor your content to resonate with your audience, ensuring it keeps them engaged and focused.
-
How to delete a Layout Slide from the Slide Master?
To delete a layout slide from the Slide Master, go to the Slide Master view, right-click the layout you want to remove, and select “Delete Layout.” This keeps your template organized by removing unused layouts, ensuring only relevant ones remain.
-
How to apply a PowerPoint Template to an existing Presentation?
To apply a PowerPoint template to an existing presentation, start by opening your presentation in PowerPoint. Navigate to the “Design” tab, and click on “Browse for Themes.” From there, select the template you want to apply.
Once you choose the desired template, it will be applied to your slides, giving them a fresh look. You may need to adjust some design elements to ensure they fit well with the new design.
-
What is the difference between a PowerPoint Template and a PowerPoint Theme?
A PowerPoint template is a pre-designed file that includes slide layouts, color schemes, fonts, and other design elements, helping you create a consistent look for your presentation. It’s essentially a blueprint for your slides.
A PowerPoint theme, on the other hand, is a broader design concept that defines the overall colors, fonts, and effects applied to a presentation. Themes can be used across multiple templates, ensuring that all your presentations have a unified, professional appearance.
In short, templates give you ready-made slide layouts, while themes focus on the overall style and color scheme.
-
How to make your own PowerPoint Template with a Picture?
To create a PowerPoint template with a picture, choose a high-quality image that fits your theme. Open a new presentation, go to the “Design” tab, and select “Format Background.” Choose “Picture or texture fill” and upload your image. Add text boxes and placeholders for content. This will give you a personalized template that aligns with your goals.
-
Where can I find slide templates and themes that I can customize?
To find customizable slide templates and themes, explore reputable websites that specialize in presentation design, such as SlideUpLift. Here, you can browse through a variety of templates that cater to different presentation needs and styles.
Once you find a template that suits your content, customize it by adjusting the color scheme, adding your own images, and modifying the text to match your brand. This allows you to create engaging presentations quickly while maintaining a professional look.
-
What kinds of templates can I get online for PowerPoint?
To customize the background in your Slide Master, go to the Slide Master tab and choose a solid color, gradient, or custom image that fits your brand. This sets a consistent tone across all slides, enhancing engagement and ensuring a cohesive, visually appealing design.
-
How can I make or edit my own custom PowerPoint templates?
To create or edit your own custom PowerPoint templates, start by opening a new presentation and designing your own PowerPoint template in the Slide Master. Customize the layout by adding your preferred colors, fonts, and logos to reflect your brand identity.
Once you have established your design, save the presentation as a PowerPoint template by selecting “Save As” and choosing the file type “PowerPoint Template.” This way, you can easily reuse your custom template for future presentations, ensuring consistency and professionalism in your design.
Table Of Content


Related posts from the same category

11 Sep, 2024 | SlideUpLift
How To Create Puzzle Pieces In PowerPoint [+Templates]
The jigsaw puzzle is the perfect design element that you can use for your strategy presentations; it helps with the storytelling aspect of your presentation by showing how the pieces

24 Oct, 2019 | SlideUpLift
How To Highlight Part Of An Image Using Focus Effect In PowerPoint : Step-By-Step Tutorial
This PowerPoint tutorial explains how to highlight any specific aspect of an image in PowerPoint. A presentation with pictures and infographics is better than a boring-looking textual presentation. Images make

7 Dec, 2022 | SlideUpLift
How To Create Neumorphic PowerPoint Presentation To Dazzle Your Audience?
Neumorphic designs are a relatively recent design style that was first used in the User Interface design of gadgets in the previous decade. The perfect and straightforward design is unexpectedly

9 Feb, 2024 | SlideUpLift
How To Loop A PowerPoint Slideshow? Detailed Guide
Microsoft PowerPoint is a popular application for creating and delivering presentations. PowerPoint has numerous options for adding flair and taking your presentations a notch higher, such as the ability to

16 Mar, 2023 | SlideUpLift
An Easy Guide On How To Edit Background Graphics In PowerPoint
Quick Answer:To edit background graphics in PowerPoint, open View → Slide Master or Design → Format Background, unlock or select the background graphic, and modify or replace it. Editing through

16 Jan, 2026 | SlideUpLift
How To Merge PowerPoint Presentations Using Simple Methods and a Free Tool
Learn how to merge PowerPoint presentations quickly and easily using manual methods or a free merge PPT tool. Keep slides, formatting, animations, and transitions intact while creating polished, professional decks.

2 Mar, 2021 | SlideUpLift
Learn How To Use PowerPoint Slide Master | PowerPoint Tutorial
When creating your own PowerPoint presentation, it can be a tedious process to make individual changes on your slides if there are elements that need to be modified throughout

19 Apr, 2023 | SlideUpLift
How To Add PowerPoint Borders To Your Presentation
Adding borders in PowerPoint is an essential aspect of presentation design as it helps to enhance the visual appeal of your slides. Customizing your presentation with borders can be a

25 Jan, 2018 | SlideUpLift
PowerPoint Hack: How To Create Sections In PowerPoint And How To Zoom In PowerPoint
This PowerPoint tutorial is about How To Create Sections In PowerPoint. Imagine that you are about to begin your business presentation to a room full of clients, and you remember

30 Dec, 2022 | SlideUpLift
How To Make A Table Of Contents In PowerPoint?
Are you tired of flipping through multiple slides or using the "Find" function to locate specific content in your PowerPoint presentations? A Table of Contents can help solve this problem