How to Flip or Mirror an Image in Google Slides?
Visuals are crucial in conveying messages effectively while presenting. They offer a variety of features to enhance your slides, including the ability to flip or mirror images. Flipping or rotating an image in presentations can reinforce storytelling. Flipping an image or a part of an image can help focus on elements in the presentation to express the intended content.
Whether you want to create a unique design, correct orientation issues, or add a creative touch to your presentation, flipping, mirroring, or cropping pictures into a circle can be handy. Learning how to flip an image in Google Slides is very simple. This article will guide you through the straightforward steps to flip, mirror, or crop an image into a circular shape in Google Slides.
How to Flip an Image in Google Slides?
Flipping images in Google Slides is as simple as it adds a dynamic visual appeal to your presentations. You can easily flip an image in Google Slides either:
- Vertically
- Horizontally
How to Flip an Image in Google Slides Vertically?
Follow the steps below to learn how to mirror an image in Google Slides vertically:
- Open the Google Slides presentation and select the slide with the image you wish to flip. To pick an image, click on it.
- Navigate to the “Arrange” tab and click on it. There will be a drop-down menu.
- Select “Rotate” > select “Flip vertically”.
- To resize your image to fit the slide after flipping it. Click and drag the image around the slide to reposition it.
- Adjust its size by clicking and dragging one of the blue squares on the image’s border.
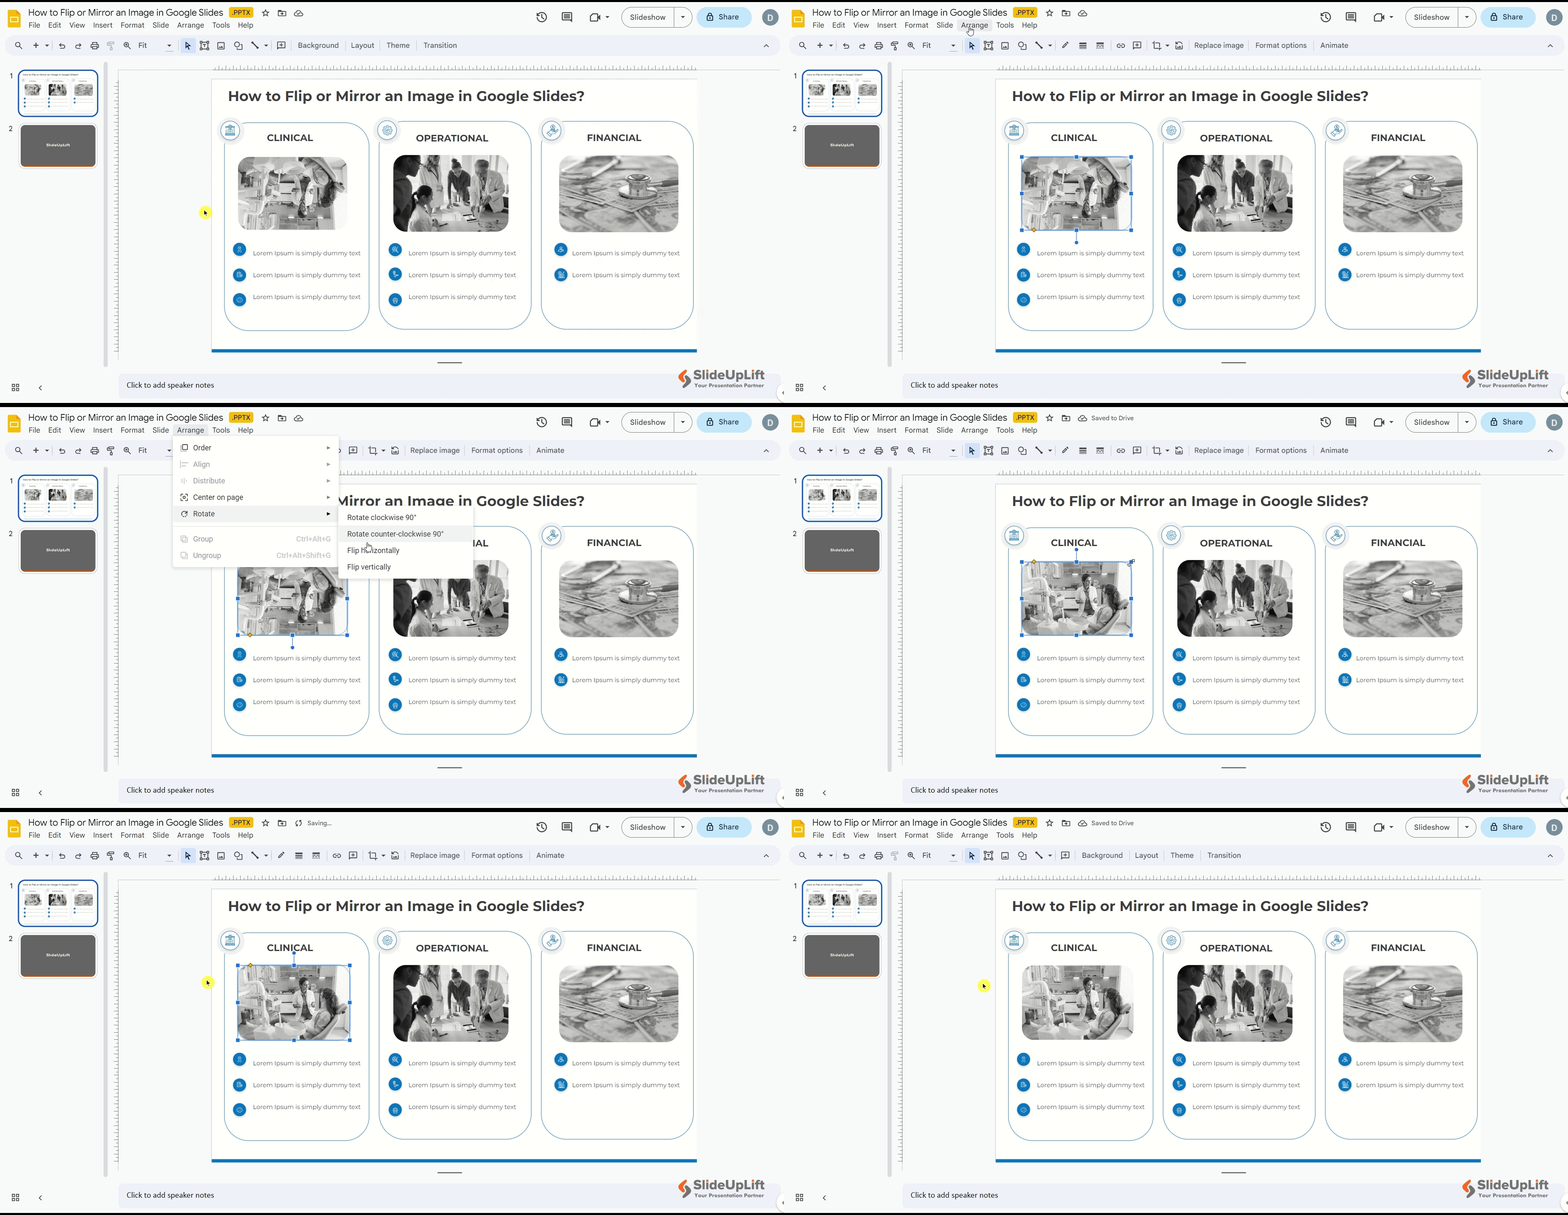
How to Flip an Image in Google Slides Vertically
ALSO READ: How to lock an image/object in Google Slides?
How to Flip an Image in Google Slides Horizontally?
Follow the steps below to mirror an image in Google Slides horizontally:
- Open your Google Slides presentation.
- Navigate to the slide which contains the image you wish to flip.
- Click on the image. A blue box will appear around it, indicating the selected image.
- Go to the “Arrange” tab from the Menu > select “Rotate” from the drop-down menu.
- Select “Flip Horizontally”. Your image will now be flipped.
That’s it! You’ve successfully flipped an image in Google Slides vertically and horizontally. You can correct any accidental distortions in the images or create desired visual effects by flipping and rotating images.
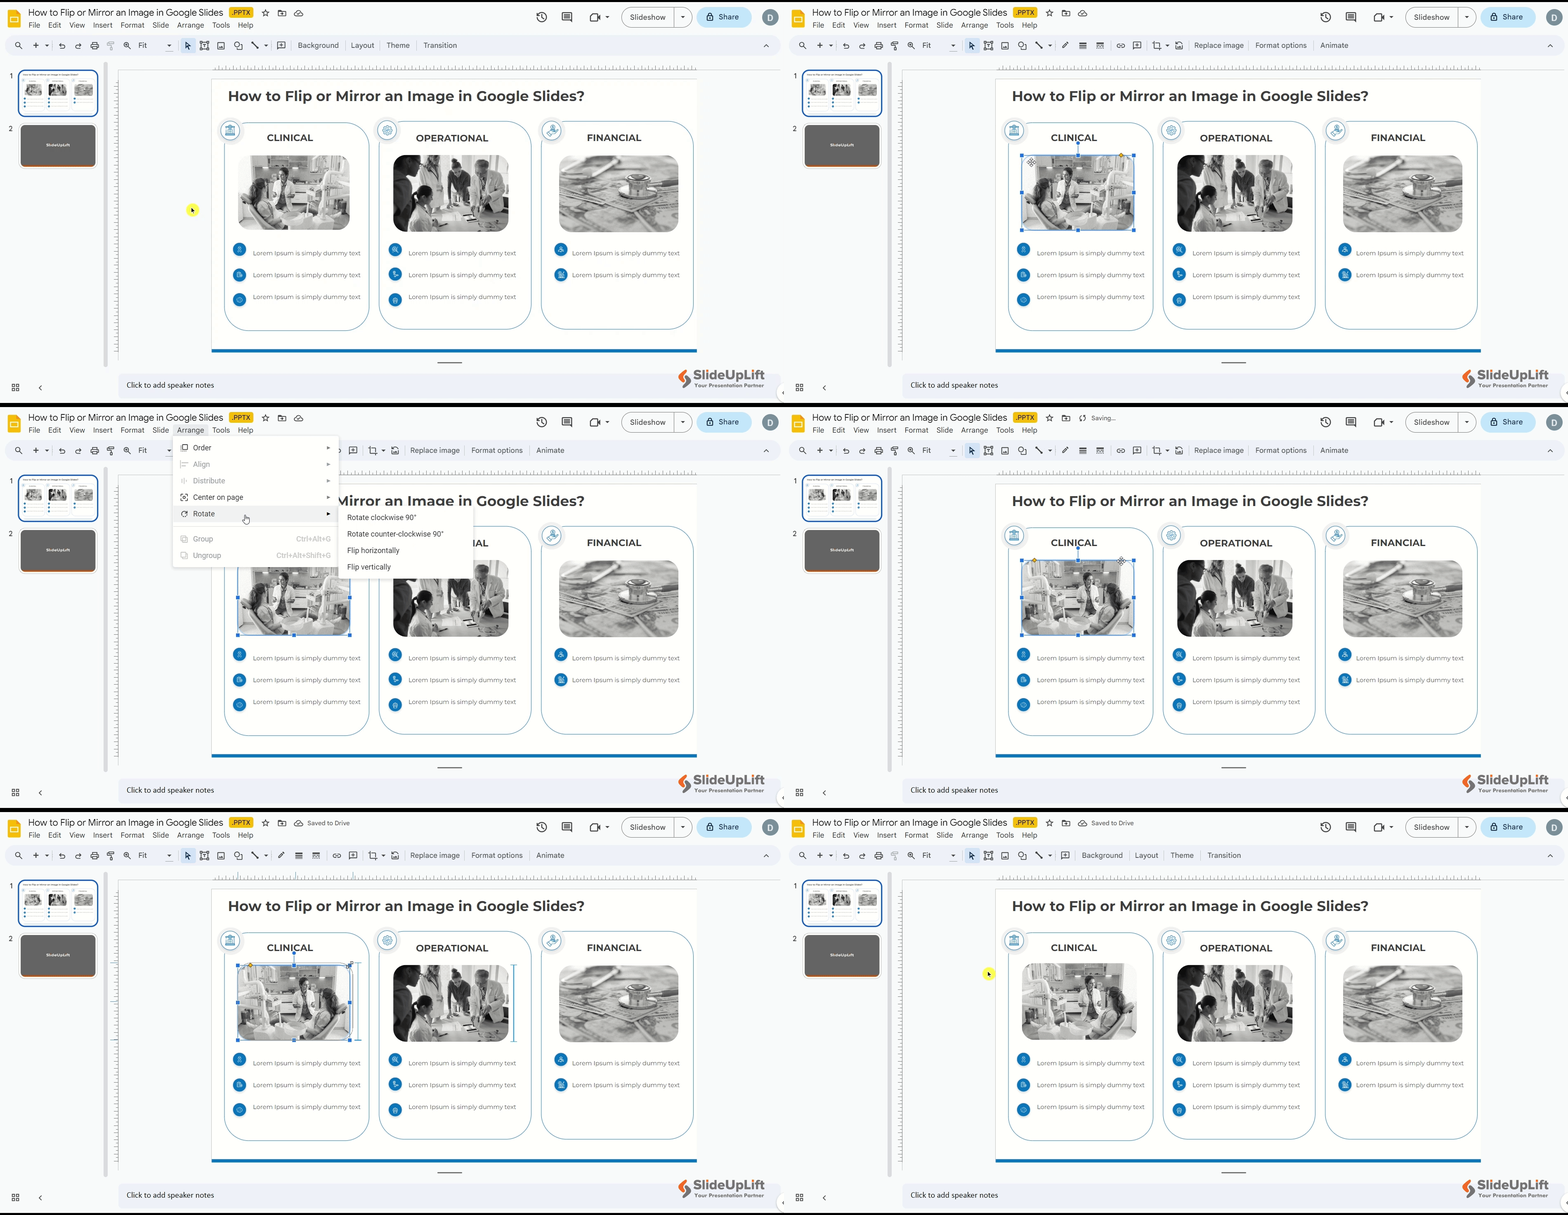
How to Flip an Image in Google Slides Horizontally
ALSO READ: How to add pictures to PowerPoint?
How to Rotate an Image in Google Slides?
You might not want to mirror the image but rotate it by some angle. Follow the steps below to rotate an image in Google Slides:
- Open your Google Slides presentation and go to the slide with an image.
- Go to the “Arrange” Tab and select “Rotate”.
- You will have two options: “Rotate clockwise 90°” or “Rotate counter-clockwise 90°”. Select the one that best suits your needs.
- If you wish to rotate your image at any angle other than 90°, go to the “Format” Tab > click on “Format Options”.
- Under the “Rotate” option, type the desired angle, and your image will be rotated.
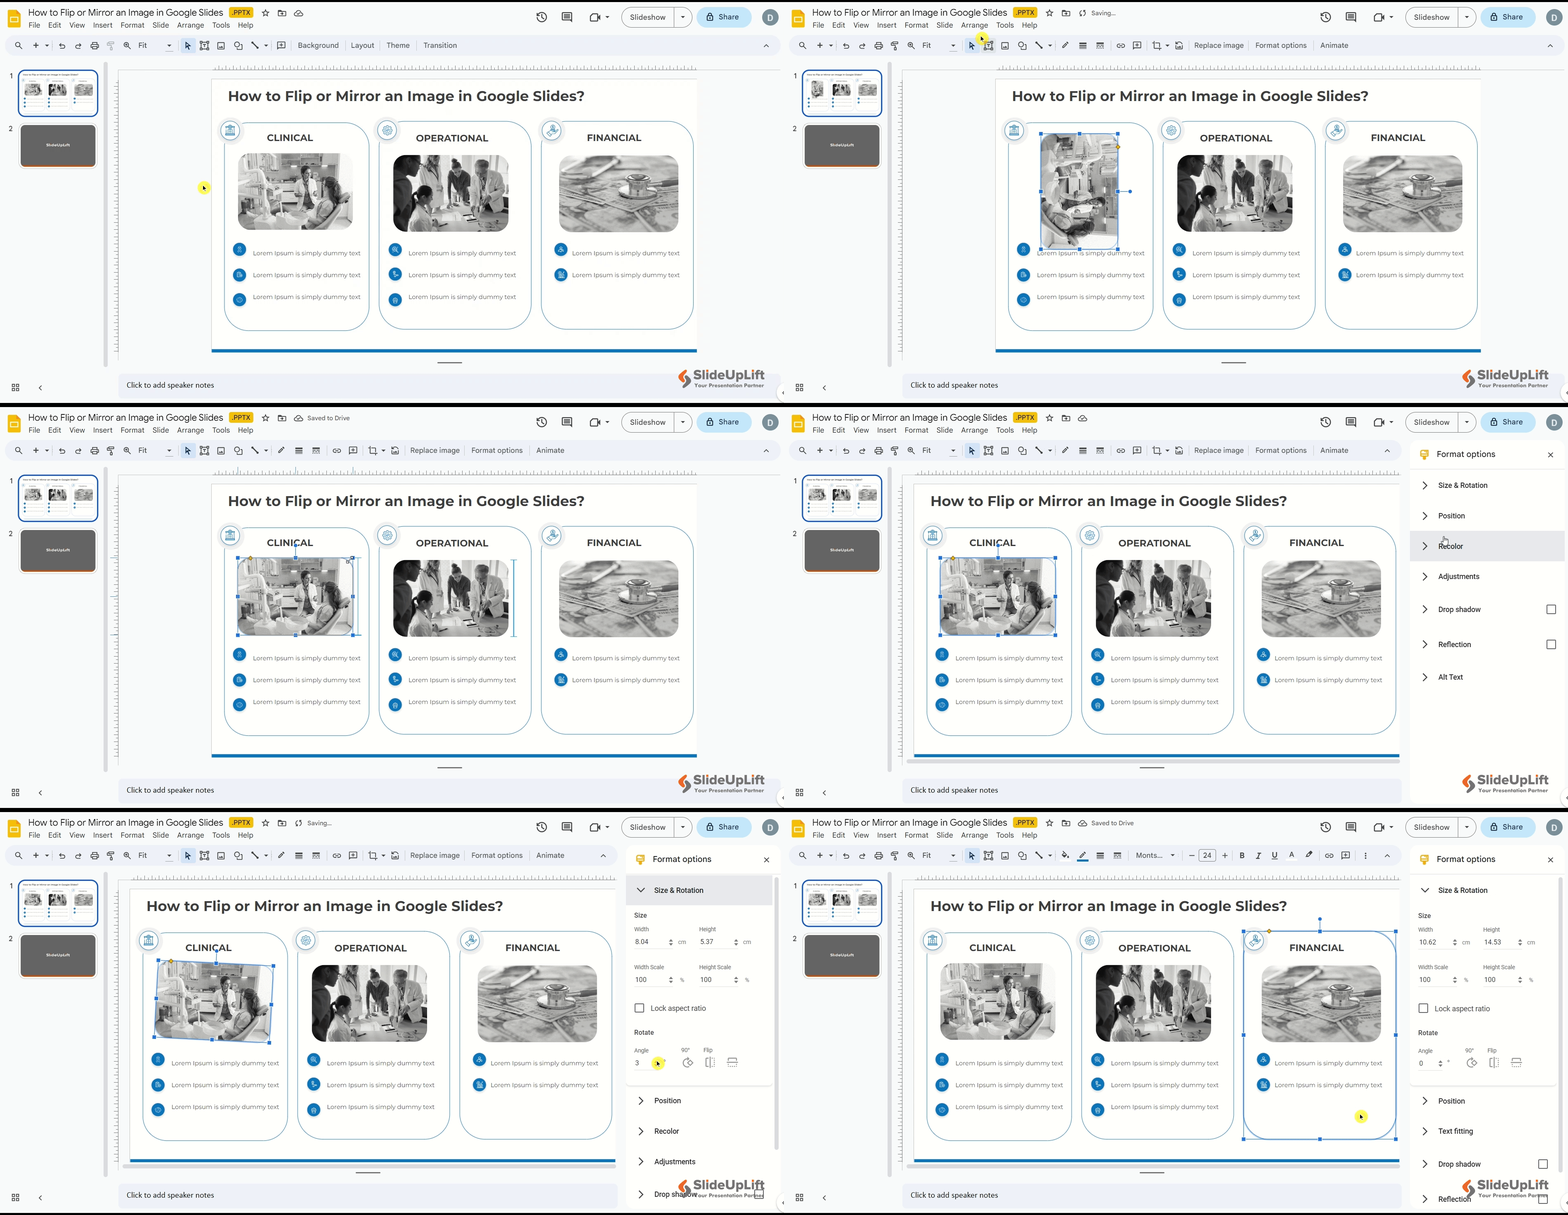
How to Rotate an Image in Google Slides
YOU MIGHT ALSO LIKE: How to apply filters to pictures in Google Slides?
Difference Between Flipping and Rotating an Image in Google Slides
Flipping and rotating are both image modification techniques. Though they are similar, they create different visual effects.
| Flip an Image in Google Slides | Rotate an Image in Google Slides |
| Involves creating a mirror image by reversing it along a horizontal or vertical axis. | Involves turning it around a central point, typically in increments of 90° or any desired angle. |
| Horizontal flipping reflects the image from left to right, while vertical flipping reflects it from top to bottom. | Rotation changes can be clockwise or counterclockwise. |
| The result is a flipped version of the original, maintaining the same orientation but with reversed characteristics. | The result is a rotated version of the original, allowing for adjustments in the image’s position without changing its characteristics. |
An image becomes mirrored when it is flipped, either vertically or horizontally. Rotation maintains the original image while adjusting its angle, allowing alignment flexibility without changing its appearance. Presenters can strategically use these techniques inside the Google Slides platform based on their unique design objectives.
ALSO READ: How to make an image transparent in Google Slides?
For a neat appearance, we occasionally need to reorient pictures. Whether correcting orientation issues, creating a unique design, or experimenting with creative layouts, this feature allows you to customize your slides easily. Additionally, adding a GIF to Google Slides also helps enhance the visual appeal of the presentation, just like images.
Save time of creating presentations from scratch by opting for Google Slides themes. These templates are 100% editable and customizable to suit your presentation needs. Download now!
FAQs
-
How do I add pictures to Google Slides?
ol.order-list li::marker {font-size: 16px !important; font-weight: 500;}
Follow the steps below to embed a photo in Google Slides:
- Go to the “Insert” tab in your Google Slides presentation.
- From the drop-down menu, click “Images” and choose “Upload from the Web” or “Upload from Device.”
- Choose a picture from your computer, then press “Insert.”
-
What distinguishes rotating images from flipping them?
When an image is turned over, it becomes mirrored and flipped vertically or horizontally. A picture’s face stays the same while its axis shifts during rotation.
-
Can you flip an image in Google Slides?
Yes, you can flip an image in Google Slides. To obtain the required mirroring effect, simply choose the image, navigate to the “Format” menu, hover over “Rotate,” and select “Flip vertically” or “Flip horizontally.”
-
Are there any restrictions on the degree of rotation I can do in Google Slides?
Google Slides provides flexibility in rotating images to any desired angle, allowing for all adjustments. No fixed limitations enable presenters to fine-tune image orientation according to their specific design requirements.
-
How does flipping an image in Google Slides affect its visual appearance?
In Google Slides, flipping a picture vertically causes a mirror effect along the vertical axis, which modifies the orientation from top to bottom. This can be helpful in presentations to provide a symmetrical visual impression or to create emphasis.


