
 Flat 4


How to Insert 3D Models in PowerPoint
Quick Answer: To insert a 3D model in PowerPoint, go to Insert > 3D Models and choose Stock 3D Models (Microsoft’s online library) or This Device (your own .glb, .gltf, .obj, .stl, .ply or .3mf file). Drag the rotation control in the middle of the model to turn it, use 3D Model Views for preset angles, and add the Morph transition or a 3D animation such as Turntable to make it move. You need PowerPoint for Microsoft 365 or PowerPoint 2019 or later.
Imagine giving a product presentation in front of your clients and you feel the need to showcase the product prototype without actually having it there with you. Also, you may want to move and rotate the model to present it from different angles. Using the 3D model feature, you can do all those things which cannot be done with a 2D image. Not only that, it keeps your audience engaged and lets you convey your message more efficiently.
This guide shows you how to insert a stock or custom 3D model, rotate and frame it, animate it with PowerPoint’s 3D effects or the Morph transition, and fix the most common problems, including FBX files that won’t open and a greyed-out 3D Models button.
Which PowerPoint versions support 3D models?
You can insert and rotate 3D models in PowerPoint for Microsoft 365 (Windows and Mac) and in PowerPoint 2019, 2021 and 2024. Microsoft lists 3D models among the features added in PowerPoint 2019 that were not in earlier versions. Some features, such as 3D animation effects and animated models, need a Microsoft 365 subscription.
| PowerPoint version | Insert & rotate 3D models | Morph transition | Animated 3D models |
| PowerPoint for Microsoft 365 (Windows) | Yes | Yes | Yes (subscribers) |
| PowerPoint for Microsoft 365 for Mac | Yes | Yes | Yes, version 16.24 and later |
| PowerPoint 2019, 2021, 2024 (Windows and Mac) | Yes | Yes | No (Microsoft 365 only) |
| PowerPoint 2016 (one-time purchase) | Not listed as a feature before 2019 | Plays Morph, cannot create it | No |
| PowerPoint for the web | See note | Yes, for files in OneDrive for work or school or SharePoint | Cannot insert, but plays them in slideshows |
| Google Slides | No | No (no Morph) | No |
What 3D file formats does PowerPoint support?
PowerPoint converts every 3D model to glTF behind the scenes, so .glb (binary glTF) is the safest format to use. GLB is also one of the formats that keeps a model’s built-in animation.
| Format | Can you insert it? | Keeps animation? | Notes |
| .glb / .gltf | Yes | Yes | Recommended by Microsoft for Office |
| .obj | Yes | No | Common on free model sites |
| .stl | Yes | No | Common for 3D-printing models |
| .ply | Yes | No | Common for 3D scans |
| .3mf | Yes | No | 3D-printing format |
| .fbx | No | — | Insertion disabled by the January 9, 2024 security update. Microsoft then announced FBX support would retire in Microsoft 365 apps on March 1, 2025. |
| .skp (SketchUp) | No | — | Retired in Microsoft 365 apps on March 1, 2025 |
Models you inserted before these changes still work in your existing files. To use an FBX or SKP model now, convert it to .glb first. In Blender, for example, open the file and choose File > Export > glTF 2.0 (.glb).
Keep files light. Microsoft recommends keeping 3D files under 50 MB, and roughly 25,000 triangles for low-end PCs, 40,000 for mid-range and 60,000 for high-end machines. Heavier models can make PowerPoint lag while you rotate or present them.
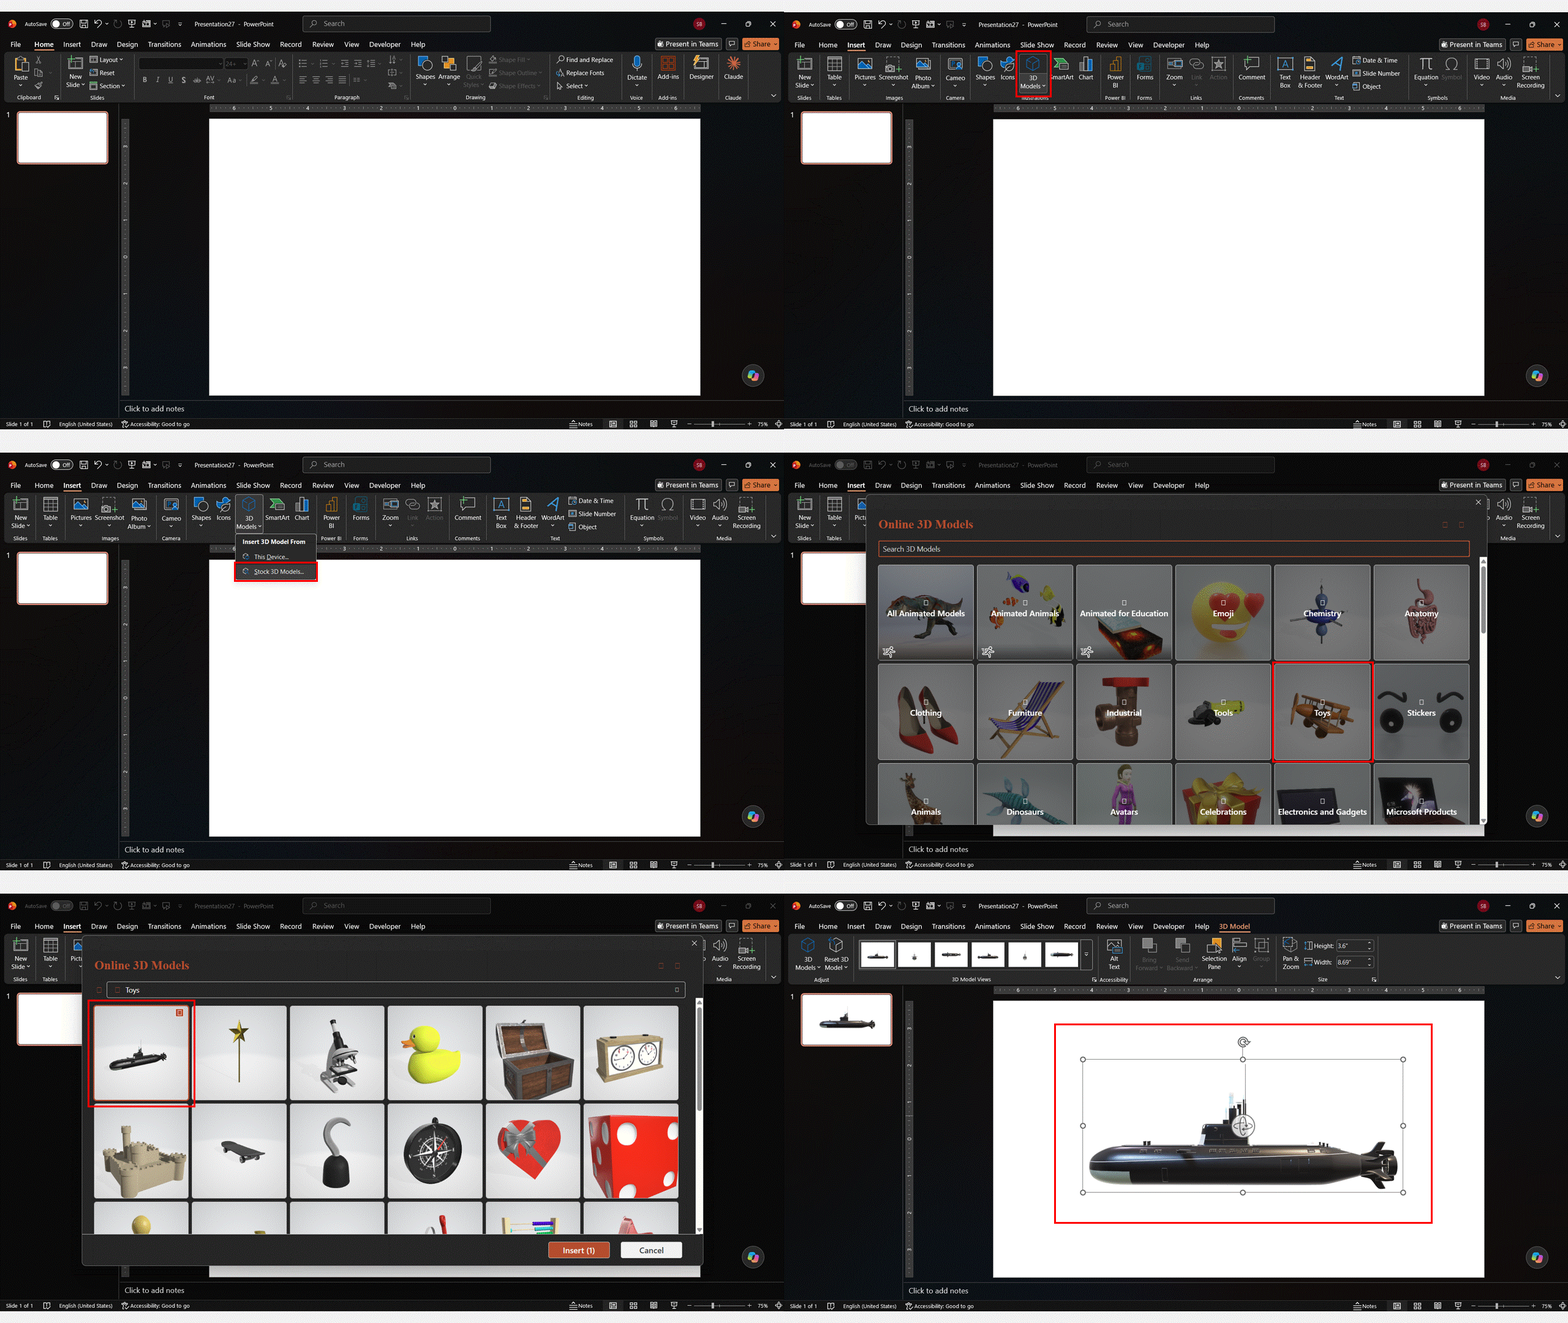
Step 1: Insert a stock 3D model
- Click the Insert tab.
- Click 3D Models and choose Stock 3D Models.
- Browse or search the online library and pick a model.
- Click Insert. The model drops onto your slide.
The library is organised into categories such as animals, avatars, vehicles and vintage cartoons, and has a search box. You can tick several models and insert them together. Categories marked with a runner badge contain animated models (see Step 5).
The stock library loads online, so you need an internet connection and Office’s connected experiences turned on.
Step 2: Insert your own 3D model from your device
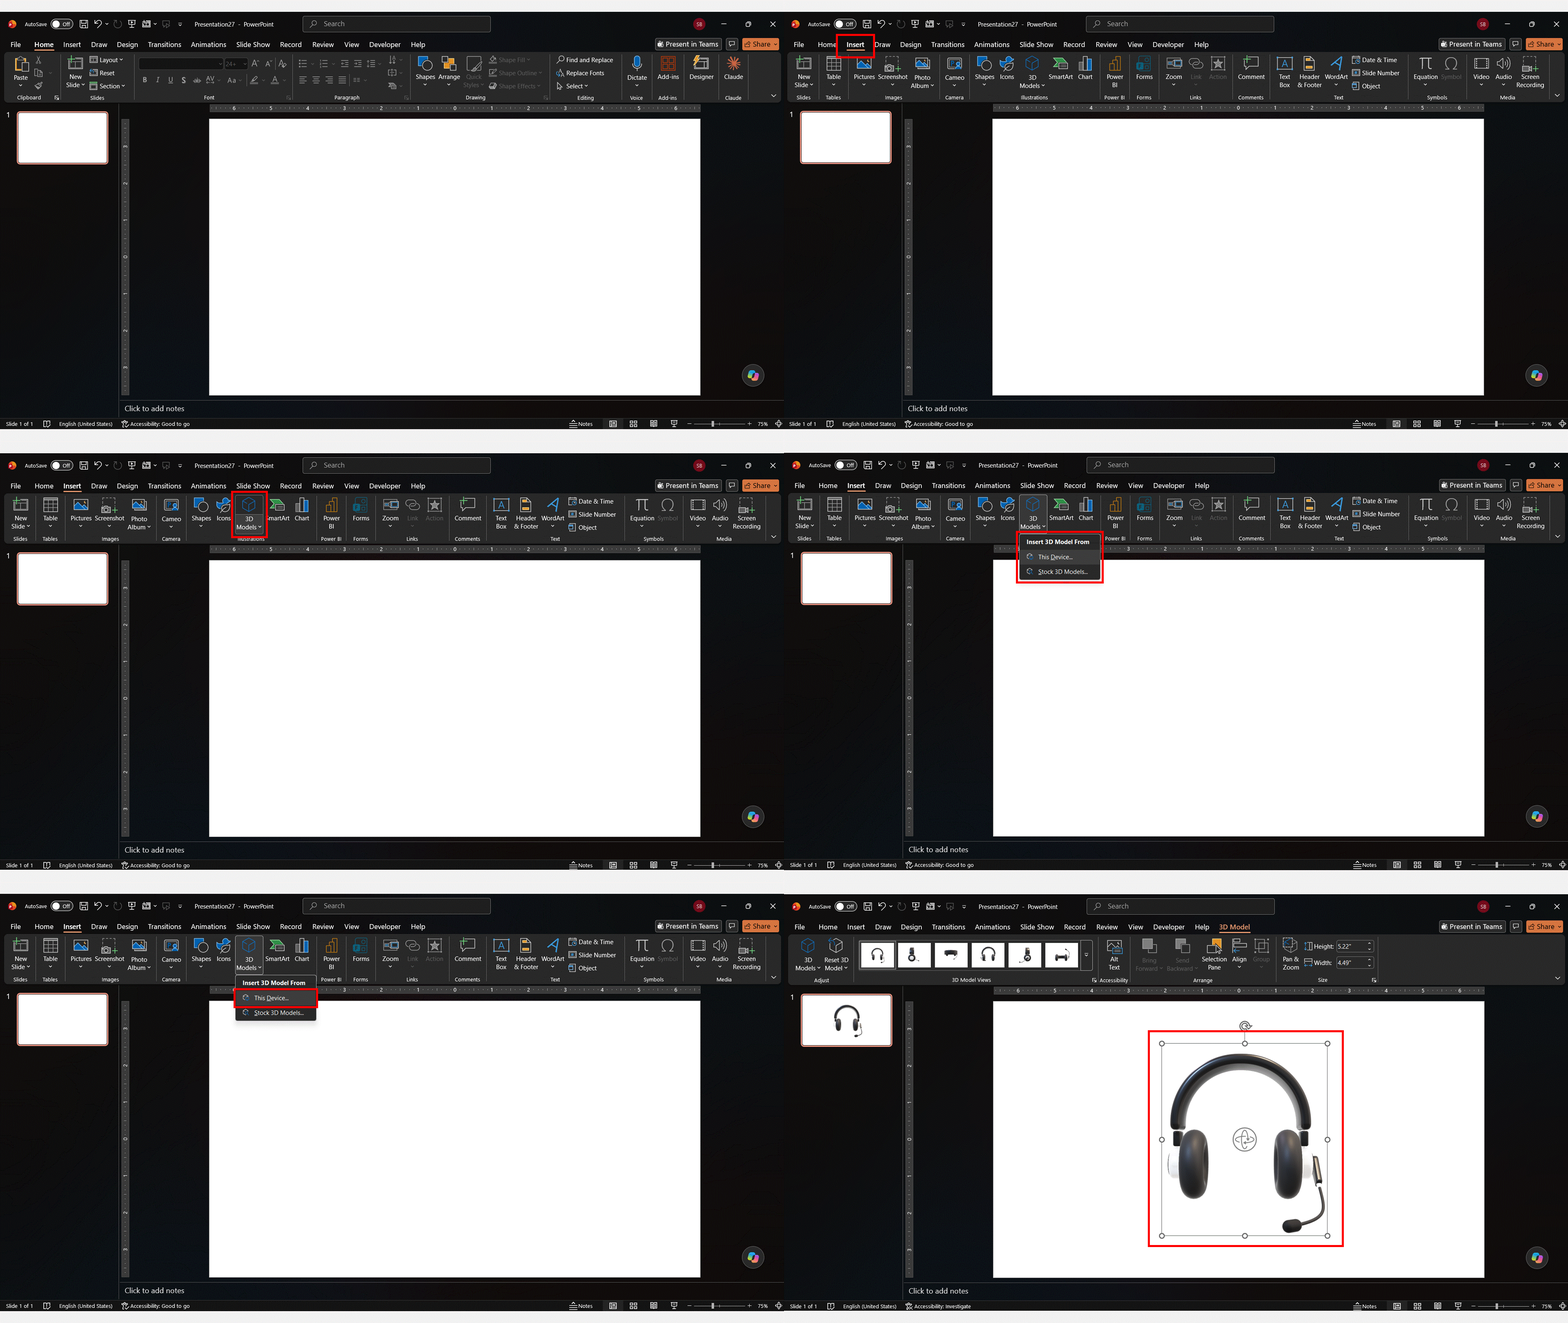
- Go to Insert > 3D Models > This Device.
- Select your model file and click Insert.
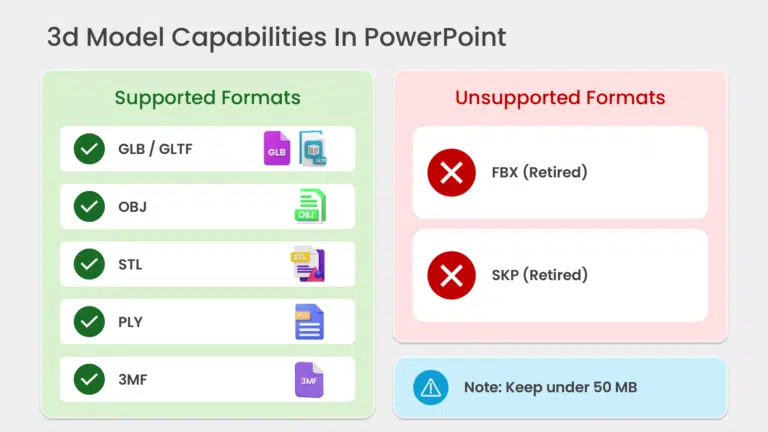
Use a .glb, .gltf, .obj, .stl, .ply or .3mf file. FBX files no longer insert (see the formats table above).
Where to find free 3D models for PowerPoint
Besides Microsoft’s stock library, you can download models from sites such as Sketchfab, Free3D, CGTrader, TurboSquid and Thingiverse. Many have free models. Look for a .glb or .obj download, and check each model’s licence before using it in a commercial presentation.
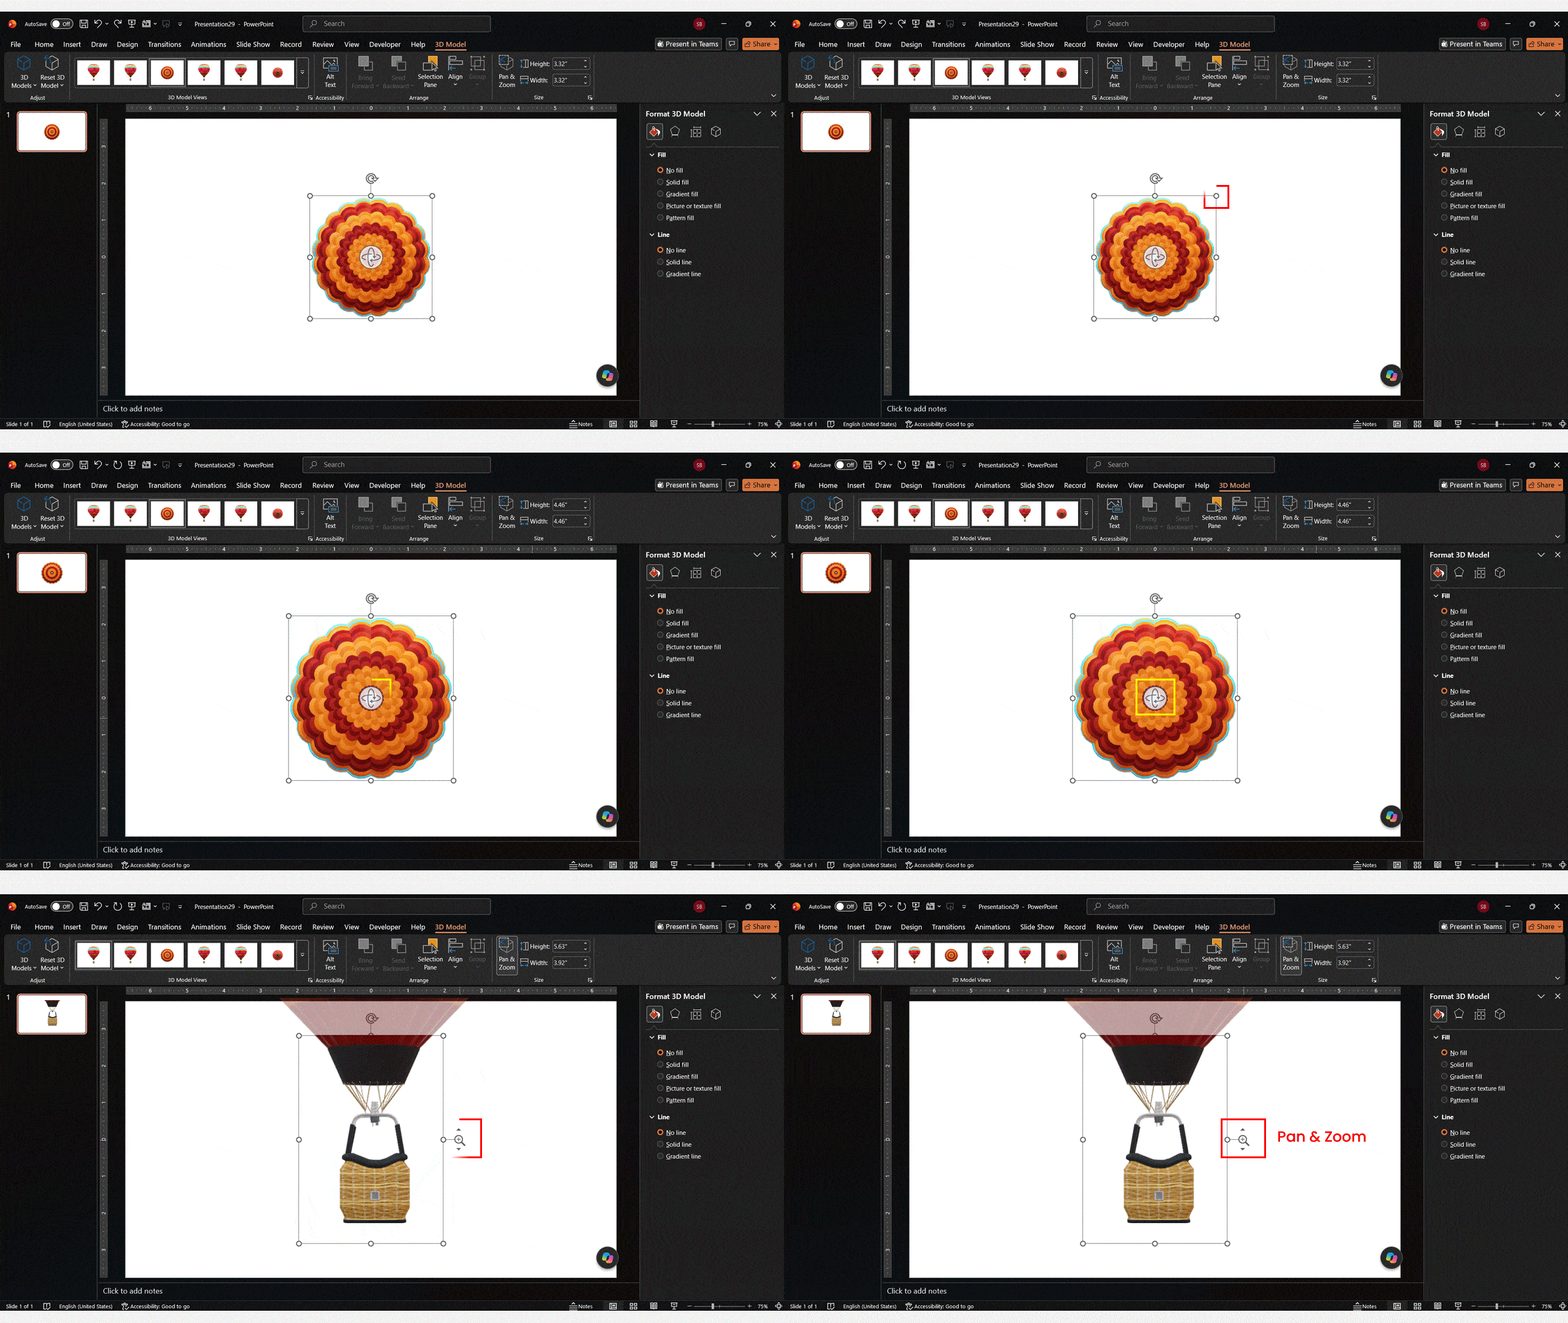
Step 3: Rotate, resize, pan and zoom your 3D model
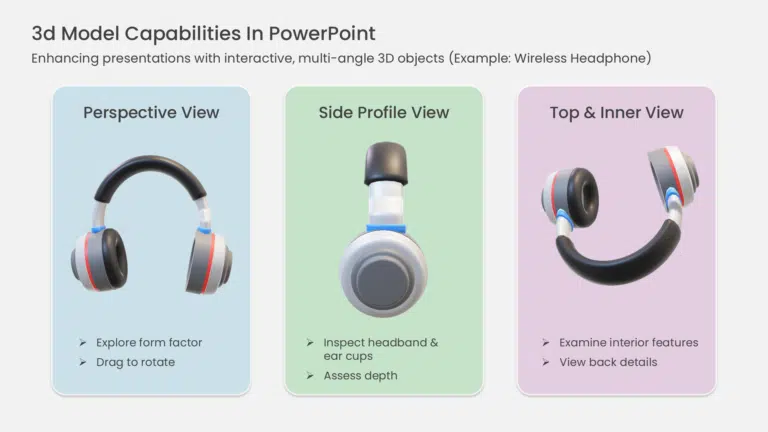
Once the 3D object is added, drag the rotation icon in the middle of the model to turn it in any direction, and drag the corner handles to resize it. To snap to a preset angle, open the 3D Model tab and pick one of the 3D Model Views.
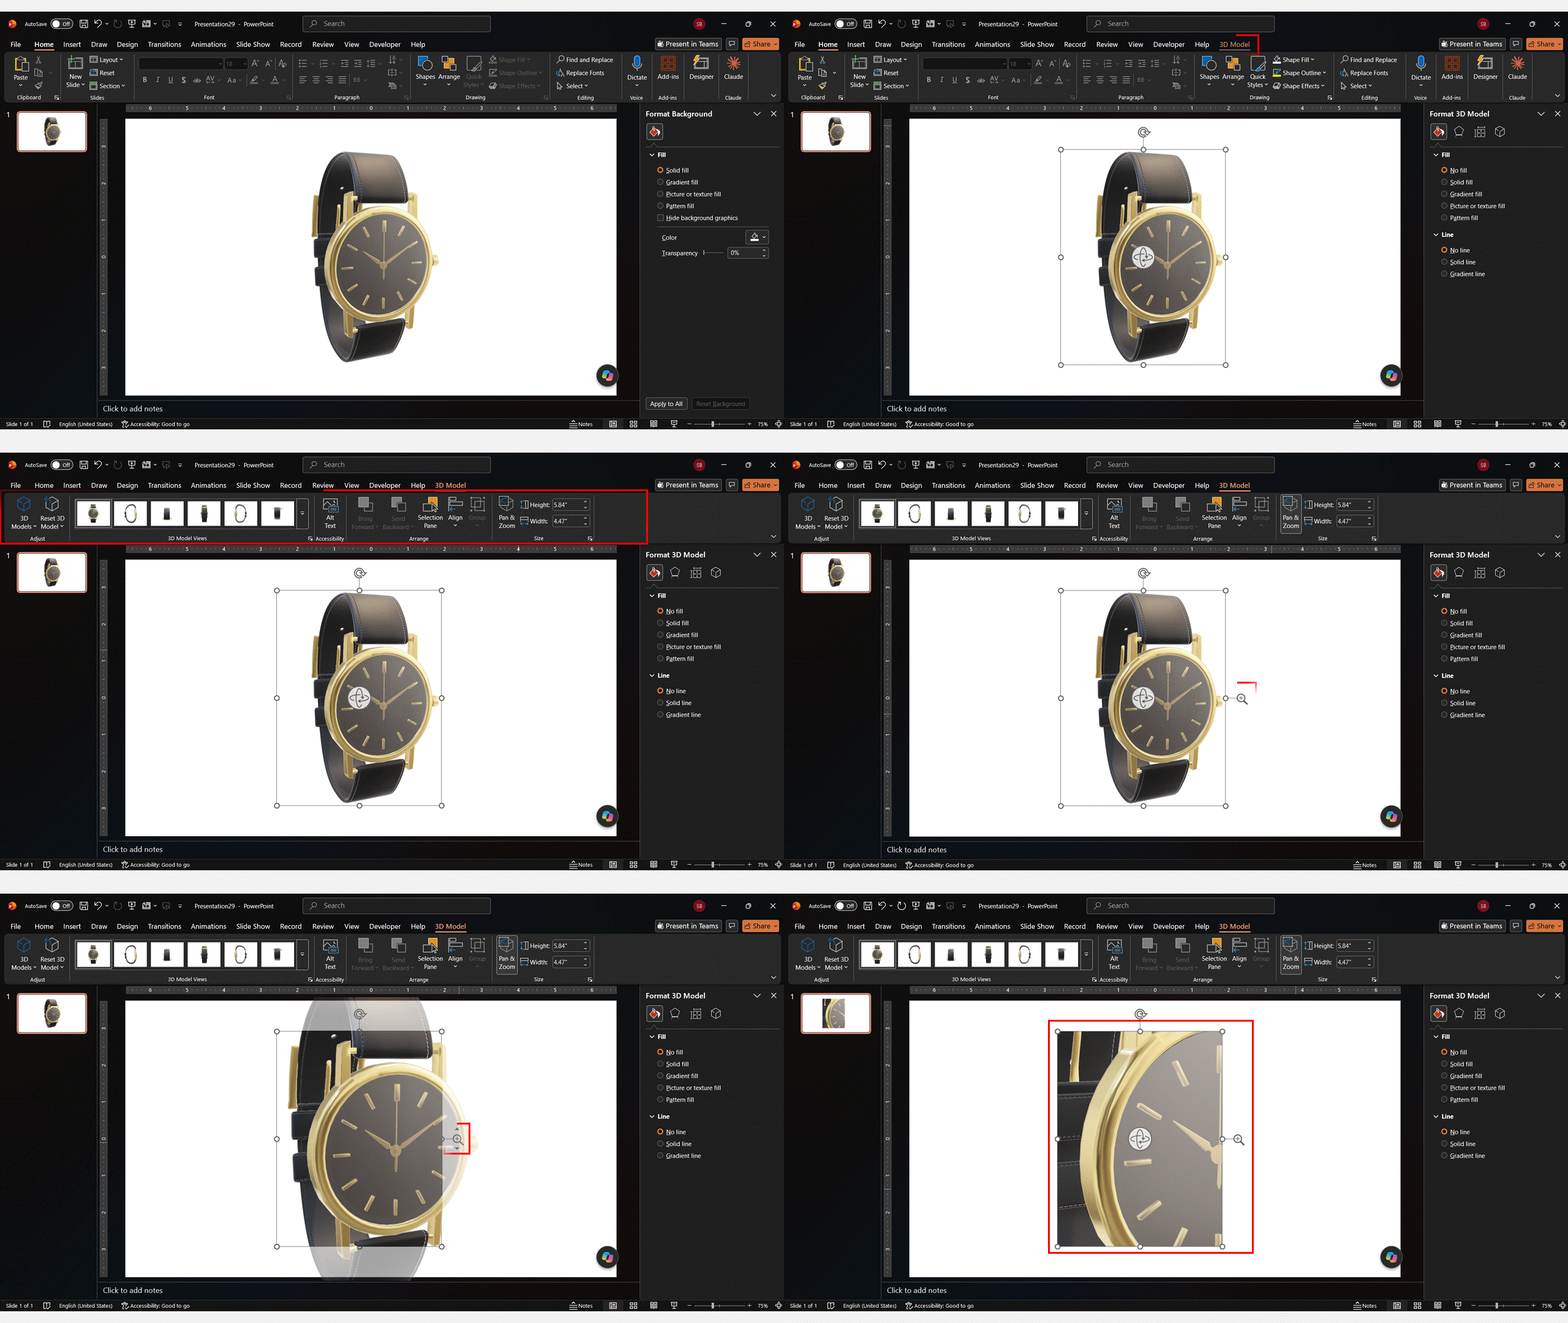
- Pan & Zoom: On the 3D Model tab, click Pan & Zoom. Drag the model to move it inside its frame, and drag the zoom arrow on the right edge of the frame to make the model bigger or smaller. This is how you focus on one detail, such as a product’s port or a part of an organ.
- 3D Model Views: This gallery has preset angles such as head-on and top-down. It is the fastest way to get a clean, consistent angle on every slide.
- Format a model like a picture: You can align, group and layer 3D models with other objects, and add effects such as a reflection.
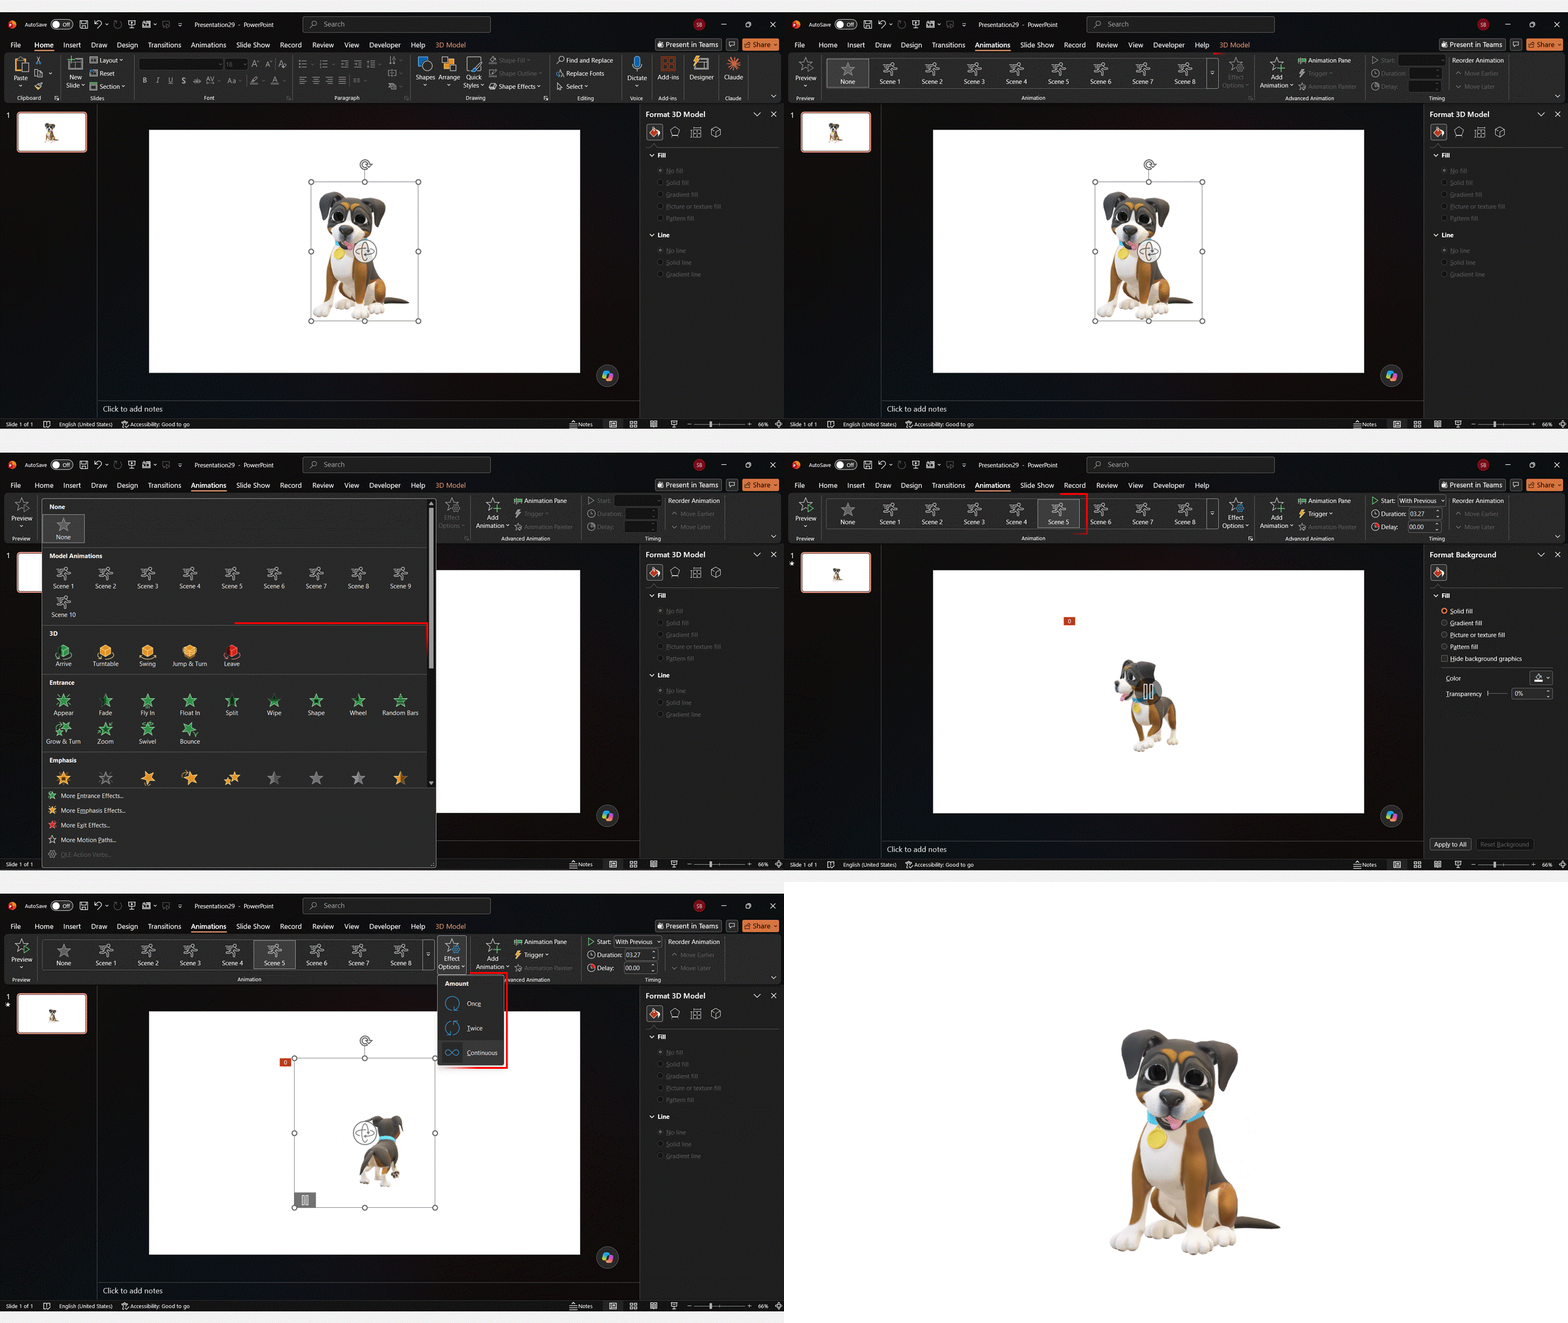
Step 4: Animate a 3D model with built-in 3D effects
PowerPoint for Microsoft 365 has animation effects made for 3D models. They play on a single slide, so you don’t need to duplicate anything.
- Select the 3D model.
- Open the Animations tab. The 3D effects appear in the gallery: Arrive, Turntable, Swing, Jump & Turn and Leave.
- Pick an effect, then open Effect Options to change the Direction, Intensity and Rotation Axis.
- Set the start, duration and delay in the Timing group, as with any other animation.
Turntable is a good default for product showcases: the model spins in place while you talk. Use Arrive and Leave to bring a model on and off the slide.
Step 5: Use animated 3D models (Scenes)
Some stock models come with their own built-in movement. Animated models are available to Microsoft 365 subscribers on Windows and on Mac from version 16.24.
- Go to Insert > 3D Models > Stock 3D Models and open a category with the runner badge.
- Insert the model. It starts playing on the slide.
- To change the movement, select the model and open Scenes on the 3D Model tab.
- To stop it while editing, click Pause on the 3D Model tab, right-click the model, or press the spacebar.
PowerPoint for the web can’t insert animated models, but a deck that already contains them plays as expected there.
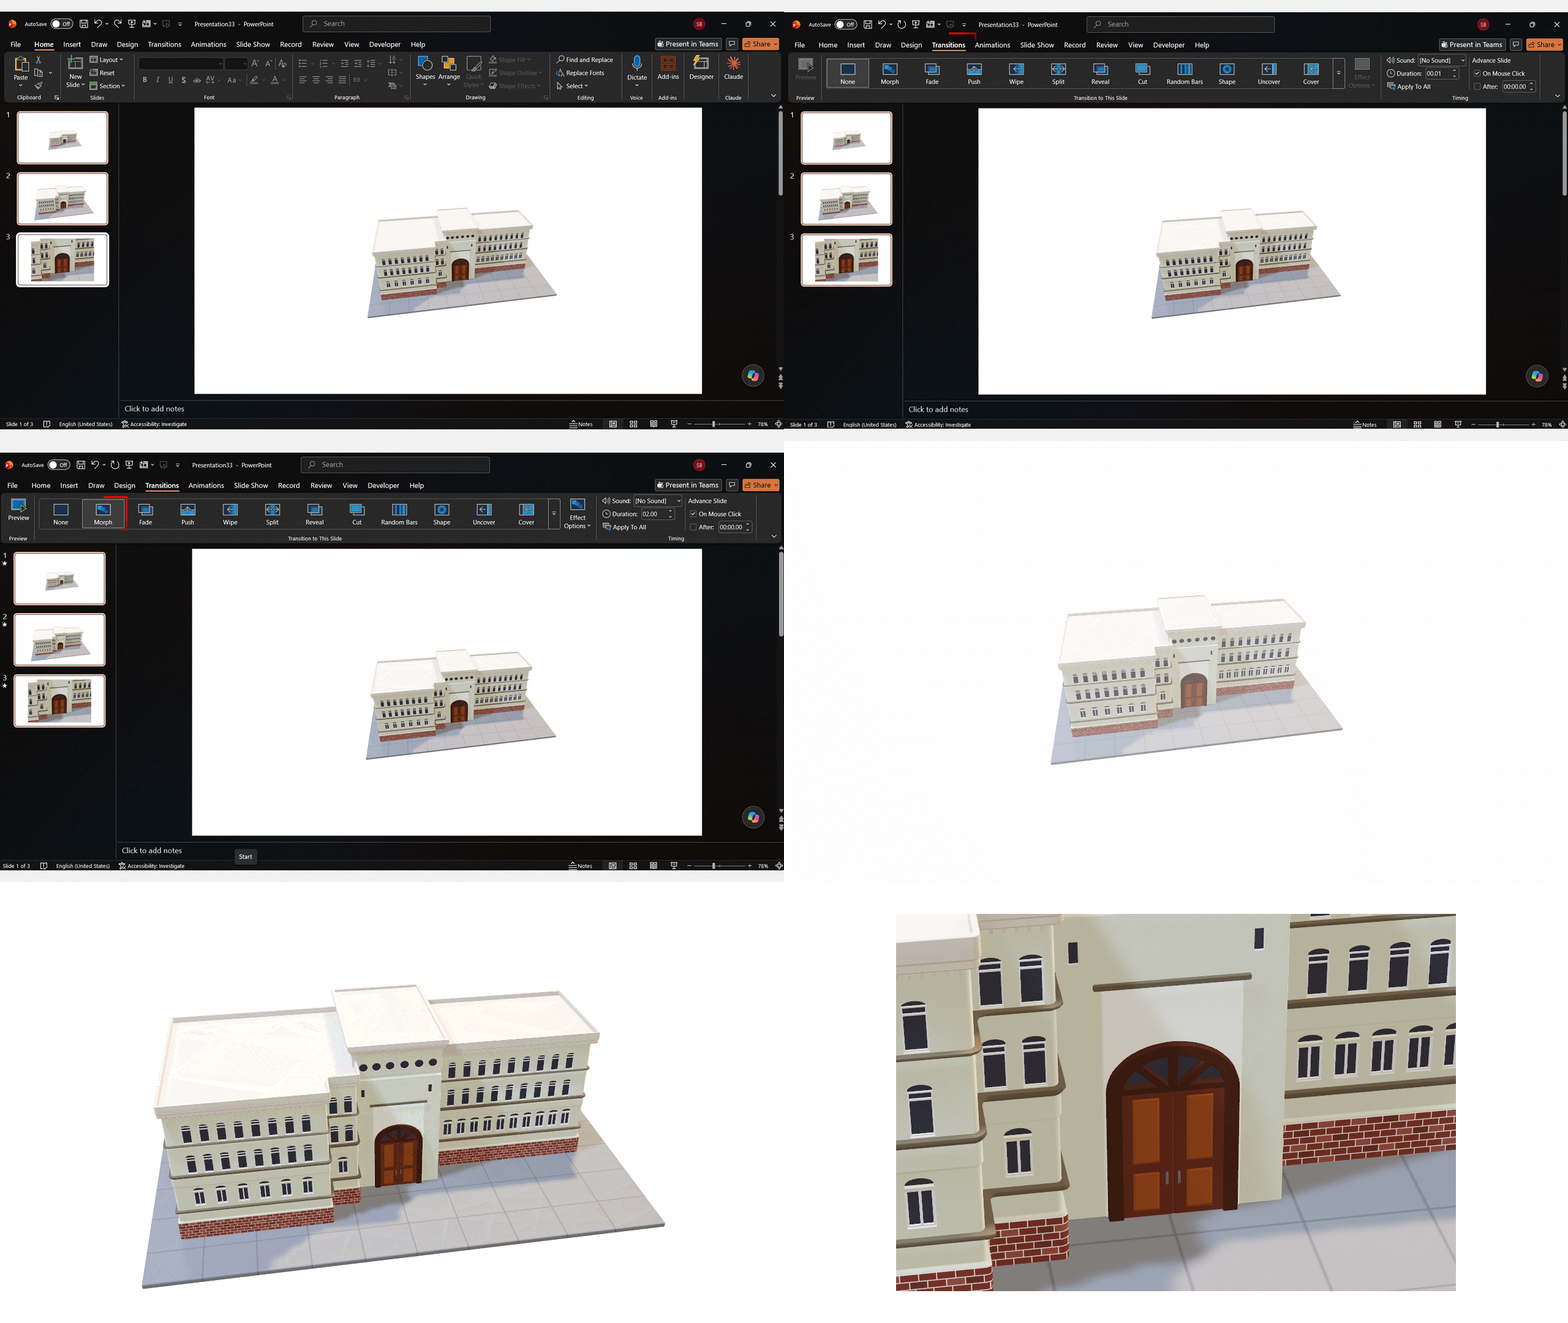
Step 6: Animate a 3D model with the Morph transition
- Insert your model on a slide and position it.
- Duplicate the slide (right-click the thumbnail > Duplicate Slide).
- On the second slide, rotate, move or resize the model.
- Select the second slide and choose Transitions > Morph.
In Slide Show, PowerPoint animates the model smoothly from the first position to the second.
Three Morph effects worth trying
- Zoom reveal: On the second slide, make the model much larger and move it so one detail fills the slide. Add a caption about that detail.
- 360° orbit: Duplicate the slide three or four times and rotate the model about 90° on each copy. Apply Morph to every copy for a full turn.
- Feature walk-through: Keep the model in the same spot, rotate it to show a different side on each slide, and change the text beside it. HowToGeek uses this with a planet model to reveal a feature on the far side.
Morph not animating your model?
- Duplicate the slide instead of inserting the model again. Morph only matches the same object on both slides.
- To create Morph you need Microsoft 365 or PowerPoint 2019 or later. PowerPoint 2016 can play it but not create it.
- Change the speed with Duration on the Transitions tab.
For more Morph techniques, see our guide on how to use Morph in PowerPoint.
Prefer to watch? This short tutorial walks through inserting and animating a 3D model:
To share the animation with people who don’t have PowerPoint, export the deck as an MP4 with File > Export > Create a Video. Our guide on converting PPT to video explains the settings.
3D model presentation ideas
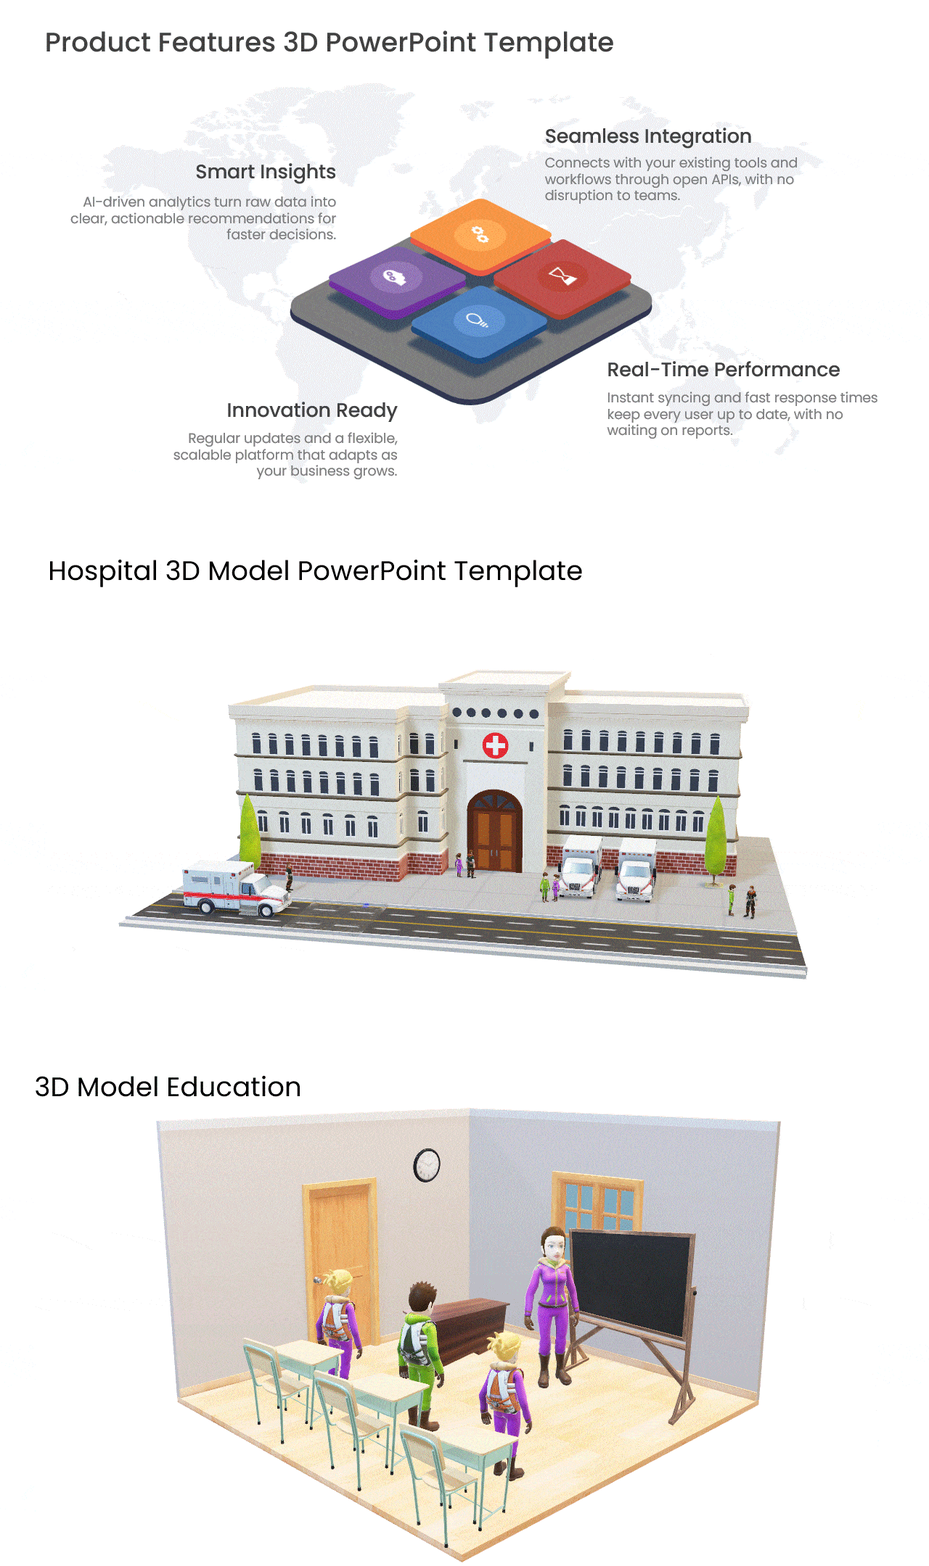
- Product launch or sales demo: Spin the product with Turntable, then use a Morph zoom to call out each feature. Pair it with our Product Features 3D PowerPoint template.
- Healthcare and anatomy: Rotate a heart, brain or tooth model to explain a procedure to patients or students. Start from the Hospital 3D Model template.
- Education and science: Show molecules, planets or animals from every side. See the 3D Model Education template.
- Architecture and real estate: Walk the audience around a building model with a multi-slide Morph orbit.
- Engineering and manufacturing: Show a part from fixed angles using 3D Model Views, then zoom into a component with Pan & Zoom.
Whichever you choose, keep one model per slide, give it room, and put no more than one line of text next to it so the model stays the focus. For more ways to present a product, read our product presentation tips.
3D models vs 3D shapes vs 3D-style templates
PowerPoint offers three ways to add depth, and each suits a different job:
- 3D models are real 3D objects that you can rotate freely. Use them for products, anatomy and anything the audience needs to see from every side.
- 3D shapes are ordinary shapes with depth added. Draw a shape, right-click it, choose Format Shape > Effects, and set 3-D Format (depth, bevel) and 3-D Rotation. They work in any recent PowerPoint version. Our 3D arrow diagram tutorial shows this step by step.
- 3D-style templates are built from these editable shapes, so you can change every label and colour, and they also open in Google Slides.
A 3D model is a separate 3D object you rotate on the slide. A 3D-style template is built from editable shapes with depth and perspective, so it also works in Google Slides and you can change every label and colour. For business diagrams such as 3D funnels, step blocks and cubes, browse our 3D PowerPoint templates, or see a ready-made hospital 3D model template.
Popular 3D templates to start from:
- Animated 3D Funnel PowerPoint Template for sales and marketing funnels
- Animated 3D Business Steps PowerPoint Template for processes and roadmaps
- Strategy 3D Building Blocks PowerPoint Template for strategy pillars
- 3D Cube Strategy PowerPoint Template for frameworks with several sides
- Animated 3D Rubik Cube PowerPoint Template for problem-solving stories
- Animated 3D Spheres PowerPoint Template for connected concepts
- Animated 3D Infographic Box PowerPoint Template for feature or package breakdowns
Or browse all animated PowerPoint templates.
Now you don’t have to scour the web to find out the right templates. Download our PowerPoint Templates from within PowerPoint. See how.
FAQs
-
Why can’t I insert my FBX file in PowerPoint?
Microsoft turned off FBX insertion in Word, Excel, PowerPoint and Outlook with the January 9, 2024 security update, after a security vulnerability was found in FBX (CVE-2024-20677). Microsoft then announced that FBX and SketchUp (.skp) support would retire in Microsoft 365 apps on March 1, 2025. Models already in your files still work. Convert new models to .glb and insert them with Insert > 3D Models > This Device.
-
Why is the 3D Models button greyed out?
Usually because PowerPoint isn’t updated or signed in, or connected experiences are switched off (File > Account > Account Privacy > Manage Settings). On work or school accounts, your IT policy may block the online library.
-
Do 3D models work in Google Slides?
No. Google Slides has no 3D model option. Use 3D-style templates built from editable shapes instead.
-
How can you add a 3D model to a PowerPoint slide?
Use the 3D Models option on the Insert tab. Choose Stock 3D Models to pick from Microsoft’s online library, or This Device to insert your own .glb, .obj, .stl, .ply or .3mf file. Adding a 3-D effect to a picture or shape only adds depth styling; it does not create a model you can rotate freely.
-
Can I insert 3D models in PowerPoint 2016?
Microsoft lists 3D models among the features added in PowerPoint 2019. If you use a one-time-purchase PowerPoint 2016 and don’t see Insert > 3D Models, you need PowerPoint for Microsoft 365 or PowerPoint 2019 or later. Until then, you can use 3D shapes (Format Shape > 3-D Format and 3-D Rotation).
-
Where can I download free 3D models for PowerPoint?
Start with Microsoft’s Stock 3D Models library inside PowerPoint. Sites such as Sketchfab, Free3D, CGTrader, TurboSquid and Thingiverse also offer free models. Download a .glb or .obj file and check the licence before commercial use.
-
How do I make a 3D model rotate automatically in PowerPoint?
Select the model, open the Animations tab and choose the Turntable 3D effect. Use Effect Options to set direction, intensity and rotation axis, and set it to repeat in the Timing options if you want continuous rotation.
-
Why does my 3D model make PowerPoint slow?
The model is probably too detailed. Microsoft recommends keeping 3D files under 50 MB and about 25,000–60,000 triangles depending on the computer. Simplify the model or export a lighter .glb version.
-
Why isn't Morph animating my 3D model?
Morph only animates objects that exist on both slides. Duplicate the slide rather than inserting the model again, change the model on the second slide, and apply Morph to the second slide. You need Microsoft 365 or PowerPoint 2019 or later to create Morph.
Table Of Content


Related posts from the same category

24 Apr, 2026 | SlideUpLift
How to Insert a Check Mark in PowerPoint (PPT): 6 Methods
The fastest way to insert a check mark in PowerPoint is to copy and paste this symbol directly: ✓. If you want to insert it from PowerPoint, go to Insert

8 Nov, 2019 | SlideUpLift
Do You Struggle With Aligning Your Content On The PowerPoint Slide? Learn The Use Of PowerPoint Guides
This PowerPoint tutorial focuses on the use of PowerPoint Guides. Your PowerPoint Presentation design and layout are as important as the content and information. Cluttered and badly proportioned slides can

20 Mar, 2026 | SlideUpLift
How to Add Annotations in PowerPoint: The Complete Step-by-Step Guide
This blog explains how to add real-time annotations in PowerPoint presentations using tools like the pen, highlighter, and laser pointer to make slides more interactive and engaging. It provides step-by-step
17 Feb, 2020 | SlideUpLift
PowerPoint Arrows: How to Make an Arrow Diagram in PowerPoint | Step-by-Step Tutorial
Quick Answer — How to Insert Arrow in PowerPoint To insert arrow in PowerPoint and build a diagram: Go to Insert > Shapes and select a Rectangle. Duplicate it (Ctrl+D)

6 Apr, 2026 | SlideUpLift
How to Make an Interactive Quiz in PowerPoint (No Add-ins Required)
Quick Answer You can build a fully interactive quiz in PowerPoint using only the built-in Action and Hyperlink features — no add-ins or plugins required. Create three slide types (question,
27 Feb, 2026 | SlideUpLift
How To Broadcast a PowerPoint Presentation Online [6 Working Methods]
If you have been looking for a way to broadcast a PowerPoint presentation online to a remote audience, you have probably run into tutorials that tell you to click Slide

3 Feb, 2023 | SlideUpLift
How To Make A Graph In PowerPoint?
Do you need help communicating data effectively in your presentations? Data visualization is an essential tool in today's world as it helps represent complex data sets in a simple and

25 Jan, 2018 | SlideUpLift
PowerPoint Hack: How To Create Sections In PowerPoint And How To Zoom In PowerPoint
This PowerPoint tutorial is about How To Create Sections In PowerPoint. Imagine that you are about to begin your business presentation to a room full of clients, and you remember
14 Aug, 2025 | SlideUpLift
Curved Arrow PowerPoint: How to Make, Draw, and Customise Arrows Step by Step
Quick Answer: To make a curved arrow in PowerPoint, go to Insert > Shapes > Block Arrows, select a curved arrow shape, and drag to draw it on your slide.

24 Oct, 2019 | SlideUpLift
How To Highlight Part Of An Image Using Focus Effect In PowerPoint : Step-By-Step Tutorial
This PowerPoint tutorial explains how to highlight any specific aspect of an image in PowerPoint. A presentation with pictures and infographics is better than a boring-looking textual presentation. Images make