How to Use Morph in PowerPoint: The Ultimate Guide to Smooth Transitions
If you’ve ever watched a presentation where shapes flow smoothly, images glide effortlessly, and text elegantly shifts between slides, you’ve witnessed the power of Morph in PowerPoint.
This feature is one of the most powerful yet underrated tools in PowerPoint — perfect for creating visually appealing and dynamic presentations without using complicated animations.
In this blog, we’ll explore what morphing in PowerPoint is, how morph works, and provide step-by-step instructions on how to use the Morph transition to take your presentations to a professional level.
What Is Morph in PowerPoint?
Morph in PowerPoint is a transition effect that allows objects to move, transform, or change properties seamlessly between slides. Essentially, it creates a motion-like effect by identifying similar objects across two slides and animating the differences between them.
This means if you have a shape, text box, or image on one slide and you change its position, size, or color on the next slide, the Morph Transition will animate that change automatically.
Think of morphing in PowerPoint as an intelligent animation tool that saves time while adding cinematic polish to your presentation.
How Does Morph Work in PowerPoint?
To understand how morph works in PowerPoint, imagine you’re moving an object from one point to another. Traditionally, you’d use animations in PowerPoint like “Fly In” or “Motion Paths.” But those require manual tweaking and can look robotic.
Morph simplifies this process by automatically animating the movement between two slides that contain the same object.
Here’s how it works:
- PowerPoint compares objects across consecutive slides.
- If it detects similar elements (same name or shape), it calculates the visual difference — like position, color, rotation, or size.
- It then animates a smooth transformation between them.
This intelligent approach creates a fluid and professional motion effect — perfect for storytelling, data visualization, and product demonstrations.
How to Add Morph Transition in PowerPoint
Here’s a step-by-step guide on how to add Morph Transition in PowerPoint and use it effectively:
- Step 1: Duplicate the Slide: Start with your original slide. Right-click it in the Slides Pane and choose Duplicate Slide. This ensures both slides contain the same elements for PowerPoint to detect similarities.
- Step 2: Modify the Objects: On the duplicated slide, move your objects to new positions or modify their appearance. You can:
- Move shapes or icons to new spots.
- Change text or font sizes.
- Replace or resize images.
- Alter color or rotation.
- Step 3: Apply the Morph Transition
- Go to the Transitions tab on the ribbon.
- Click on Morph under the list of available transitions.
- Hit Preview to watch the animation in action.
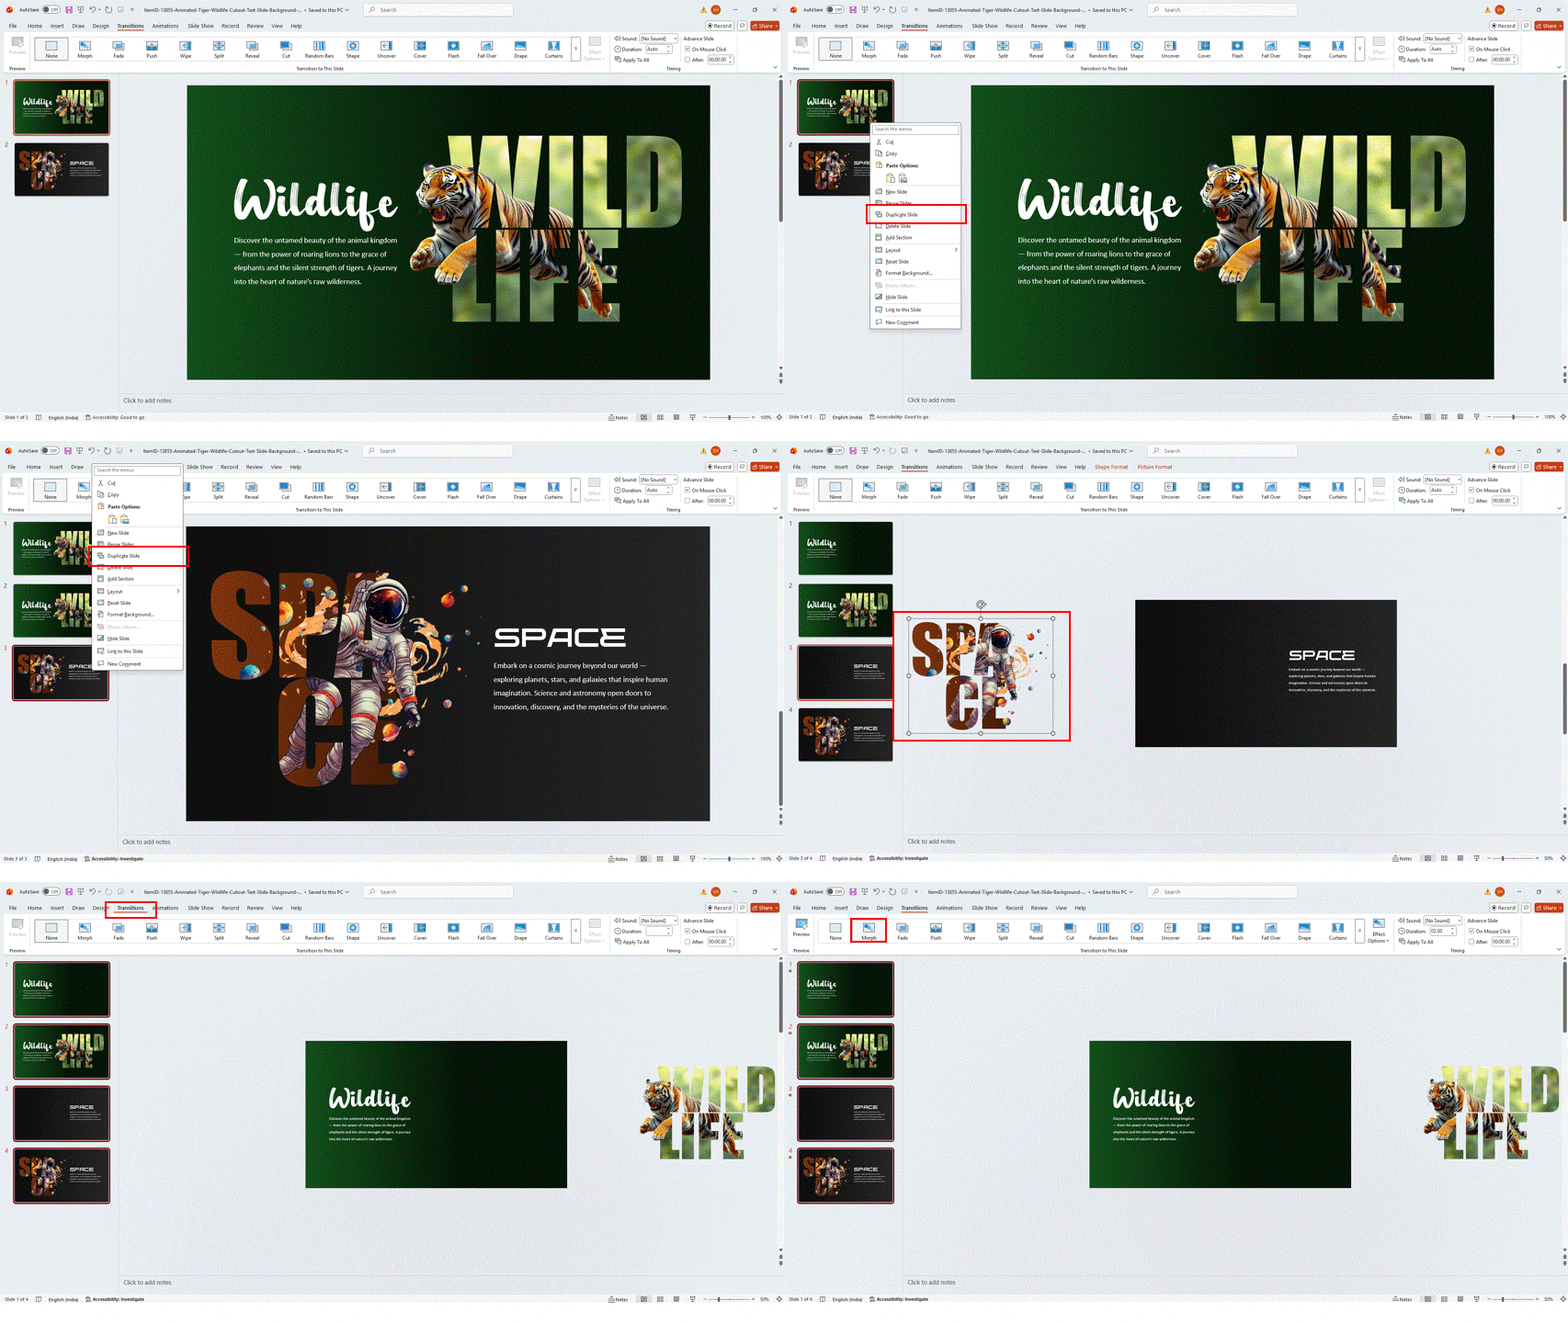
You’ll instantly see how PowerPoint morphs the elements between slides, creating a visually appealing and dynamic flow.
Output:

What are the Creative Ways to Use Morph in PowerPoint?
The Morph Transition in PowerPoint isn’t just about moving objects — it’s a storytelling tool. Here are some creative ways to make the most of it:
- Animate Text for Smooth Narratives: Morphing can help reveal text step by step, making your message more digestible and engaging. Perfect for introducing key points or highlighting transitions in ideas.

- Transform Shapes and Icons: Create professional infographics where shapes transform to represent evolving data or processes — like a circle morphing into a bar chart or icon.

- Build Seamless Timelines: Use morphing in PowerPoint to animate project phases or historical timelines, showing progression in a fluid, connected way.

- Create Mockups and Demos: Product designers and marketers can use Morph to simulate UI screens or app interactions — a powerful trick for pitch decks and client demos.

What Are the Tips for Using Morph Effectively
Here are some expert tips on how to use Morph in PowerPoint like a pro:
- Keep object names consistent: Rename elements in the “Selection Pane” if PowerPoint doesn’t detect them correctly.
- Use subtle movement: Avoid overuse. Subtle, purposeful morphs enhance focus.
- Combine with other transitions: Use “Fade” or “Zoom” transitions between major sections for balance.
- Maintain visual hierarchy: Morph should guide attention, not distract from your content.
- Leverage for storytelling: Morph is best when it visually connects ideas — like cause and effect, before and after, or process evolution.
Advanced Uses of Morph Transition
Once you’re comfortable with the basics, you can take Morph further:
- Morph letters: Break text into individual shapes to animate letters for custom effects.

- Use with 3D objects: PowerPoint 3D models morph beautifully between angles or scenes.

- Apply Morph to icons and SmartArt: Transform organizational charts or workflows with dynamic flow.

These techniques make your slides look like they were designed in professional animation software — but they’re all native to PowerPoint.
Final Thoughts
The Morph Transition in PowerPoint is one of the most powerful tools for creating visually compelling presentations. Whether you’re designing a business deck, pitching a startup idea, or teaching a concept, learning how to use Morph in PowerPoint helps you tell your story with flow and professionalism.
With just a few clicks, your slides can go from static to cinematic. So go ahead — experiment, explore, and add Morph transition in PowerPoint to make your next presentation unforgettable.
And if you’d rather not start from scratch, you can leverage SlideUpLift’s free animated PowerPoint templates and more to save time and enhance your designs. Our huge collection of professionally built, fully editable templates helps you create impactful, motion-rich presentations in minutes — without needing advanced design skills.
FAQs
-
What is Morphing in PowerPoint?
Morphing in PowerPoint refers to an intelligent transition that animates objects between slides, creating seamless motion without manual animation. It’s ideal for modern, engaging presentations.
-
How to Use Morphing in PowerPoint?
To use morphing in PowerPoint, create two slides with similar elements, apply the Morph transition, and PowerPoint will automatically animate the differences between them.
-
How to Morph in PowerPoint for Text or Shapes?
Duplicate your slide, modify the text or shape position on the second slide, then apply the Morph transition. You can make text appear to type itself, move smoothly, or change color.
-
How Does Morph Work in PowerPoint Technically?
PowerPoint tracks identical elements across slides using internal IDs or names. When it detects changes (in size, position, or color), it animates them seamlessly through vector interpolation.
-
How to Add Morph Transition in PowerPoint 2016 or 365?
In PowerPoint 365 or 2019+, go to Transitions → Morph → Apply to All. For older versions, Morph might be unavailable — consider updating or using “Morph Alternative” animations like Motion Paths.
-
Can I Morph Images and Icons?
Absolutely. You can morph photos, icons, or 3D objects. For best results, ensure objects are the same type (vector-to-vector, image-to-image) across slides.
-
Is Morph Transition Available in All Versions of PowerPoint?
No. Morph Transition is available in PowerPoint 2019, PowerPoint 2021, and Microsoft 365. It isn’t included in PowerPoint 2016 standalone or older editions.


