Password Protect PPT: How To Secure Your Presentations (Easy Guide)
Have you ever shared a PowerPoint and then worried, “What if someone changes my slides?”, or even worse, “What if the wrong person opens it and leaks the content?”. Frustrating, right? This is where protecting your presentations becomes an important concern, especially in the business world.
Presentations often contain sensitive business strategies, numbers, and ideas that you do not want falling into the wrong hands. That is when this question arises ‘Can I password protect a PowerPoint presentation?’. Because after the file is shared, you lose control over who views or edits it. Unless you add one extra layer of security to it. By doing this, you are ensuring the utmost safety of the content in your decks. You can decide who can access the presentation, who can view it, and who is completely restricted.
PowerPoint has bestowed upon its users the built-in ability to password protect PPT without needing any complicated tools. Yes, you can now password protect PowerPoint presentation and share your work with confidence.
In this blog, we are going to cover:
- Why password-protecting a presentation matters;
- How to password protect a PPT with the different options Microsoft PowerPoint provides us.
- You will also learn about some alternative methods that you can use to secure your presentations.
It is going to be an easy step-by-step guide designed to help anyone who wants to safeguard their presentations.
What Are the Reasons to Password Protect a PPT?
So, let’s look at the main benefits of securing your PowerPoint with a password:
- Keep the Information Safe: As we previously discussed, presentations often have confidential data that is not for the non-intended audience.
- Prevent Unwanted Edits: Adding a passcode will ensure that no one can copy content, delete or swap images (even if accidental), or rearrange your slides without permission.
- Stop Unauthorized Sharing: Your work is secured from being copied or misused by outsiders.
- Maintain Total Control: It is completely in your hands to decide who can view it, edit it, or keep it restricted from.
What Password Protection Options Does PowerPoint Offer?
Microsoft PowerPoint does more than just serve as a playground for designing slides. It also gives you the power to keep your hours of hard work secure. The built-in password protection is a game-changer. Here is a quick overview of the protection it offers:
Inbuilt Security Layers: The protective shields that are activated when you apply a password to your PowerPoint presentation are:
- Encryption
- Digital Signature
Password Options: These password protection options that you can use to secure your file:
- Password to open
- Password to modify
Having control over how your work is circulated among others, while being completely preserved until opened, is the assurance every creator needs when sharing sensitive content. We always make sure that we choose the strongest lock and key combination to keep things safe, and so does PowerPoint. When you add a password, layers of shield come into play that work together to keep your decks both private and authentic. Meaning that internal security is as crucial as external security.
Let’s understand the difference between these two terms in depth.
Difference between Encryption and Digital Signature
Understanding in depth about these two terms can help you choose the correct option that suits your needs the best:
‘Encryption’is all about keeping your PPT private. When a password is added, the data of the file gets scrambled into unreadable code. Only with a correct pass can someone open the file. This makes the encryption a powerful way to prevent unauthorized access.
On the other hand, ‘Digital Signature’ focuses on authenticity. It does not hide the content; it acts as a stamp of approval that confirms that the file is genuine. It shows that the presentation has not been changed since it was last signed. It works as the wax used to seal letters; if someone tampers with it, you will know immediately.
Now that you have understood how PowerPoint shields the files internally, let us look at the two types of password protection it offers to control access.
Password Protection Options in PPT
There are two types of password protection PPT provides, which are equally important as they serve different purposes in safeguarding your presentation. They are:
- Password to Protect
- Password to Modify
Let us learn the difference between them:
| Feature | Password to Open | Password to Modify |
| Access Level | Requires a password to view the file | Allows read-only access without a password |
| Editing Rights | Full editing rights once opened with the password | Requires a separate password to edit the file |
| Best For | Highly confidential or sensitive content | Preventing accidental edits while allowing review |
Isn’t it amazing? Who knew PowerPoint could do this as well! After knowing these features, I am pretty sure that you would want to learn how to password protect PowerPoint. So let’s get into it.
How to Password Protect a PowerPoint?
If you are wondering how to lock a PowerPoint presentation, then follow these simple steps to add an extra layer of safety:
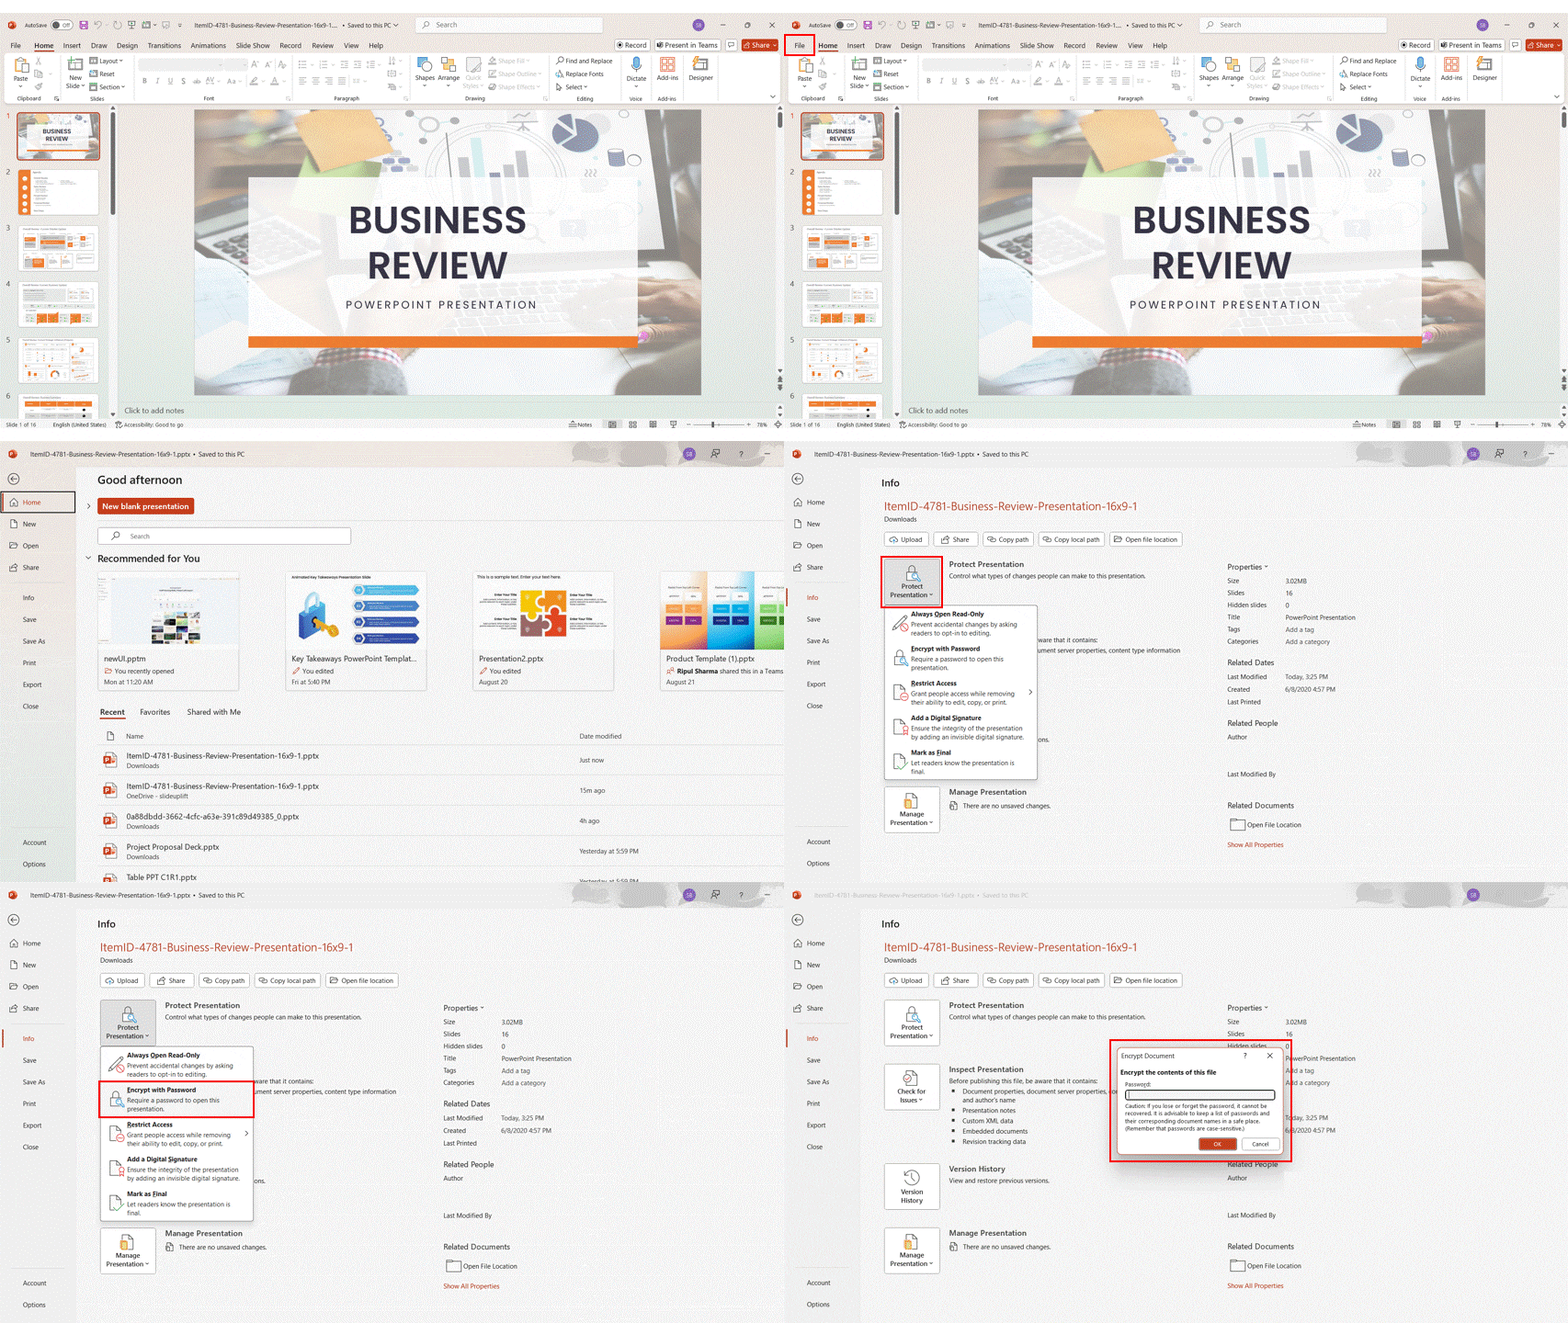
Step 1: Open your PowerPoint file.
Step 2: Click on ‘File’, which is available at the top-left corner of the screen.
Step 3: Now, select ‘Info’ from the panel on the left. It is right below the option of ‘Share’.
Step 4: Tap on the first box labelled as ‘Protect Presentation’.
Step 5: From the dropdown that appeared, select ‘Encrypt with Password’. Type in your password. It will double-verify it.
Step 6: Confirm the password and hit ‘OK’.
Tip: If you forget the password, Microsoft cannot recover it, so always save it in a secure place.
Now, whenever someone tries to open the file, they will need to type in that password.
How to Apply a Password to Modify in PowerPoint?
Sometimes, you may want to allow others to see your deck but not change anything in it. With the password to modify option, you can let people open your file in a ‘read-only’ mode. This is how you can do that:
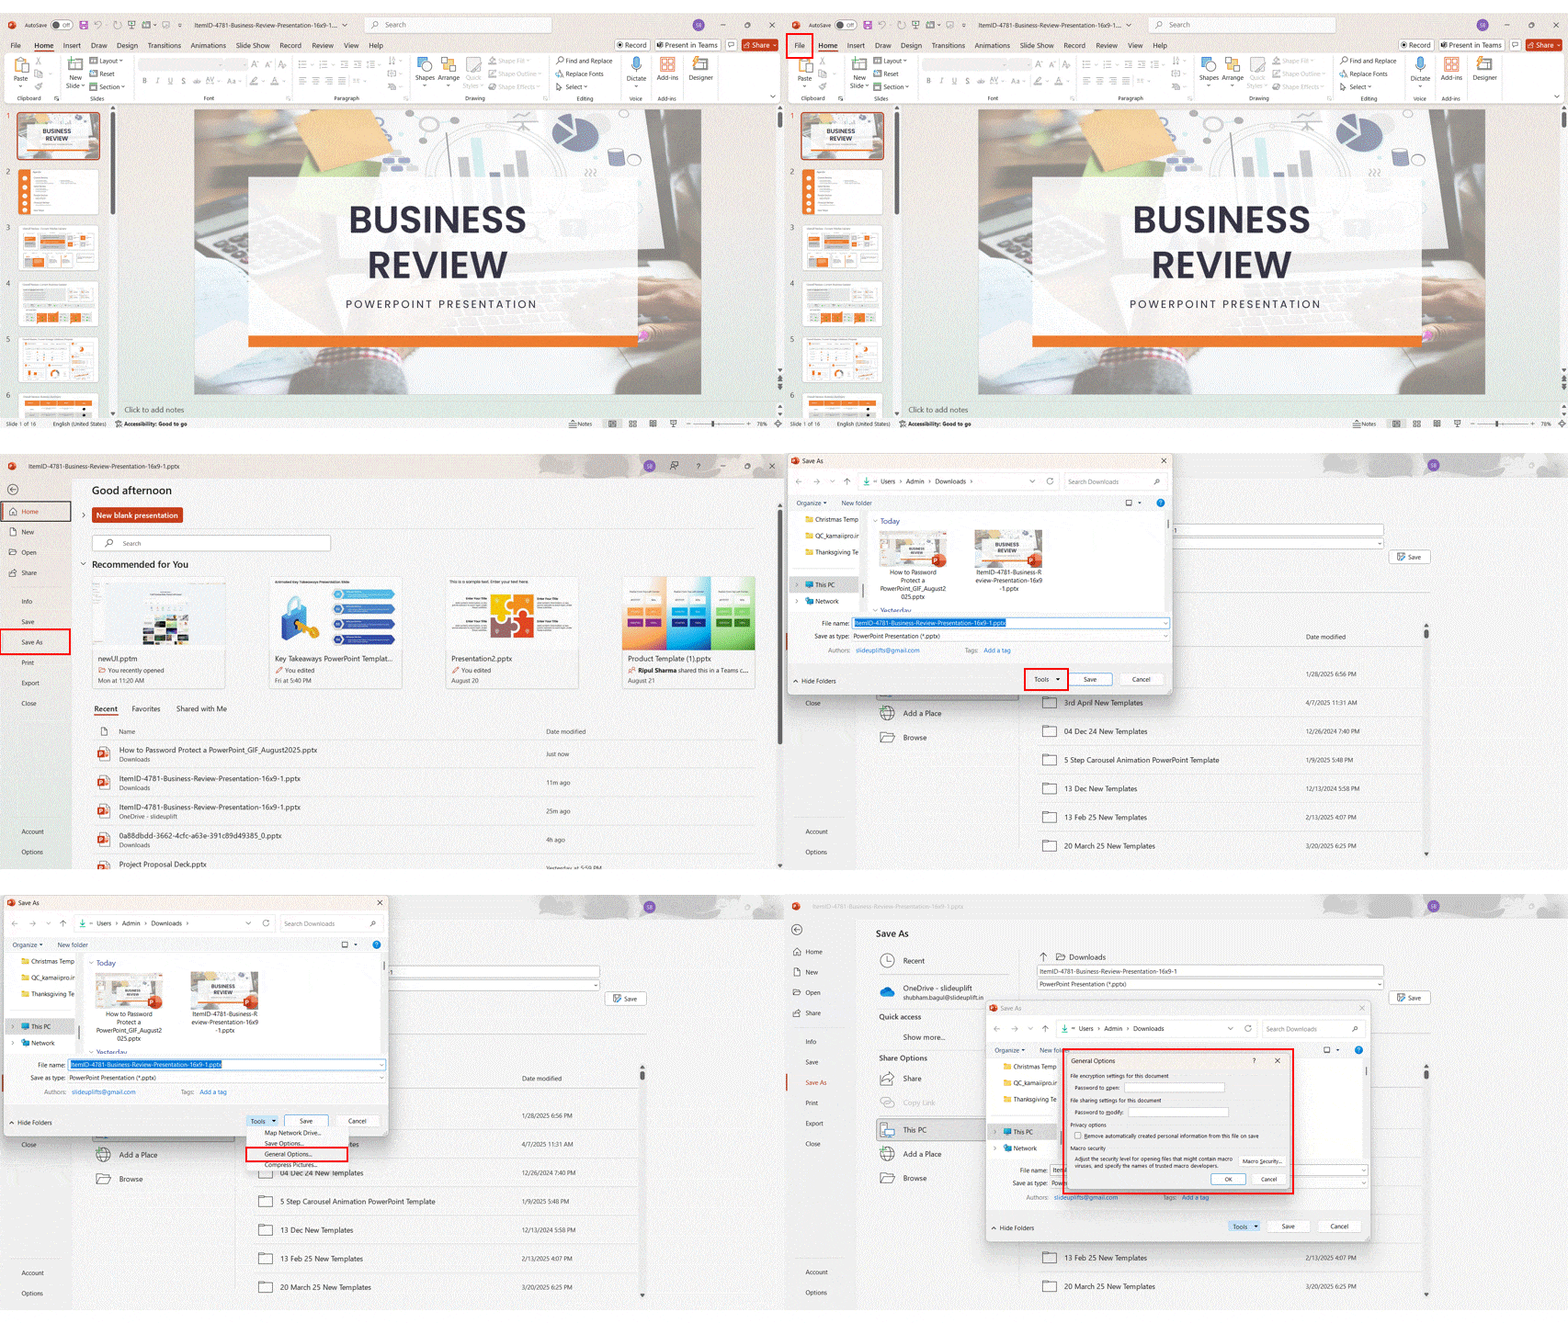
Step 1: Open your PowerPoint presentation.
Step 2: Go to ‘File’ and click on ‘Save As’ to select the location of the file to OneDrive or your preferred site. (or ‘Save a Copy’ if you are in OneDrive/SharePoint)
Step 3: Once the ‘Save As’ dialog box opens, tap on the ‘Tools’ dropdown, situated right beside the ‘Save’ button.
Step 4: From the dropdown options, tap on ‘General Options’.
Step 5: A pop-up window will appear on your screen. Choose ‘Password to Modify’ and type in your password.
Step 6: Click on ‘OK’.
How to Password Protect a PPT on Mac and Cloud Platforms?
The steps for adding a password to a presentation on the Mac versions of PowerPoint differ from the process in Windows. People may also use cloud platforms like OneDrive or Google Drive to share and collaborate on files. These platforms offer their own set of security features. For Mac users, follow these steps:
Step 1: Open your presentation and go to the ‘Review’ tab.
Step 2: Now, click on ‘Passwords’ and choose either of the options:
- Password to Open- It requires a password to view.
- Password to Modify- It allows read-only view unless the password is entered.
Step 3: Save the file.
On Cloud Platforms (OneDrive & Google Drive)
When sharing the presentations online, you can easily control access directly through the cloud platforms.
- On OneDrive, you can share with specific people. Just choose the ‘View’ or ‘Edit’ permissions. The business users can set expiry dates for the links. You can do this when:
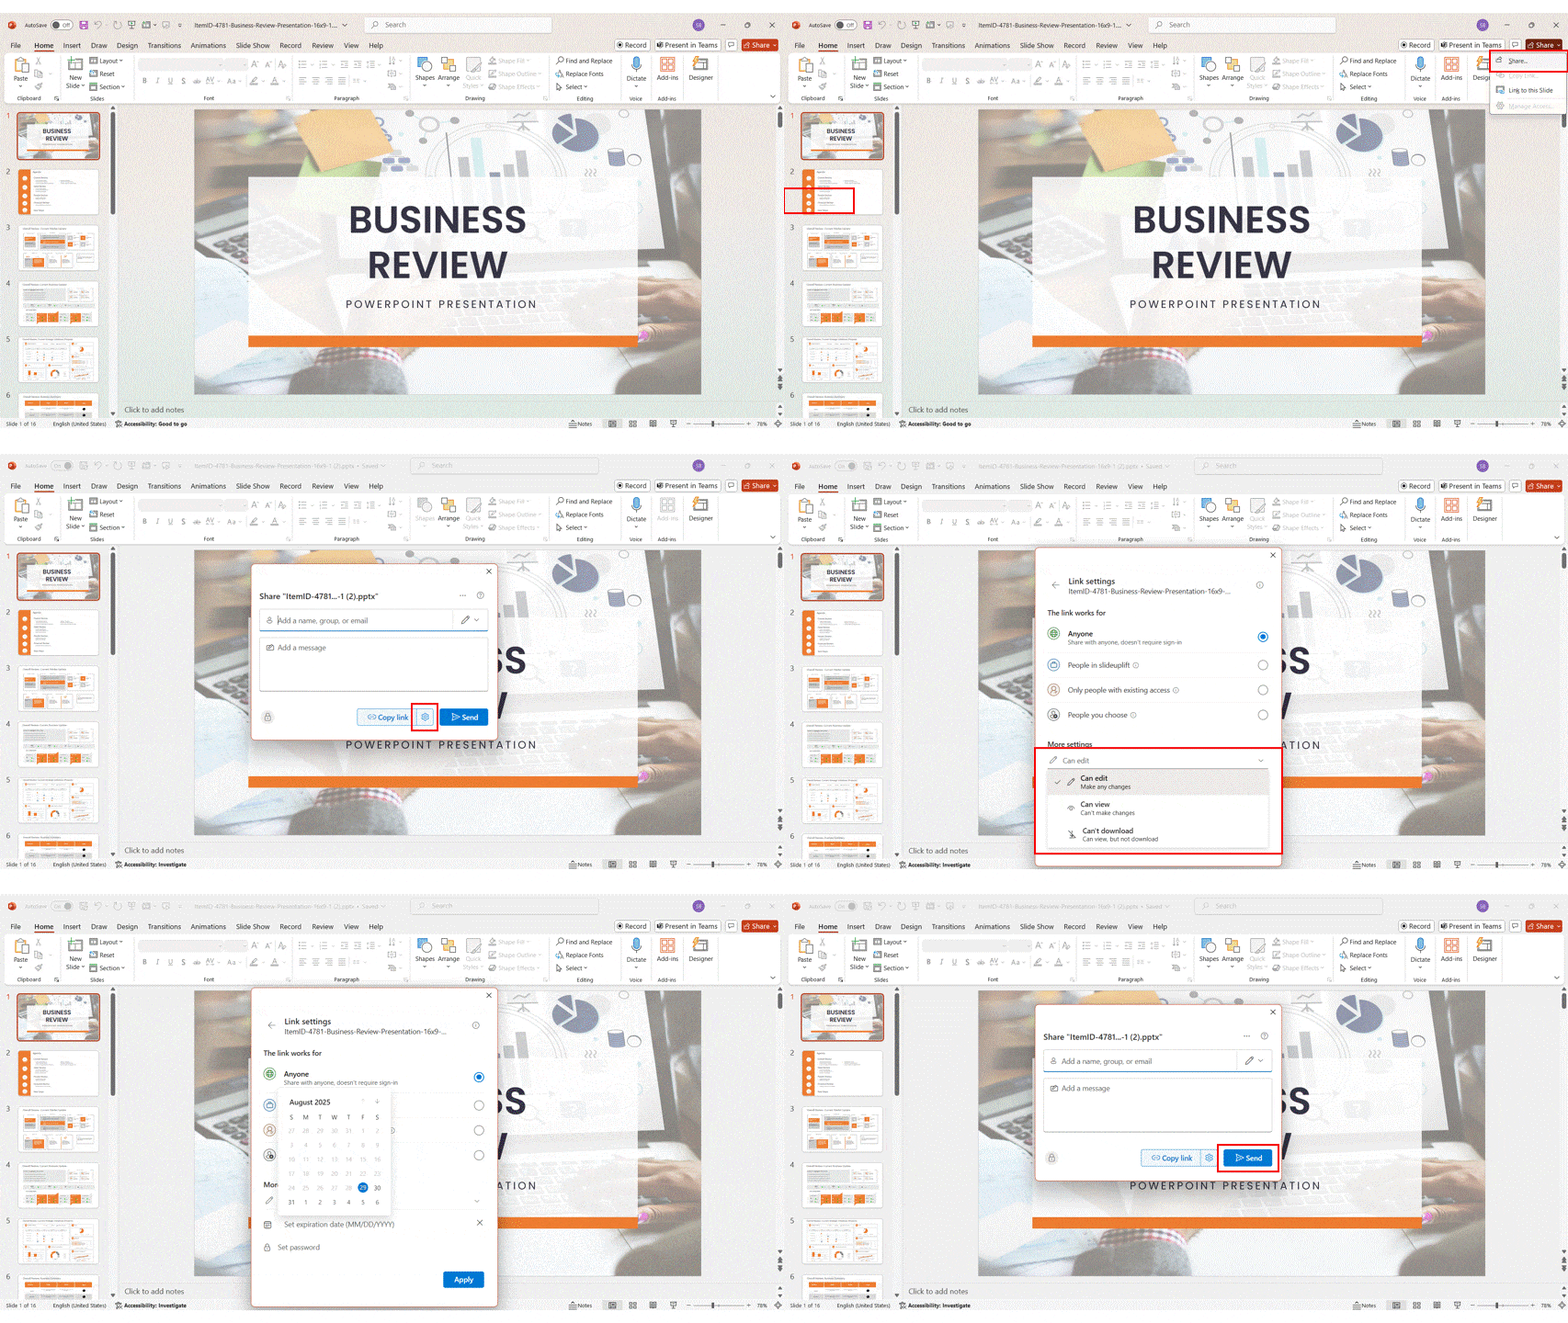
- You click on the ‘Share’ button, then open ‘Link Settings’.
- Under ‘Other Settings’, turn on the option of ‘Set Expiration Date’ and pick a date.
- On Google Drive, you can upload your PowerPoint or convert it into Google Slides. You can share it with the selected email addresses or through a restricted link. You also have the freedom to choose the levels of access, such as:
- Viewer
- Commentor
- Editor
You also have the right to disable actions like downloading, printing, or copying to keep your work even more secure.
Advanced and Alternative Methods for Protecting PPT Files
The built-in password protection PPT is a good start, but sometimes you may need some extra layers of security. For example, stop people from downloading your presentation, add watermarks, or limit access to users. In such cases, these advanced methods and external tools can give you better control:
| Method | Where It’s Available | Best For |
| Watermarks | Needs external tools (PDF editors, DRM software) | Marking ownership and discouraging unauthorized use. |
| Time-Limited / Expiry Access | Cloud services (OneDrive, Google Drive, DRM systems) | Sharing files temporarily with clients or teams. |
| Restrict Downloads, Printing, or Copying | Cloud sharing platforms or DRM | Preventing file misuse or unauthorized distribution. |
| Convert to Password-Protected PDF | External software (Adobe Acrobat, etc.) | Locking a final version securely for sharing. |
Conclusion
In today’s world, where files are shared with a single click, keeping them safe is more important than ever. A PowerPoint deck can carry private information, not the kind of content you can risk being exposed to. By adding full security to your PPTX. file, now you can share presentations confidently, knowing your content will not be changed or leaked. Learning how to protect PowerPoint presentation with password is not just a tech trick, it is a professional habit. So, the next time you hit ‘Send’, make sure your slides are locked and your ideas are truly yours.
FAQs
-
Does password protection PPT works on all PowerPoint versions?
The password protection works on most of the desktop versions of PowerPoint, including Windows, Mac, and Office 365 apps. PowerPoint Online (the web version) has limited security features. The option of full password protection is not available there. Learning how to password protetct PowerPoint presentation is a smart way to safeguard your content and ensure its utmost safety.
-
What is the difference between ‘password to open’ and password to modify’ in Microsoft PowerPoint?
The difference between these two terms is:
- In ‘password to open’, nobody can open or view the file without typing in the password.
- In ‘password to modify’, people can open the file in a read-only mode. If they want to make any changes, then they will be required to enter a password.
-
Is it possible to restrict editing in a PowerPoint file with a password?
Yes! By using a ‘password to modify’ feature,you can allow people to view your presentation but prevent them from changing any slides and other elements. Unless, they have the password for it.
-
Does adding a password to PowerPoint also encrypt the file?
Absolutely! When you set a password to open a PowerPoint file, the content is encrypted. This means that the text, images, and other data cannot be read without the correct password. That is how knowing how to make a PPT password protected works wonders.
-
What happens if someone tries to open my file with the wrong password?
When somebody tries to open the file with an incorrect password, PowerPoint will not open the file. The content will stay locked and non-accessible. They will not be able to open it if they do not know how to open a password protected PowerPoint file with the correct passcode.
-
How do I password protect PPT on a Mac?
To know how to protect PowerPoint with password on a Mac, follow these steps:
- Open the presentation and go to the ‘Review’ tab.
- In there, click on ‘Passwords’.
- You can choose either ‘password to open’ or ‘password to modify’.
- Enter and confirm the password before saving the file.
-
What should I do if I forget my PowerPoint password?
Unfortunately, Microsoft cannot recover a lost password for you. If the password is forgotten, then the file will not open. You can use a password manager or write it down somewhere safe. This way, such a situation can be avoided.
-
Can I remove a password from a PowerPoint file?
Certainly! Knowing how to remove password protection from Powerpoint is as important as knowing how to lock a presentation in PowerPoint. Follow these steps to unlock a locked file:
- Go to ‘Files’ > ‘Info’ > ‘Protect Presentation’ > ‘Encrypt with Password’ (on Windows).
- On Mac, go to ‘File’ > ‘Passwords’.
- Here, delete the existing password from the box and click on ‘OK’.
- Save the file, and you are good to go.


